
In this project, I will delve into the setup and automation of Secure Operations Center (SOC).
Overview
- Windows 10 Host (hosted in Azure )
- Wazuh server (hosted in DigitalOcean cloud)
- TheHive server (hosted in DigitalOcean cloud)
- SOC Analyst email (squarex)
In this build, I will be utilizing DigitalOcean cloud servers and Azure. It Possible to host this project on hypervisor like VMware & VirtualBox.
Objective
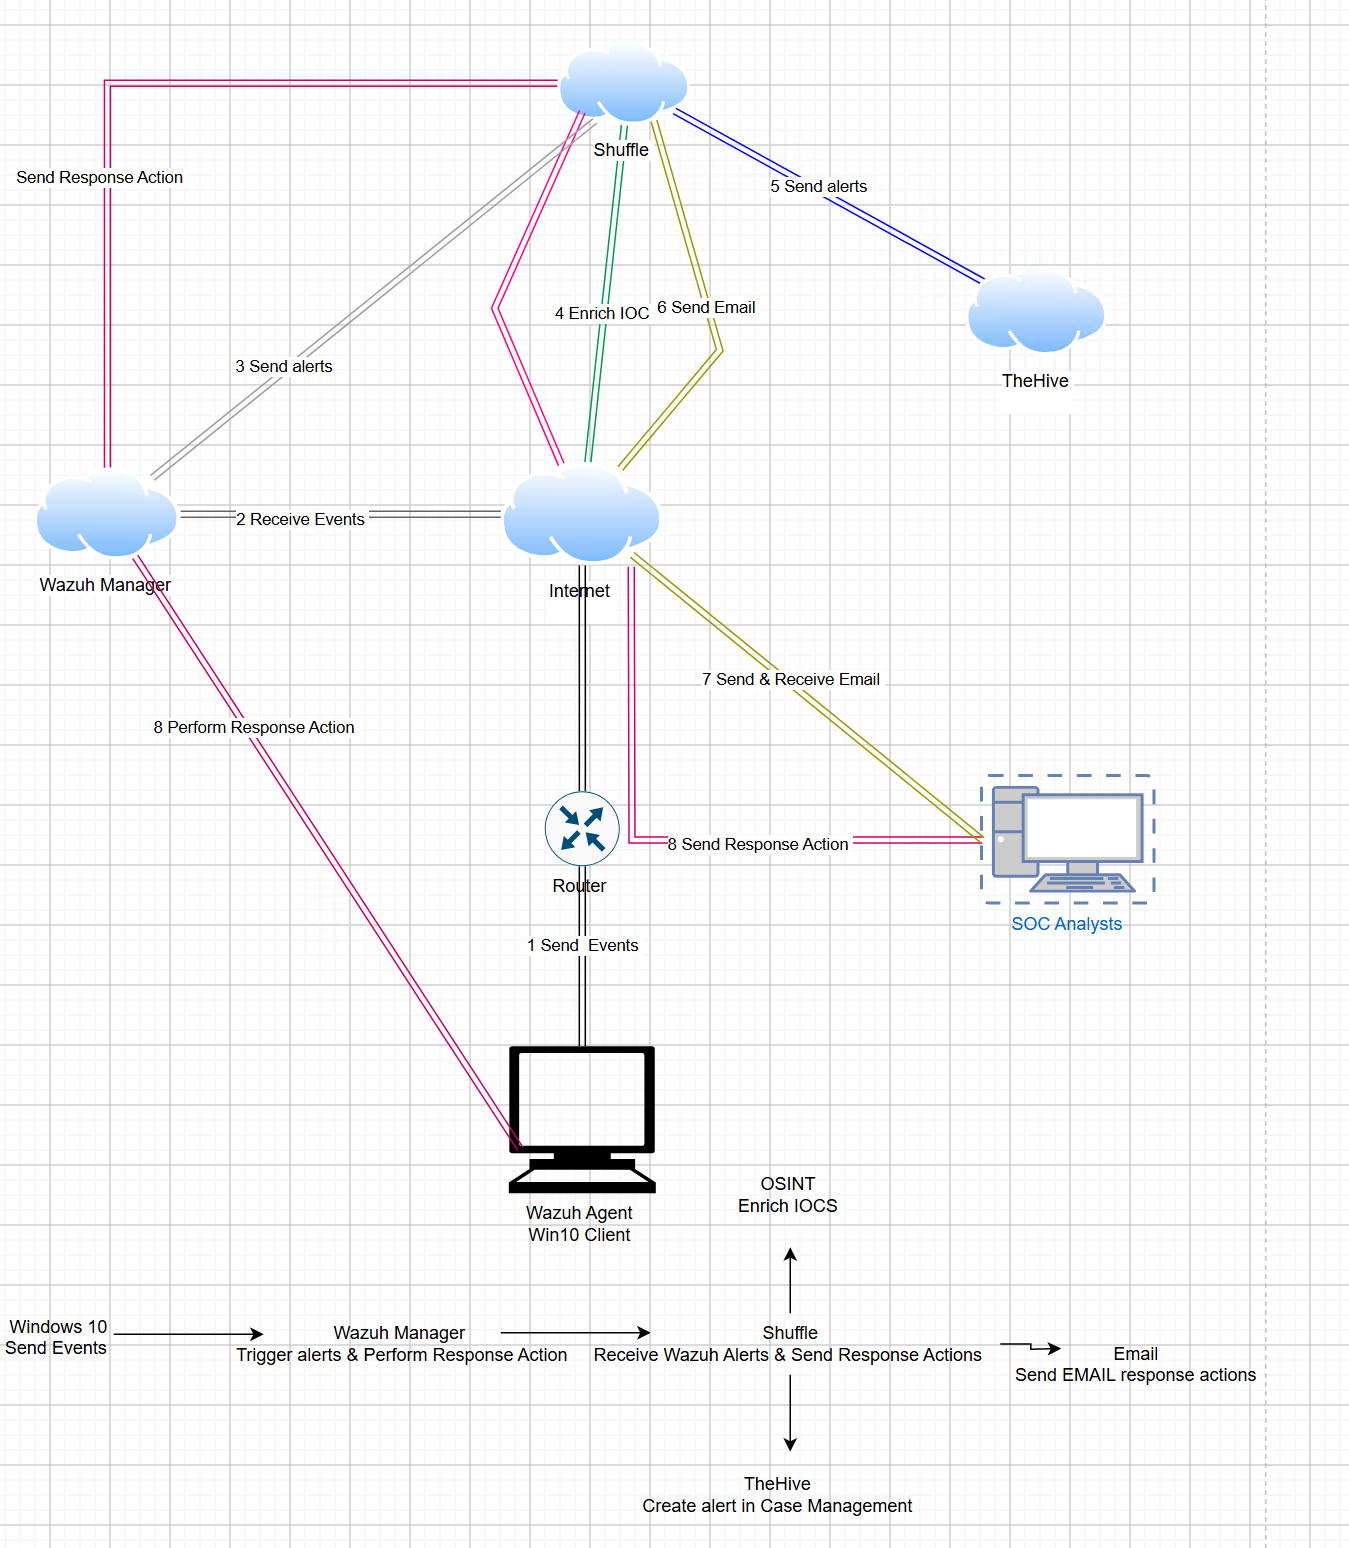
In this SOC automation lab project, I will deploy Wazuh for SIEM and XDR capabilities to trigger alerts and perform responsive actions, set up TheHive for case management to create and manage alerts, and use Shuffle for SOAR integration to enrich IOCs, send alerts to TheHive, and email the SOC analyst with alert details and response options. I will configure a Windows 10 client to send events via the Wazuh agent and receive responsive actions. The setup uses cloud servers for Wazuh and TheHive, with a diagram created in draw.io to map data flow.
Windows 10 Client Creation
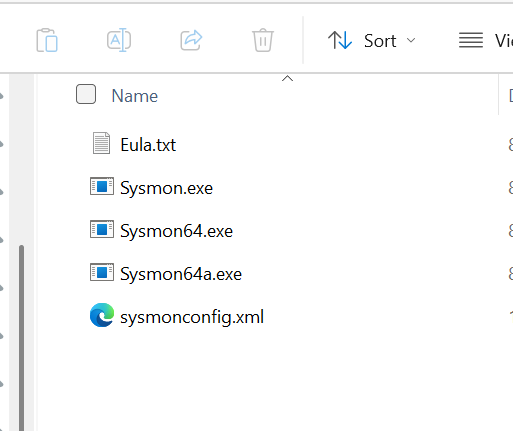
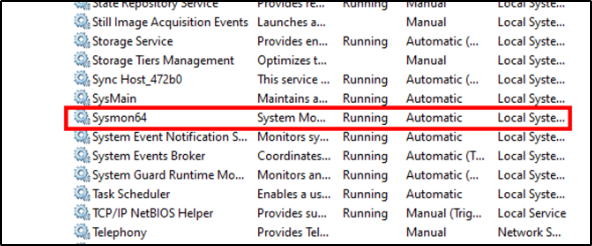
After setting up the Windows 10 client on Azure, I installed Sysmon and verified it was running by checking the Services and Event Viewer for Sysmon logs. Sysmon, a system monitoring tool from Microsoft Sysinternals, captures detailed telemetry on system activities like process creation and network connections, aiding in the detection of malicious behavior through its configurable event logging.
Creating Ubuntu Servers/Droplets
After creating an account on DigitalOcean’s I went on to create two Ubuntu Droplet( Server)
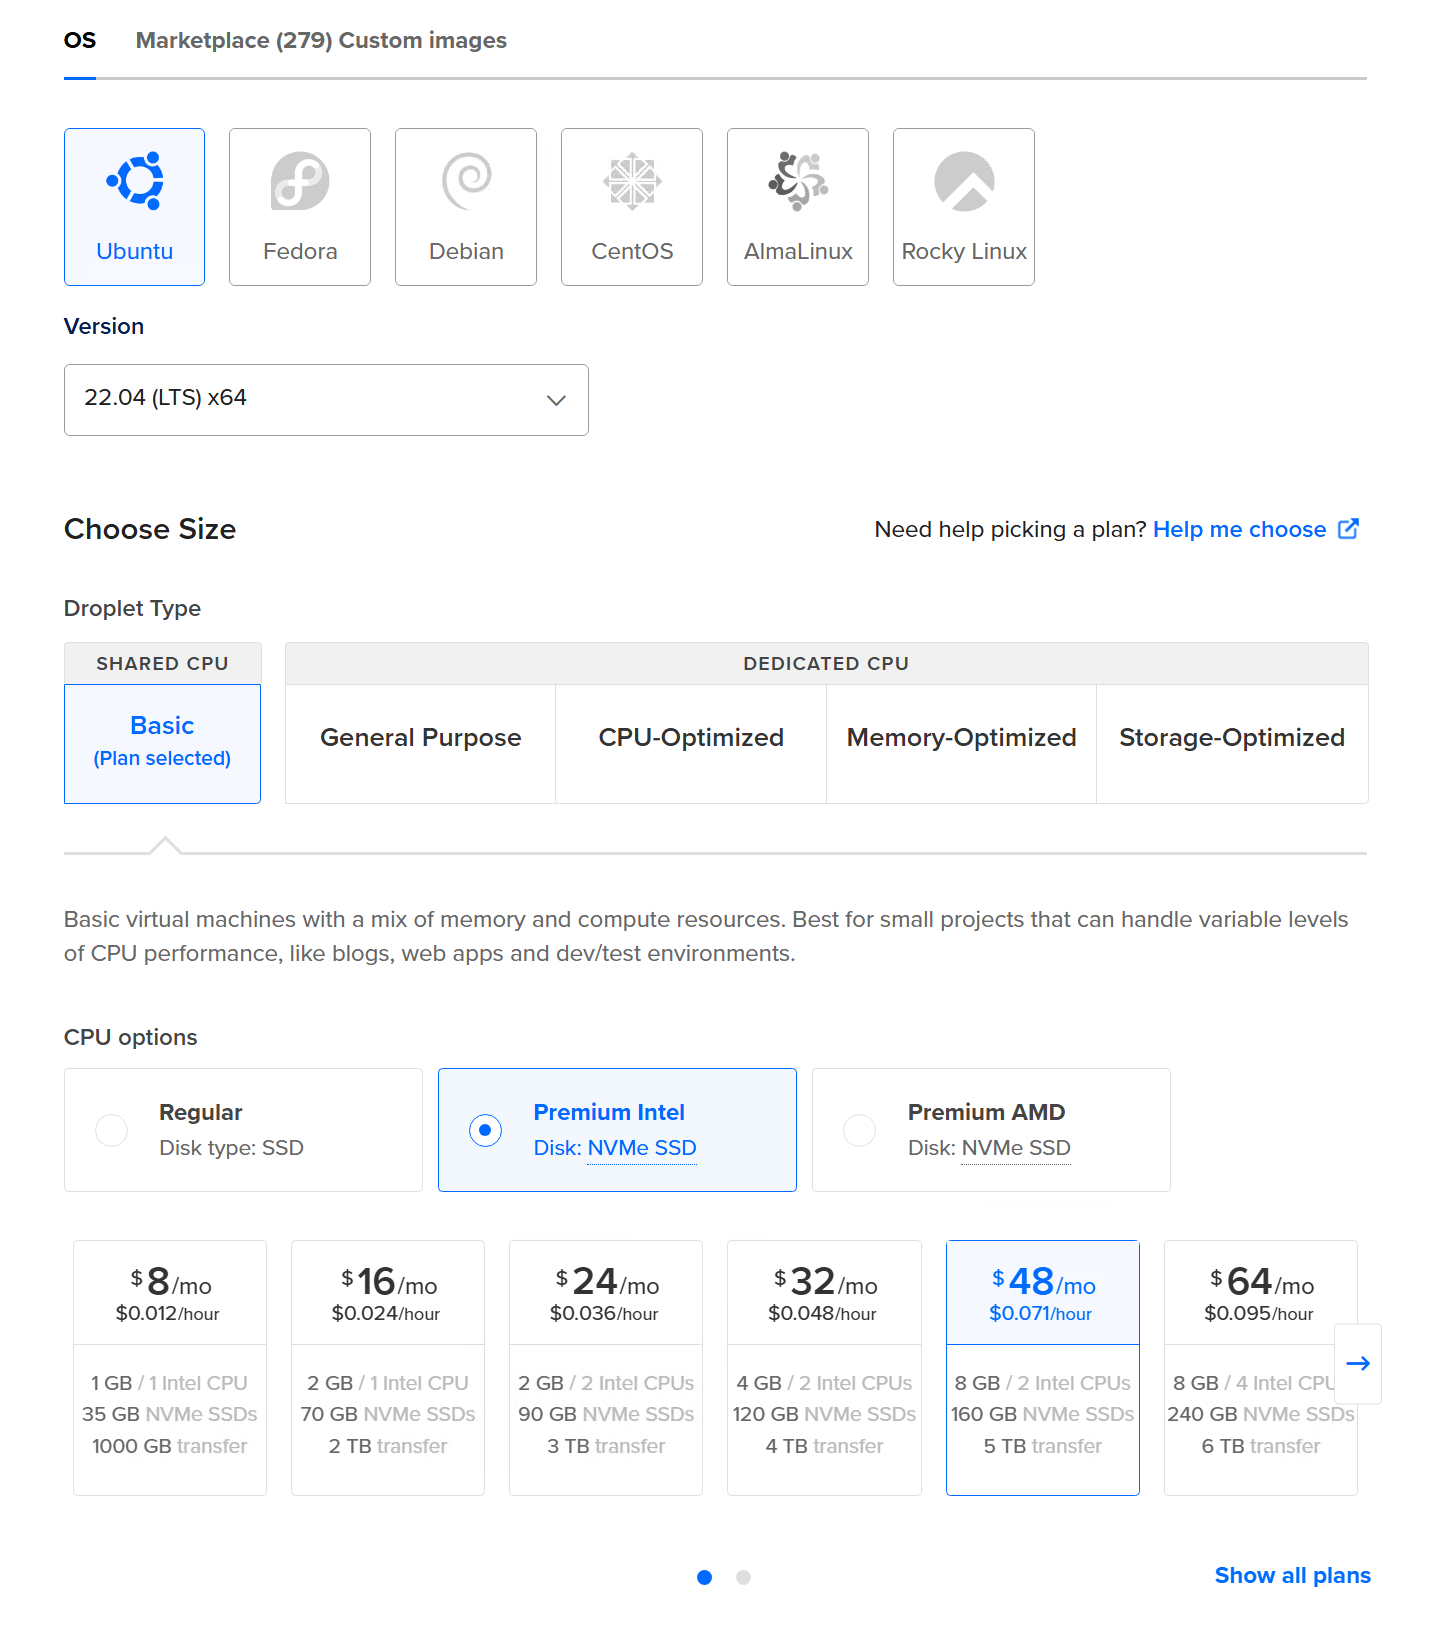
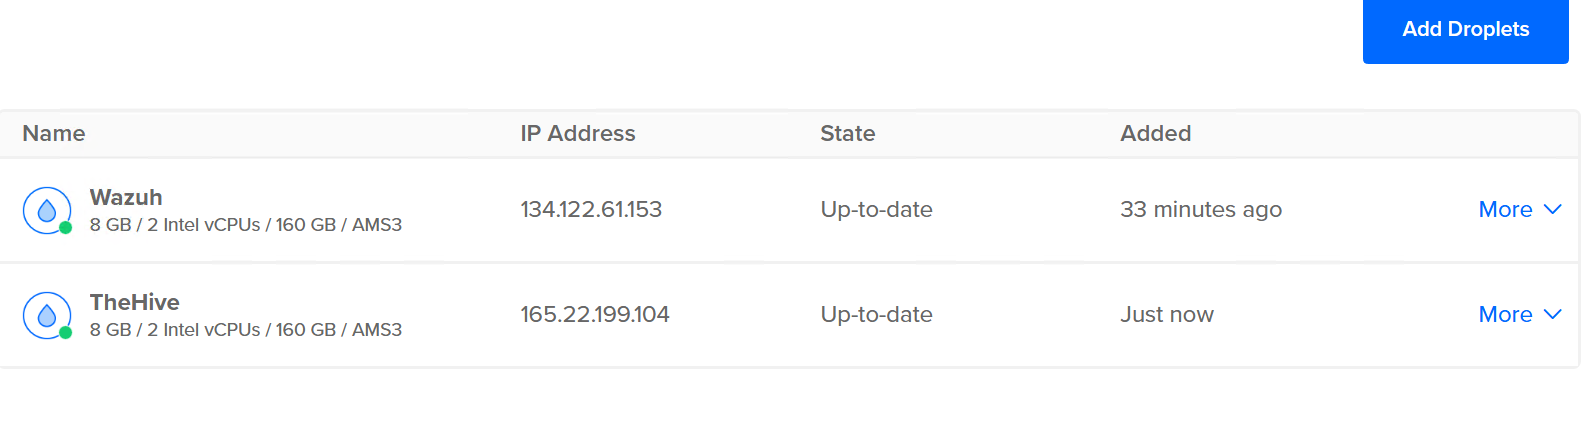
Installing Wazuh Server The Wazuh server analyzes the data received from the Wazuh agents, triggering alerts when threats or anomalies are detected. It is also used to remotely manage the agents’ configuration and monitor their status.
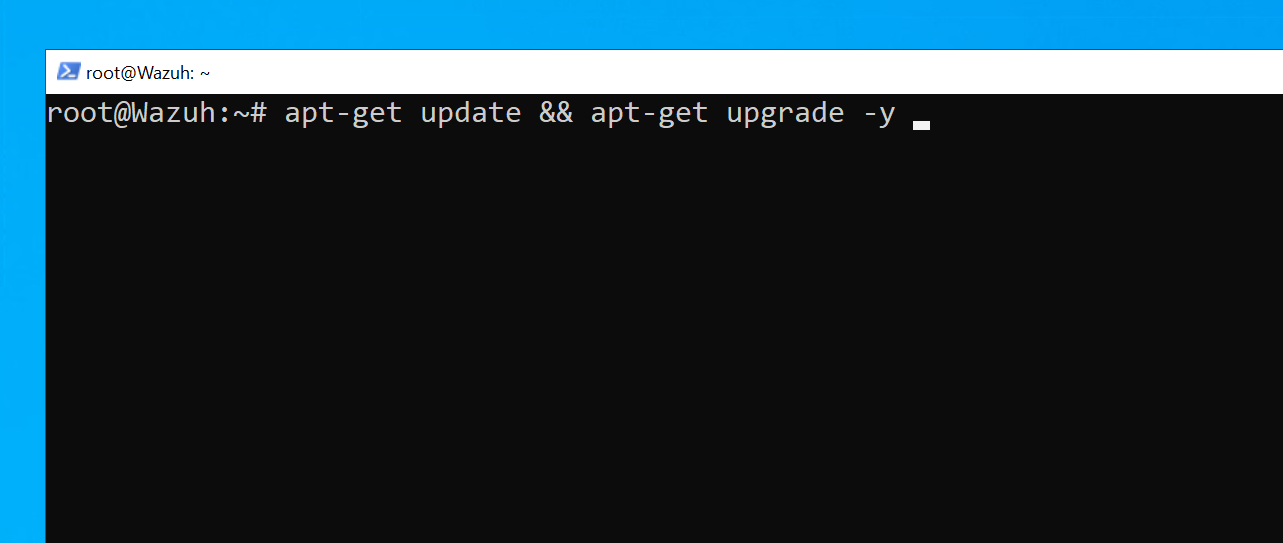
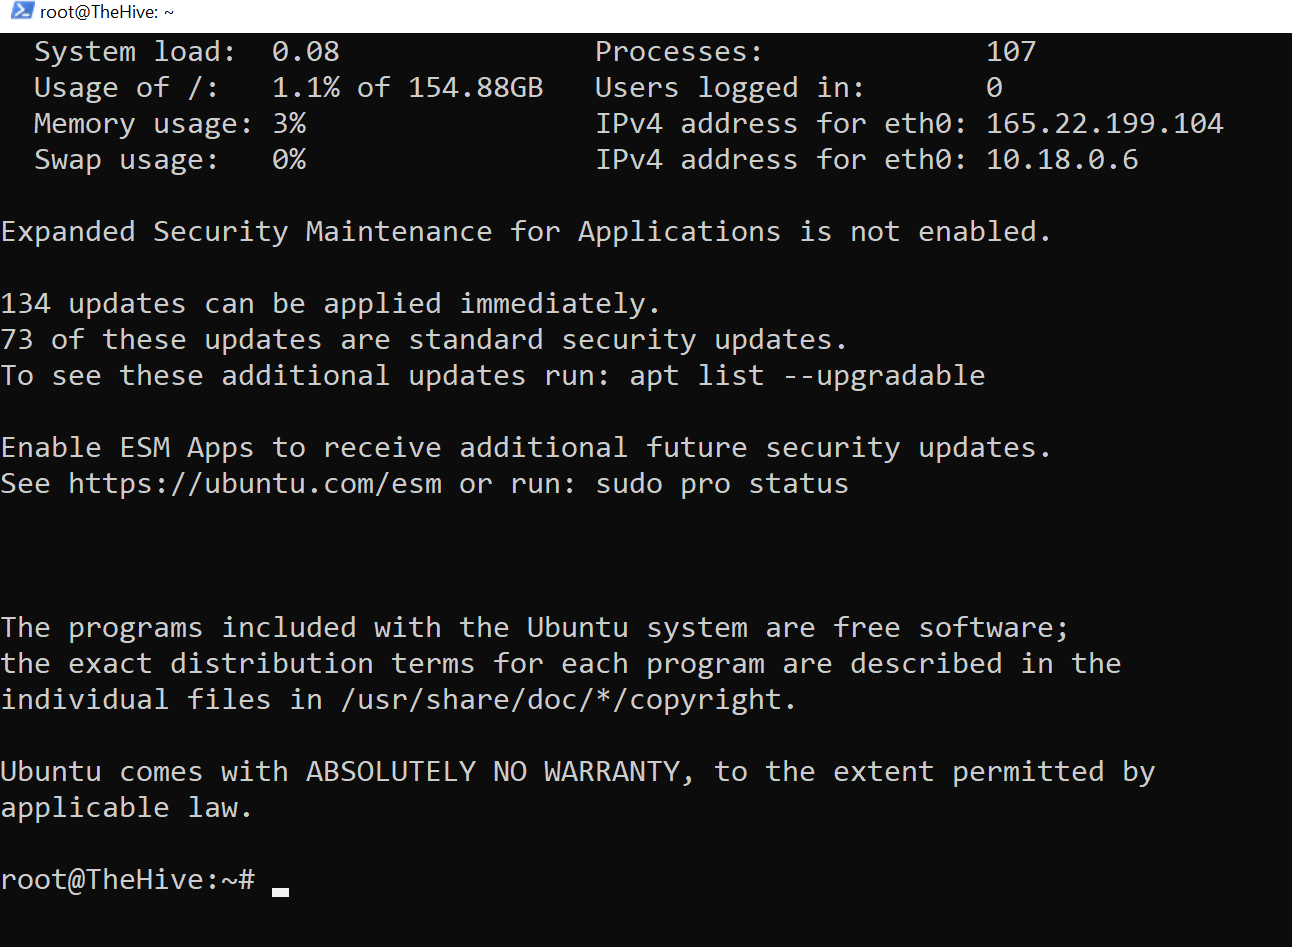
First, log into the Ubuntu server and update and upgrade it with the following command:
Update and upgrade ubuntu server
# apt-get update && apt-get upgrade -y
To install the Wazuh server we will use the assisted installation that is available on
# Installing Wazuh Server
curl -sO https://packages.wazuh.com/4.7/wazuh-install.sh && bash ./wazuh-install.sh -a

Installing theHive Server
TheHive is designed to manage and respond to security incidents and we will use it as our case management tool.
To install it, we need to install several components first. Start with installing Java (provides the runtime environment for theHive), then Cassandra (stores and manages incident data), followed by Elasticsearch (enables fast, real-time search and retrieval of incident data), and finally, theHive.
To complete this, use the following commands:
installing dependencies
apt install wget gnupg apt-transport-https git ca-certificates ca-certificates-java curl software-properties-common python3-pip lsb-release


#Install Java
wget -qO- https://apt.corretto.aws/corretto.key | sudo gpg --dearmor  -o /usr/share/keyrings/corretto.gpg
    echo "deb [signed-by=/usr/share/keyrings/corretto.gpg] https://apt.corretto.aws stable main" |  sudo tee -a /etc/apt/sources.list.d/corretto.sources.list
    sudo apt update
    sudo apt install java-common java-11-amazon-corretto-jdk
    echo JAVA_HOME="/usr/lib/jvm/java-11-amazon-corretto" | sudo tee -a /etc/environment
    export JAVA_HOME="/usr/lib/jvm/java-11-amazon-corretto"

# Installing Cassandra
wget -qO -  https://downloads.apache.org/cassandra/KEYS | sudo gpg --dearmor  -o /usr/share/keyrings/cassandra-archive.gpg
echo "deb [signed-by=/usr/share/keyrings/cassandra-archive.gpg] https://debian.cassandra.apache.org 40x main" |  sudo tee -a /etc/apt/sources.list.d/cassandra.sources.list
sudo apt update
sudo apt install cassandra

# Installing Elasticsearch
wget -qO - https://artifacts.elastic.co/GPG-KEY-elasticsearch |  sudo gpg --dearmor -o /usr/share/keyrings/elasticsearch-keyring.gpg
sudo apt-get install apt-transport-https
echo "deb [signed-by=/usr/share/keyrings/elasticsearch-keyring.gpg] https://artifacts.elastic.co/packages/7.x/apt stable main" |  sudo tee /etc/apt/sources.list.d/elastic-7.x.list
sudo apt update
sudo apt install elasticsearch

# Installing theHive
wget -O- https://archives.strangebee.com/keys/strangebee.gpg | sudo gpg --dearmor -o /usr/share/keyrings/strangebee-archive-keyring.gpg
echo 'deb [signed-by=/usr/share/keyrings/strangebee-archive-keyring.gpg] https://deb.strangebee.com thehive-5.2 main' | sudo tee -a /etc/apt/sources.list.d/strangebee.list
sudo apt-get update
sudo apt-get install -y thehive
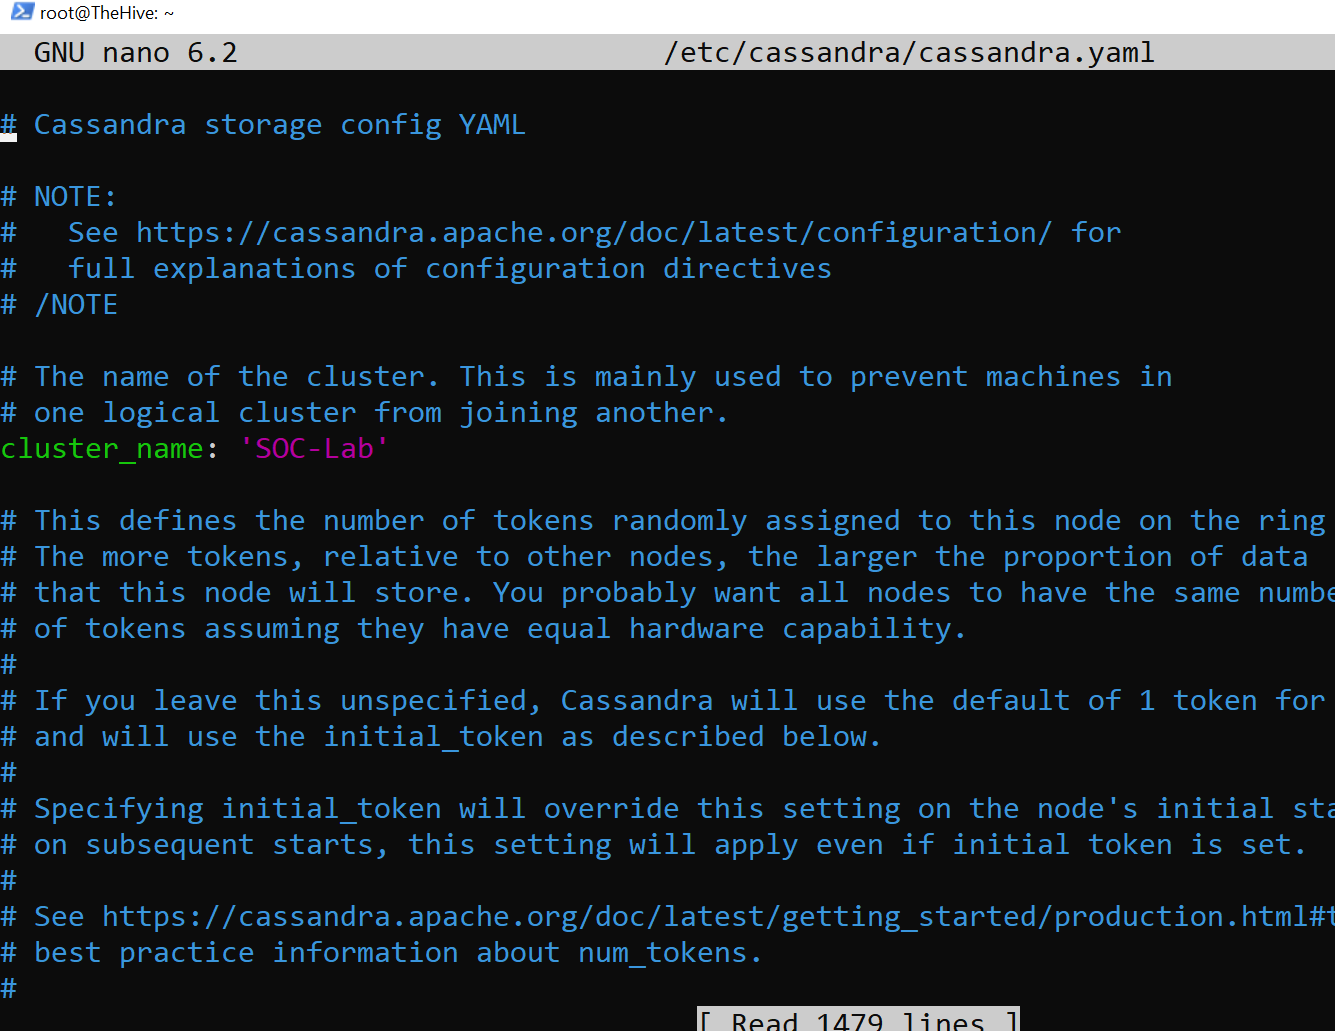
Cassandra Configuration
Cassandra serves as the primary data storage backend for TheHive, housing all structured data such as cases, tasks, alerts, observables, and user information. To complete TheHive installation, I will need to modify certain fields in Cassandra’s configuration file located at /etc/cassandra/cassandra.yaml. The command for this is provided below:
# Configuring Cassandra
nano /etc/cassandra/cassandra.yaml
Change the following fields
- listen_address: Change it to theHive public IP
- rpc_address: Change it to theHive public IP
- seeds: Change it to theHive public IP
- cluster_name: SOC-Lab
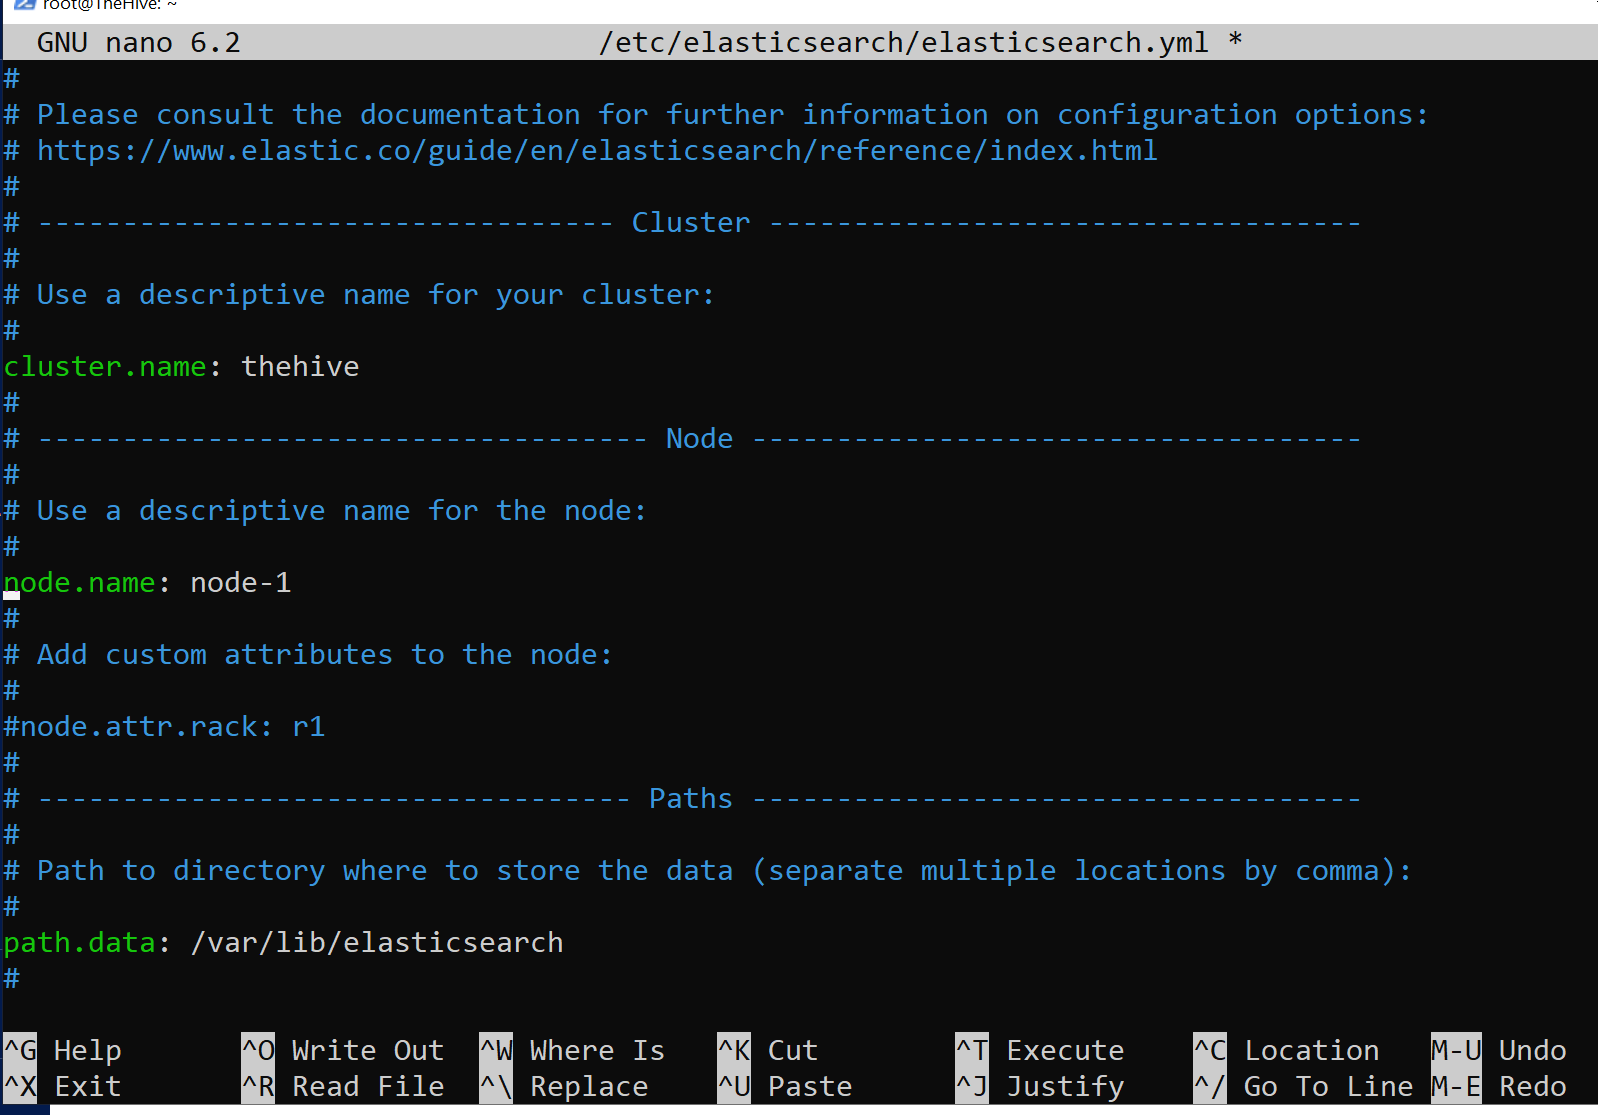
Elasticsearch configuration
Elasticsearch is utilized to index and search data in TheHive, providing fast and flexible search capabilities across all stored data, allowing users to efficiently locate relevant cases, tasks, observables, and alerts. I will need to adjust settings in the Elasticsearch configuration file.
# Configuring Elasticsearch
nano /etc/elasticsearch/elasticsearch.yml
- cluster.name: thehive
- node.name: Uncomment it.
- network.host: Uncomment and change it to theHive’s public IP.
- http.port: Uncomment it.
- cluster.initial_master_nodes: Uncomment it and remove the second node
TheHive configuration
First, I will confirm that TheHive user and group have access to the /opt/thp file path by using the ls -la command.
To modify ownership, I will use the command below:
# Changing directory ownership
chown -R thehive:thehive /opt/thp
Now, we will need to change the following fields in theHive config file:
- db.janusgraph_hostname: Change it to theHive public IP.
- db.janusgraph_cluster-name: Change it to the cluster named on Cassandra’s config file.
- index.search_hostname: Change it to theHive public IP.
- application.baseUrl: Change it to: “https://theHive_IP:9000”.

The final step is to start and enable TheHive service.
# Starting and enabling theHive service
systemctl start thehive
systemctl enable thehive

# Checking theHive service status
systemctl status thehive
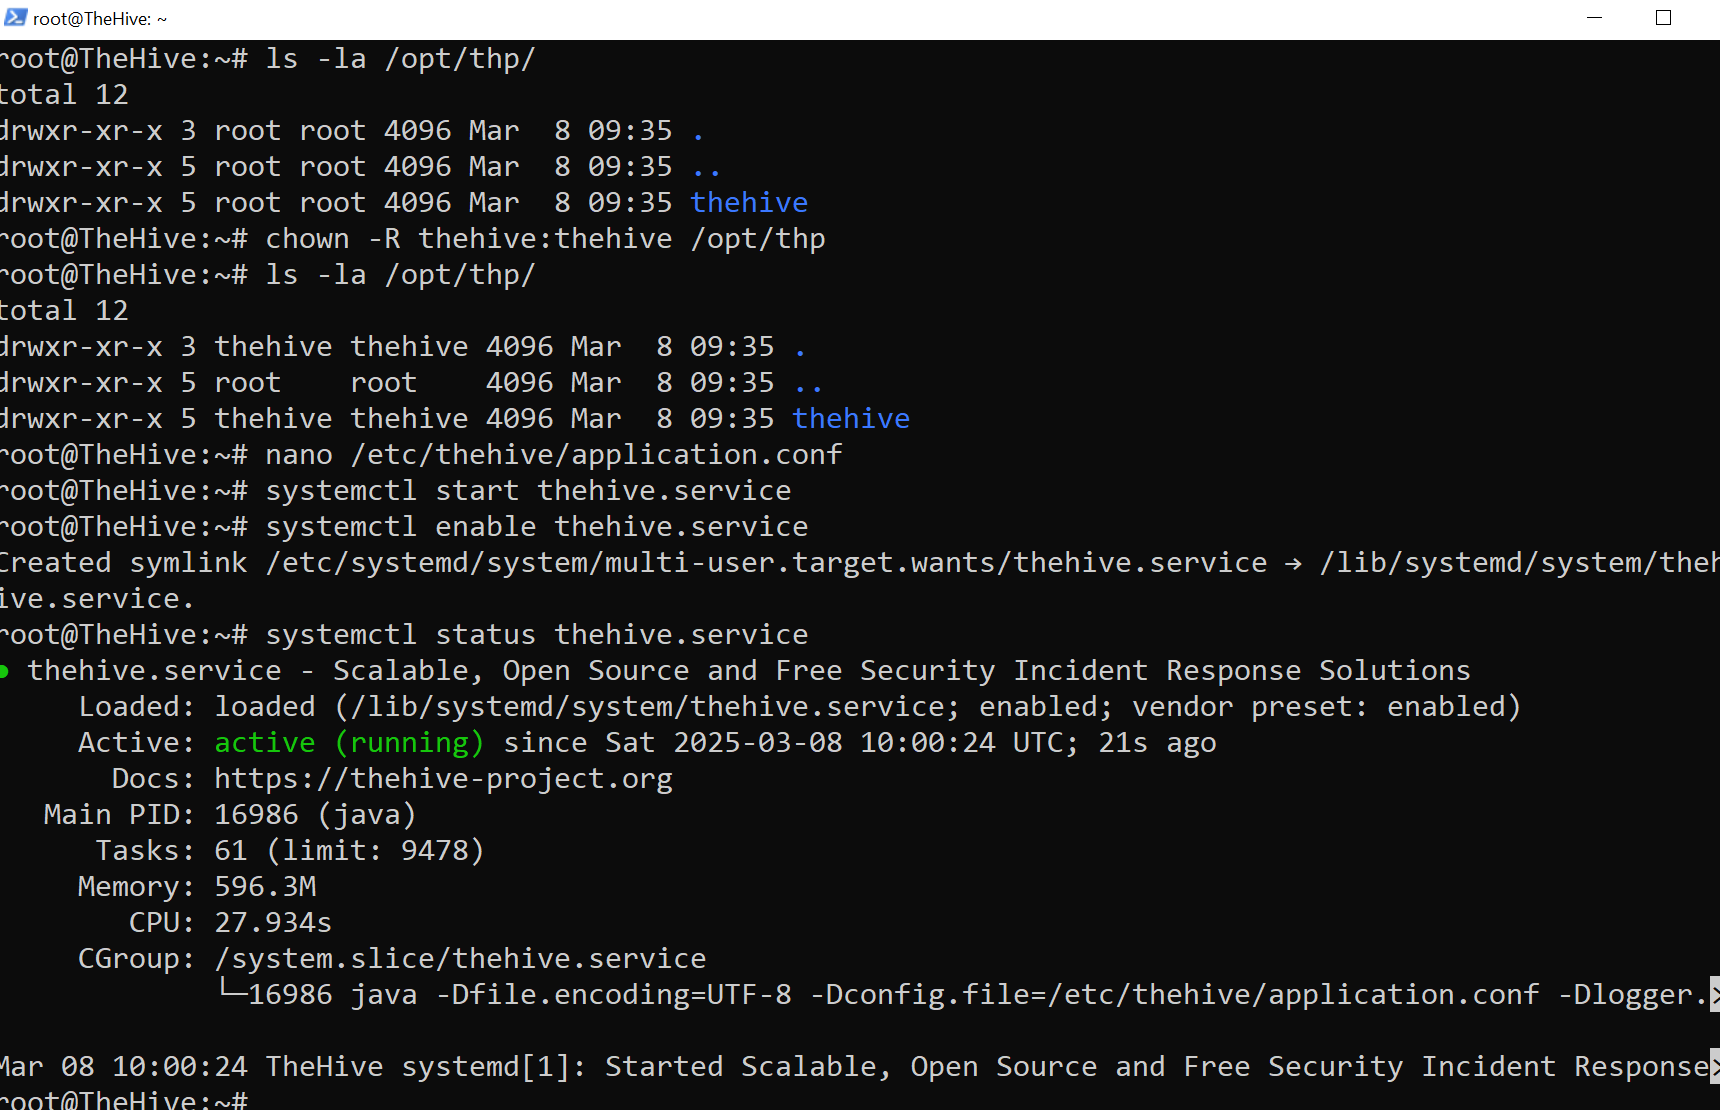
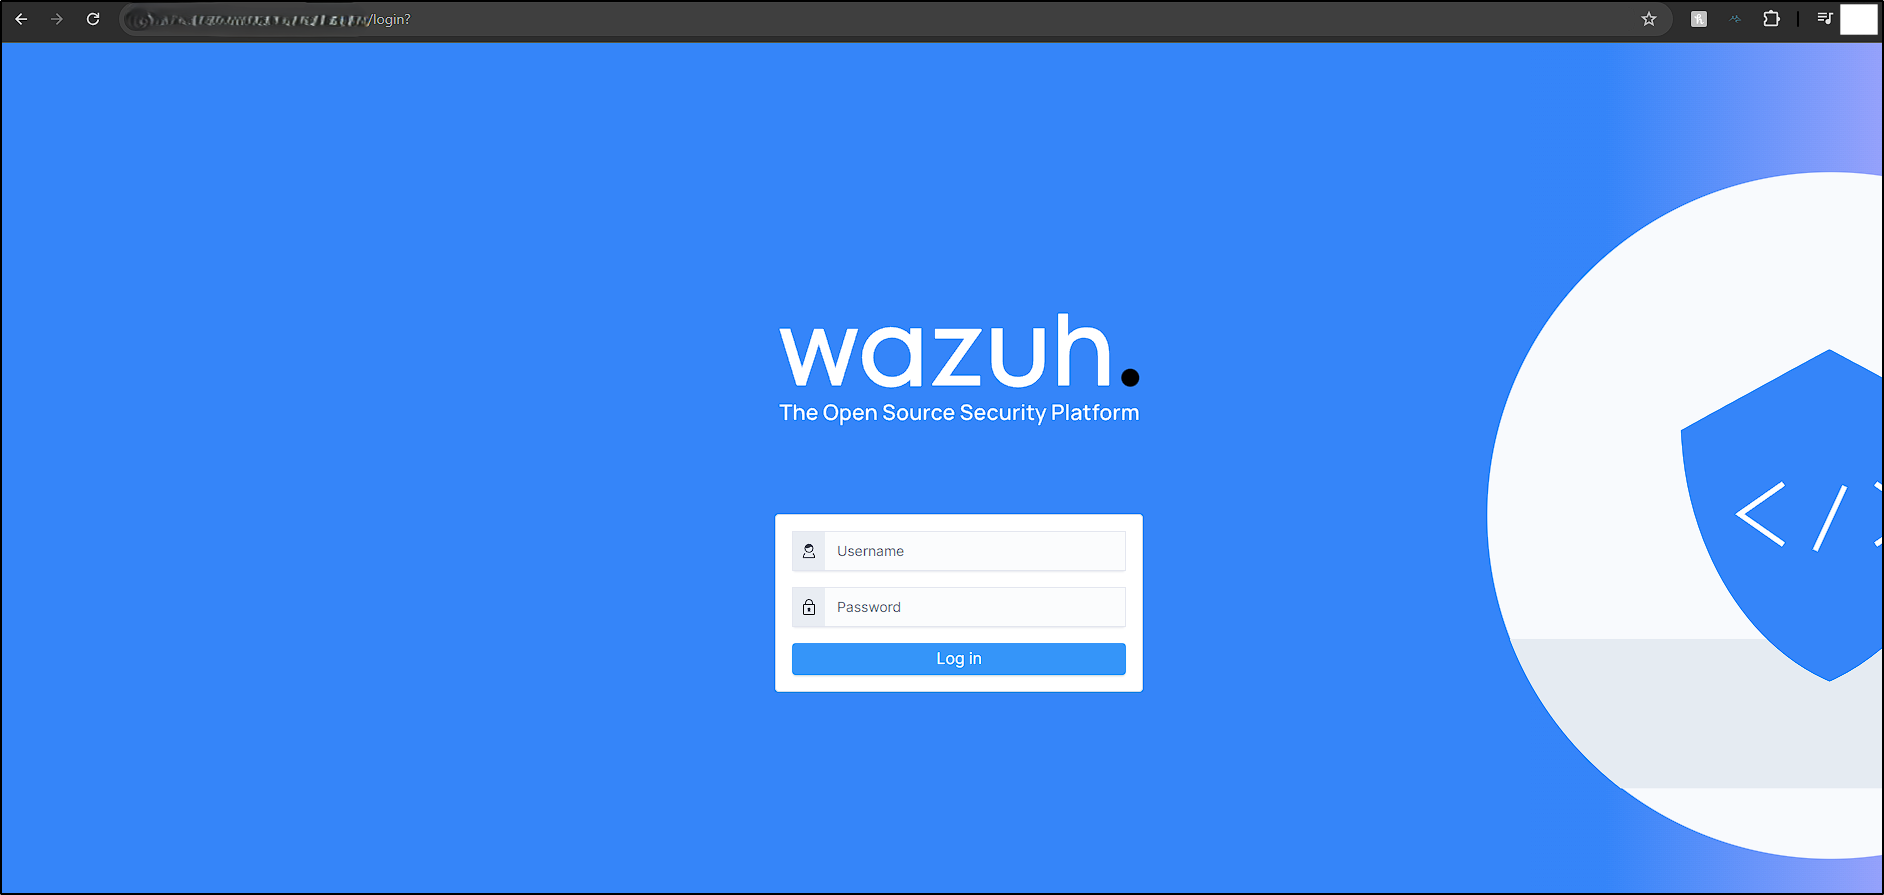
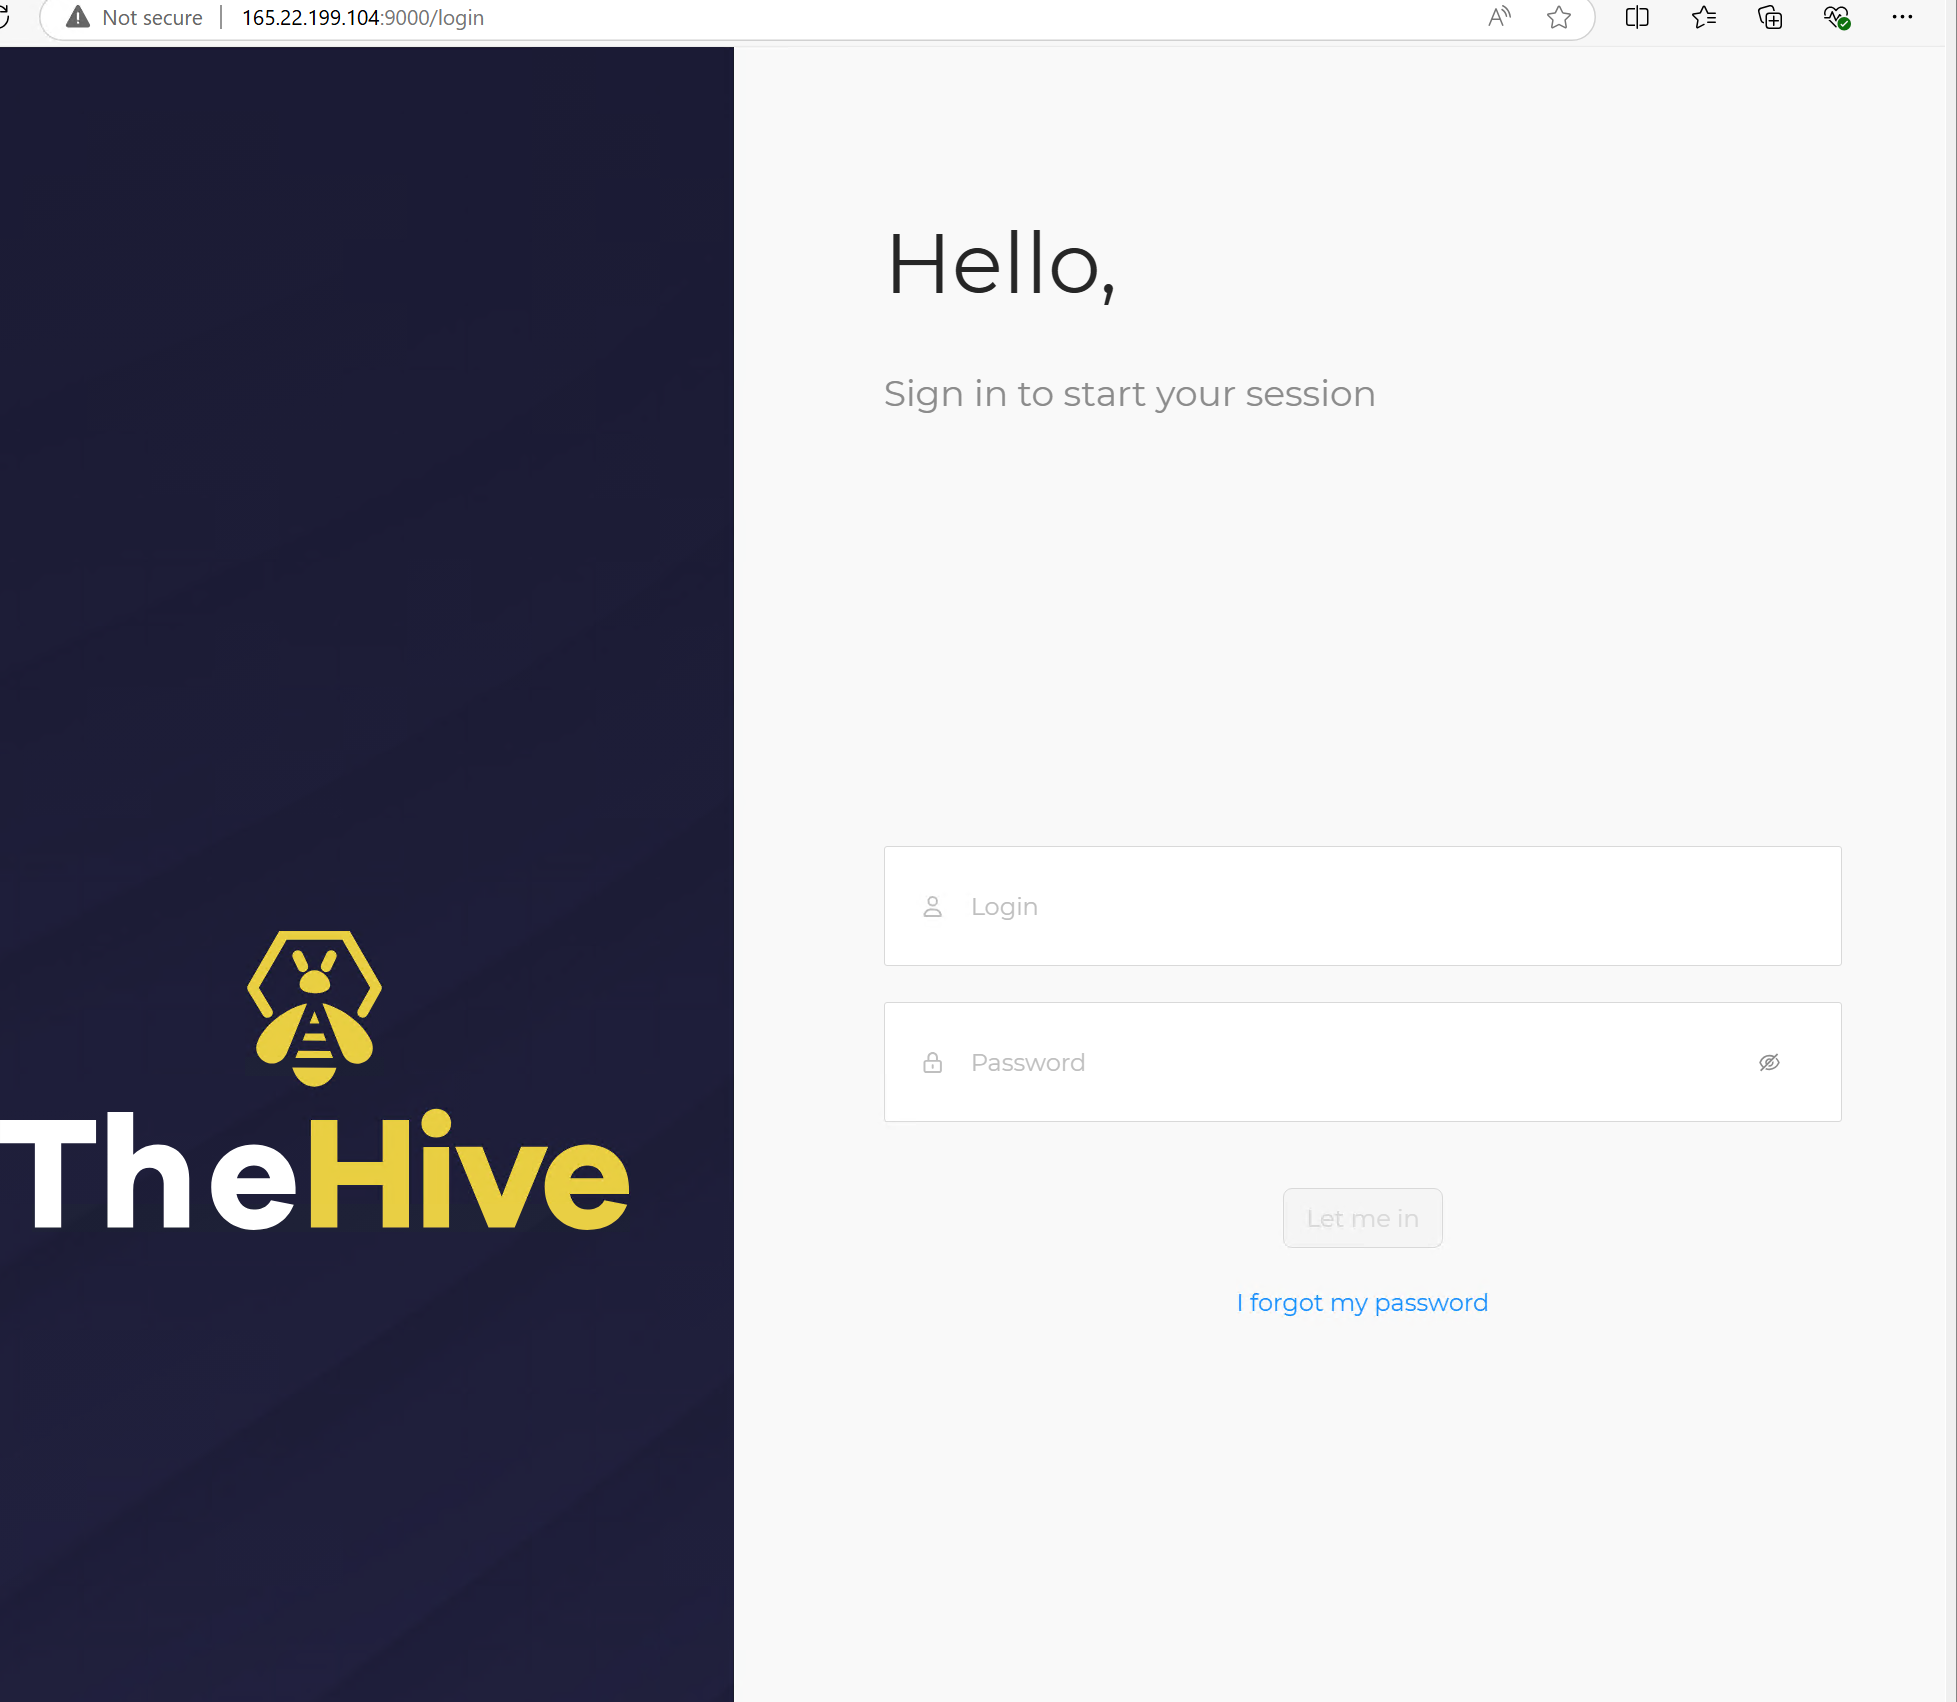
Since all services are running and configured correctly, I was able to access TheHive web interface at https://"thehive_IP":9000 by using the default credential
Adding Agent to Wazuh
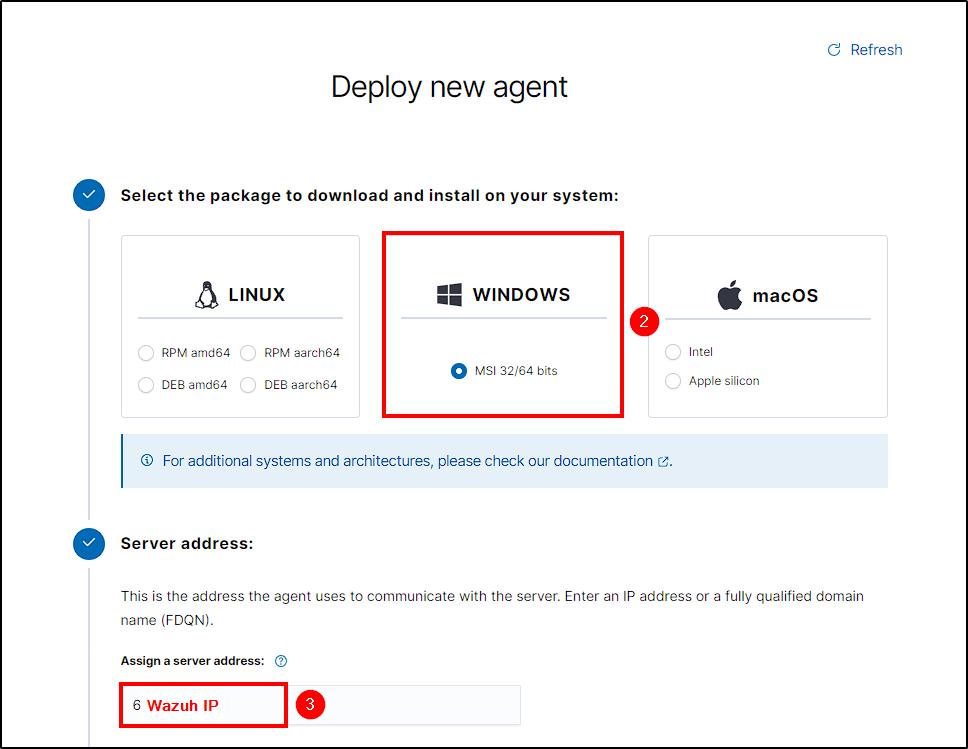
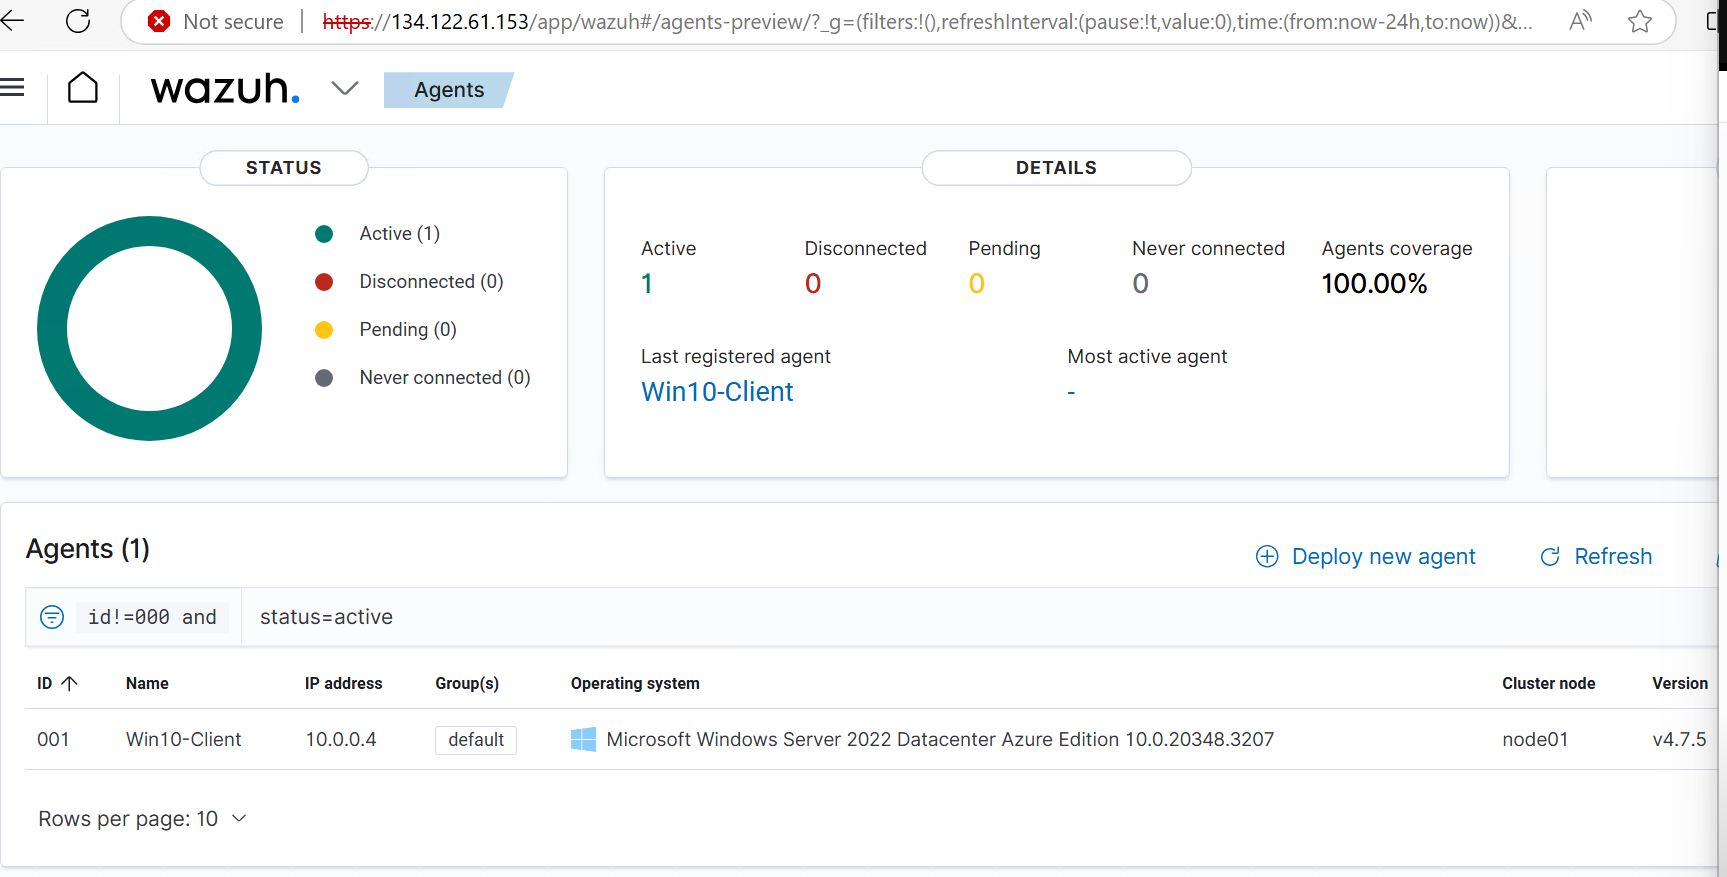
First, I will log into Wazuh’s manager at “https://”Wazuh_IP” using the admin credentials obtained during installation. I will name the agent and copy the command generated in step 4. This command will download and install the Wazuh agent software on the host, configuring its server address and agent name. Next, I will power on the Windows Client, open a PowerShell terminal with admin rights, and run the copied command. After the download and installation complete, I will start the Wazuh service with the following command: Now the agent is connected to the Wazuh Manager, and I can begin generating telemetry!
Generating Telemetry
Telemetry involves collecting, transmitting, and analyzing data about the performance and activity of the Wazuh infrastructure and its monitored endpoints. This data encompasses security events, operational metrics, and other critical information needed to maintain and optimize system functionality.
Wazuh Agent Log Configuration
To ensure Wazuh can detect activities related to Mimikatz, I will modify the ossec.conf file, which serves as the primary configuration file for Wazuh.
To do this, I will navigate to C:\Program Files (x86)\ossec-agent and open ossec.conf
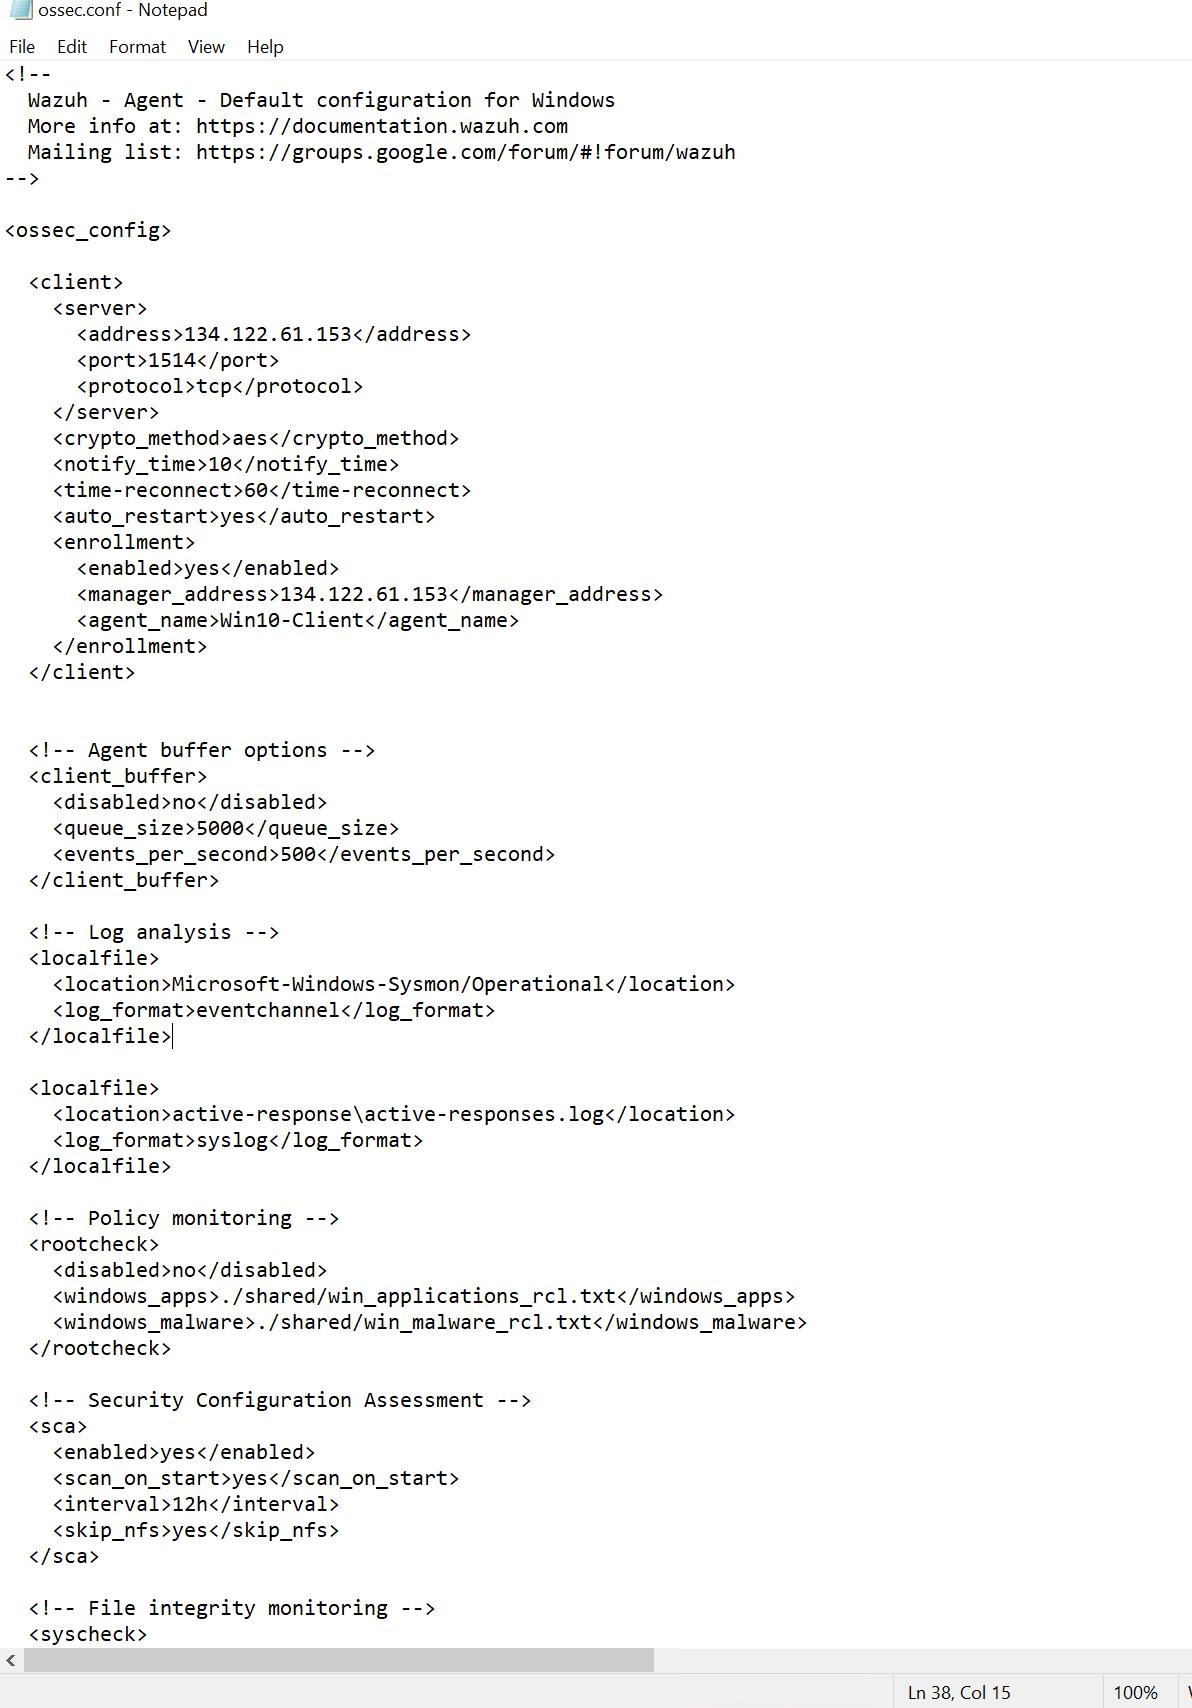
The Log Analysis section specifies the logs that Wazuh will ingest. I will need to add Sysmon logs in order to Wazuh detect mimikatz activity.
Changing Wazuh to Log Everything
To ensure that Wazuh logs everything, including our mimikatz activity, we need to modify Filebeat’s config file and the ossec.conf file on the Wazuh server.
- logall: Change it to yes.
- logall_json: Change it to yes.
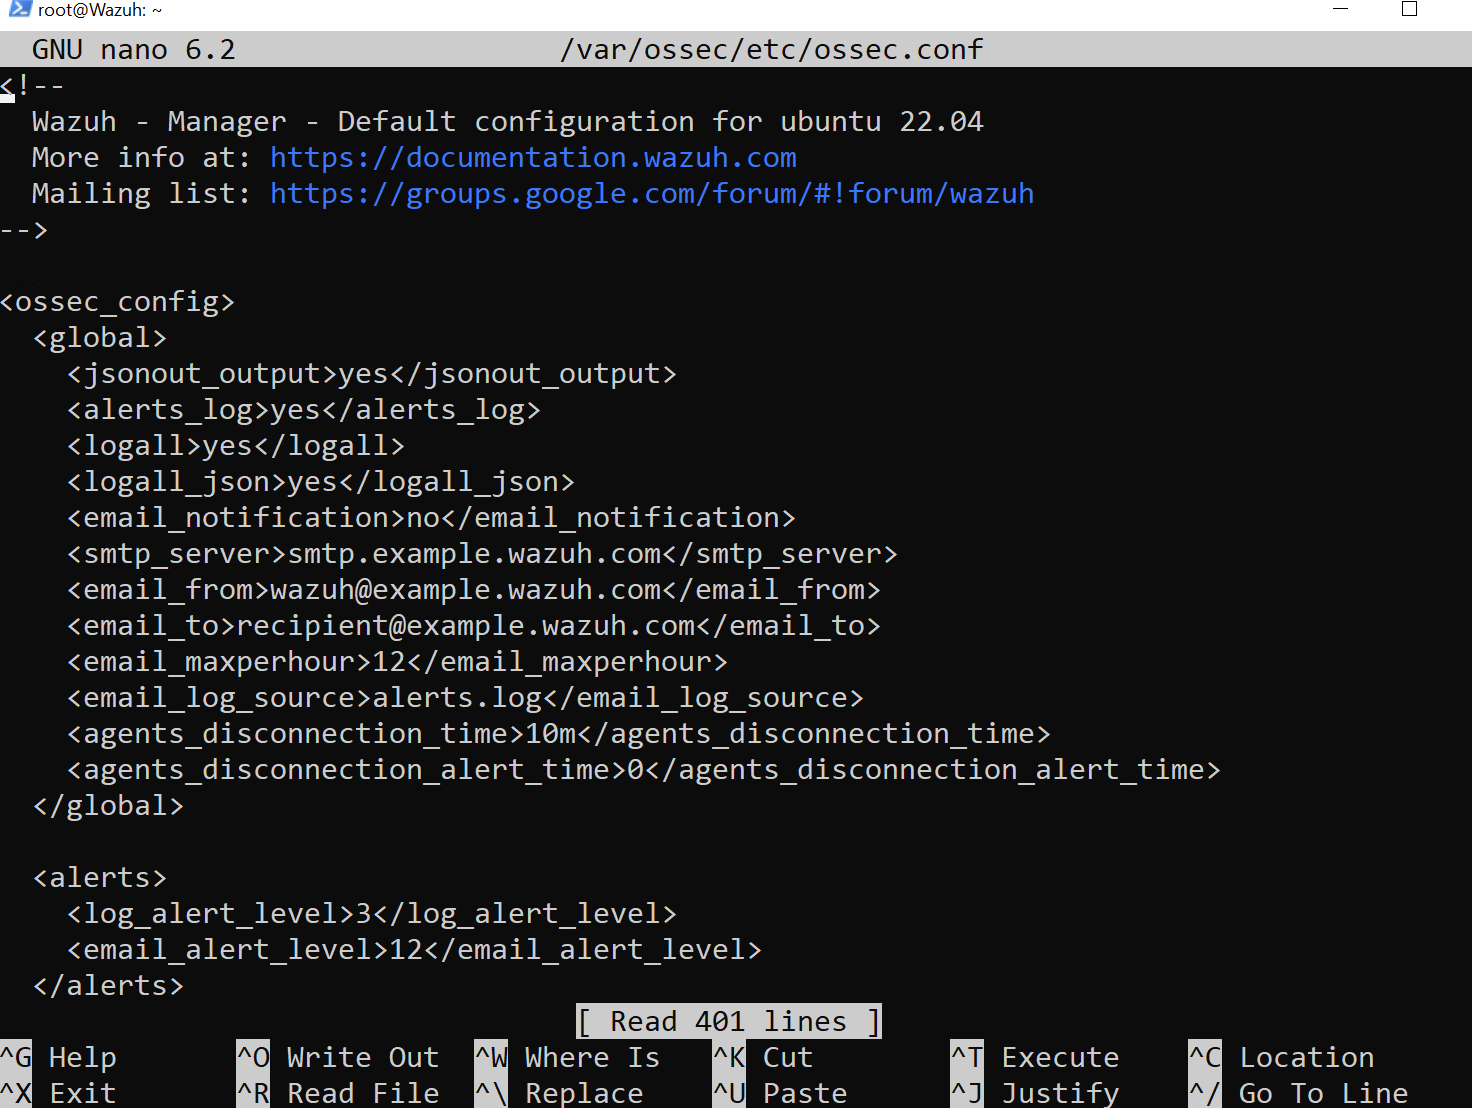
Log into the Wazuh server via SSH and make the following changes to ossec.conf:
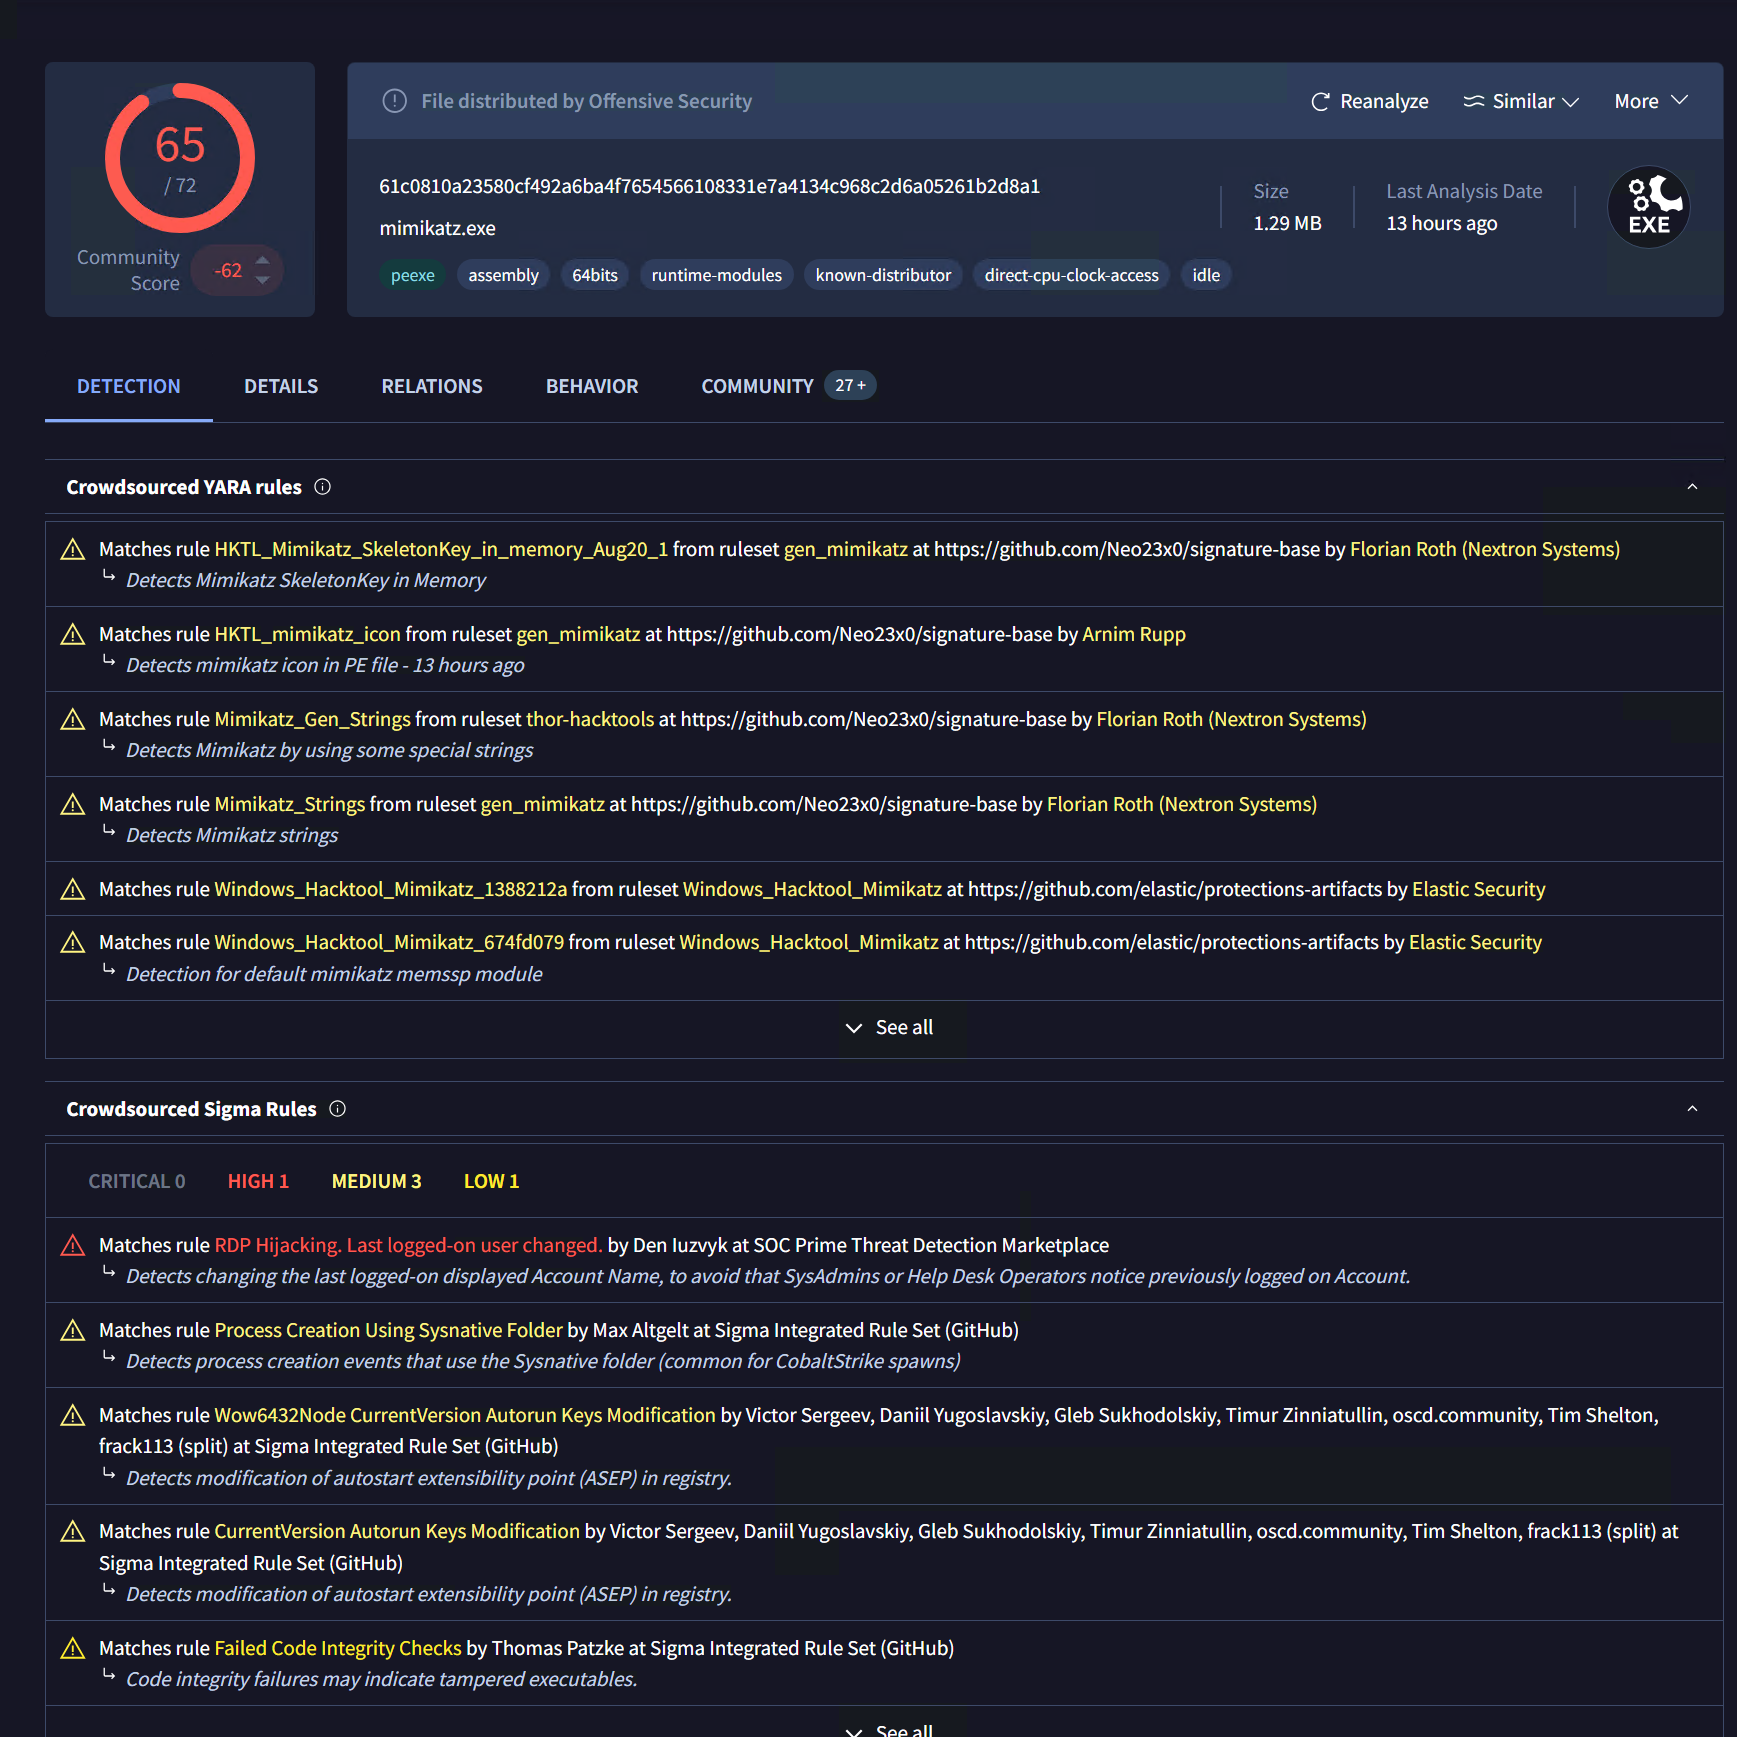
Downloading Mimikatz
Mimikatz is a tool designed to extract sensitive information, like passwords and credentials, from a system’s memory. \
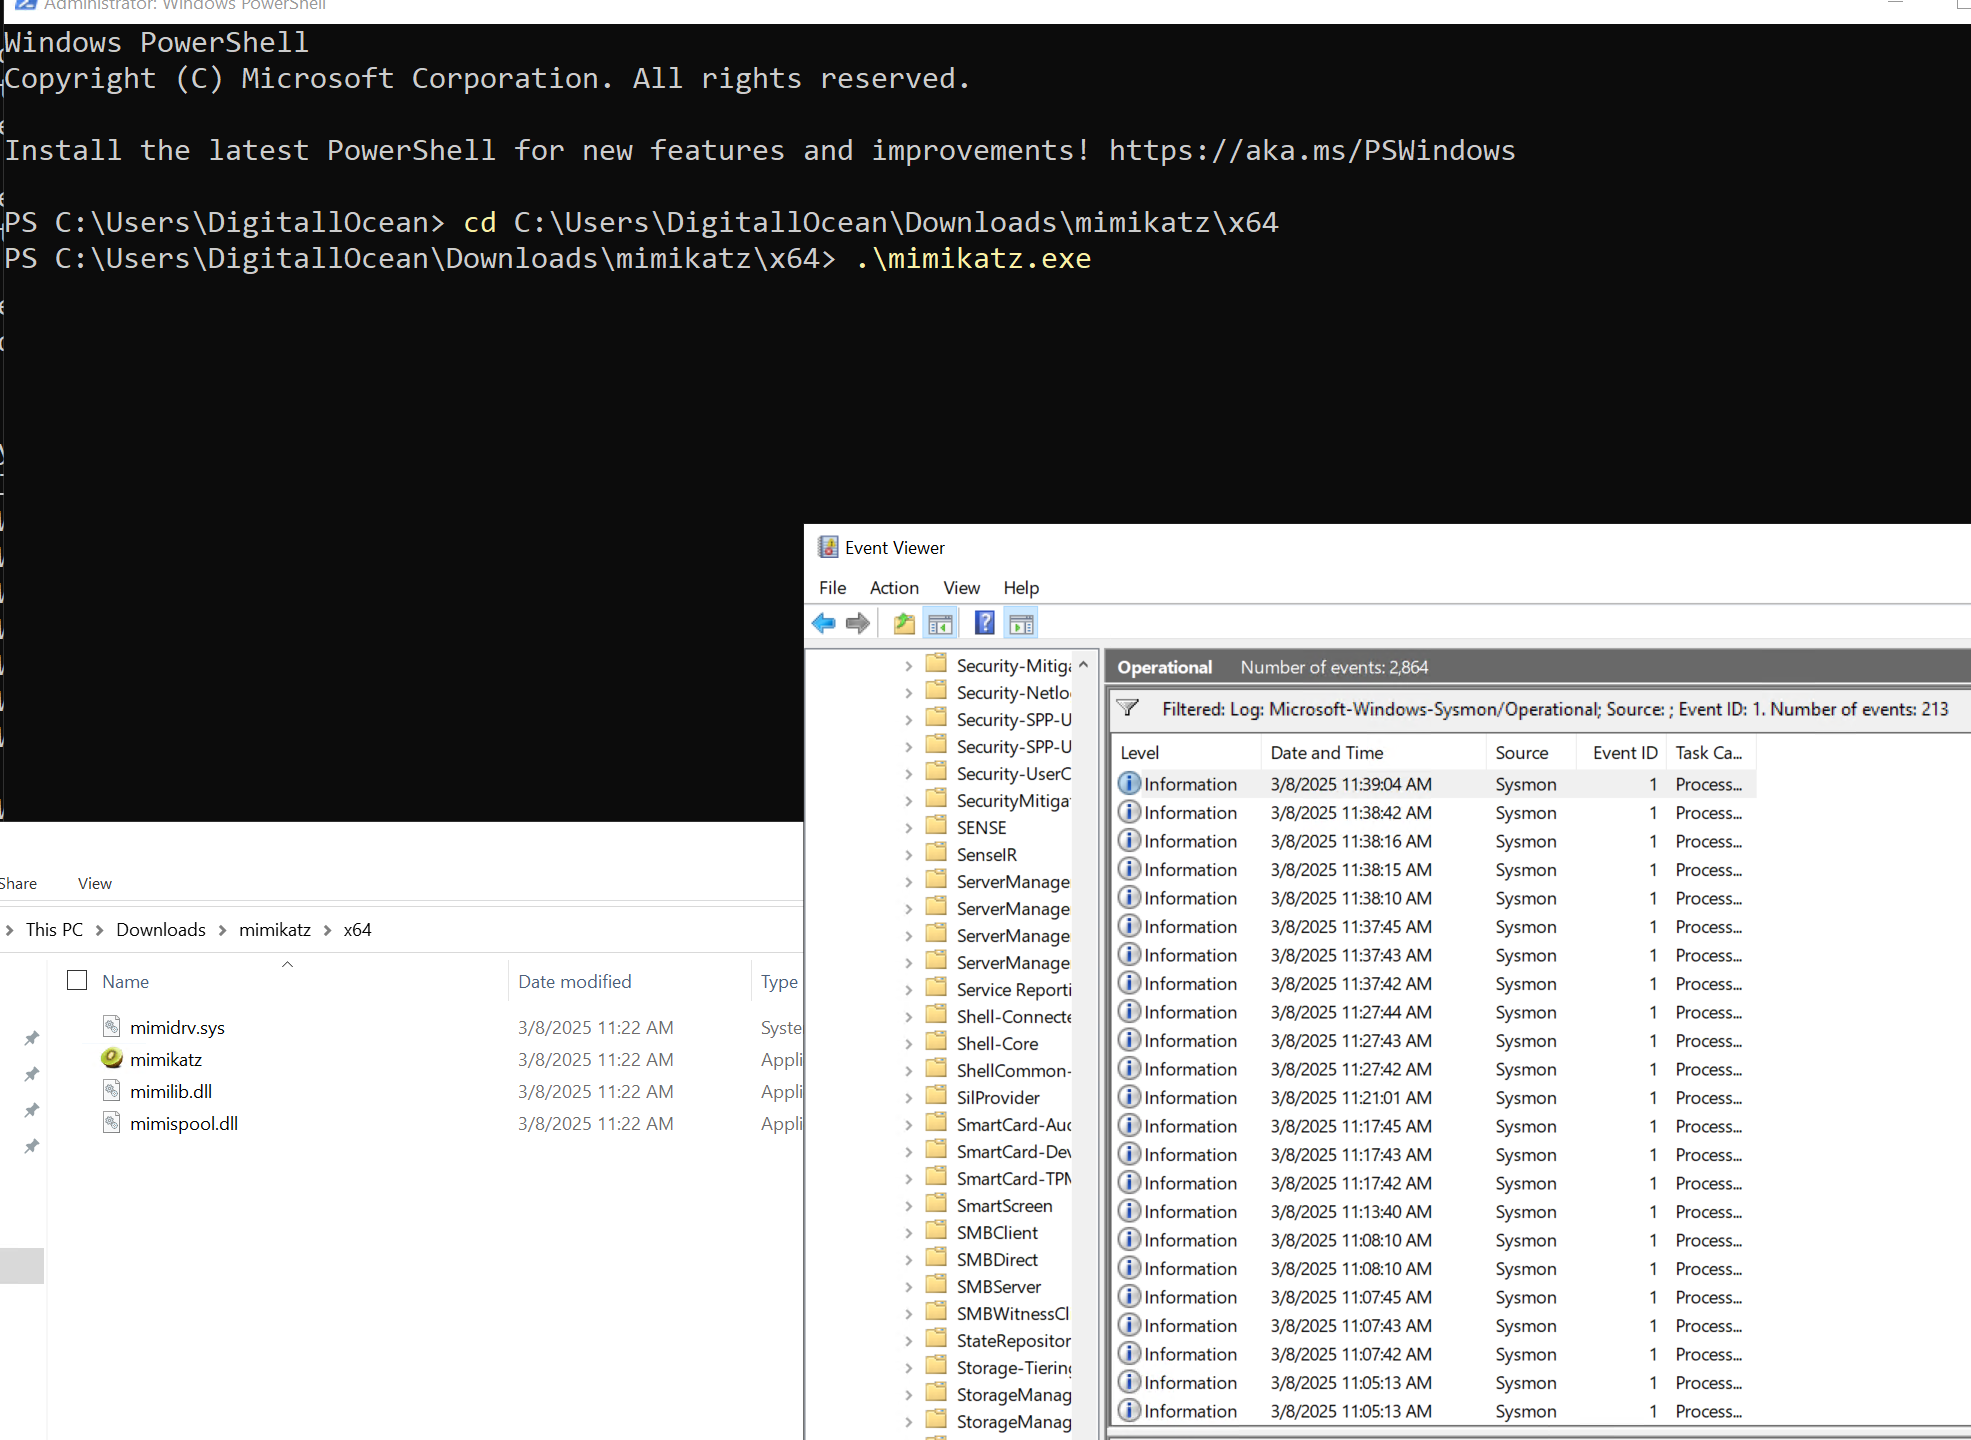
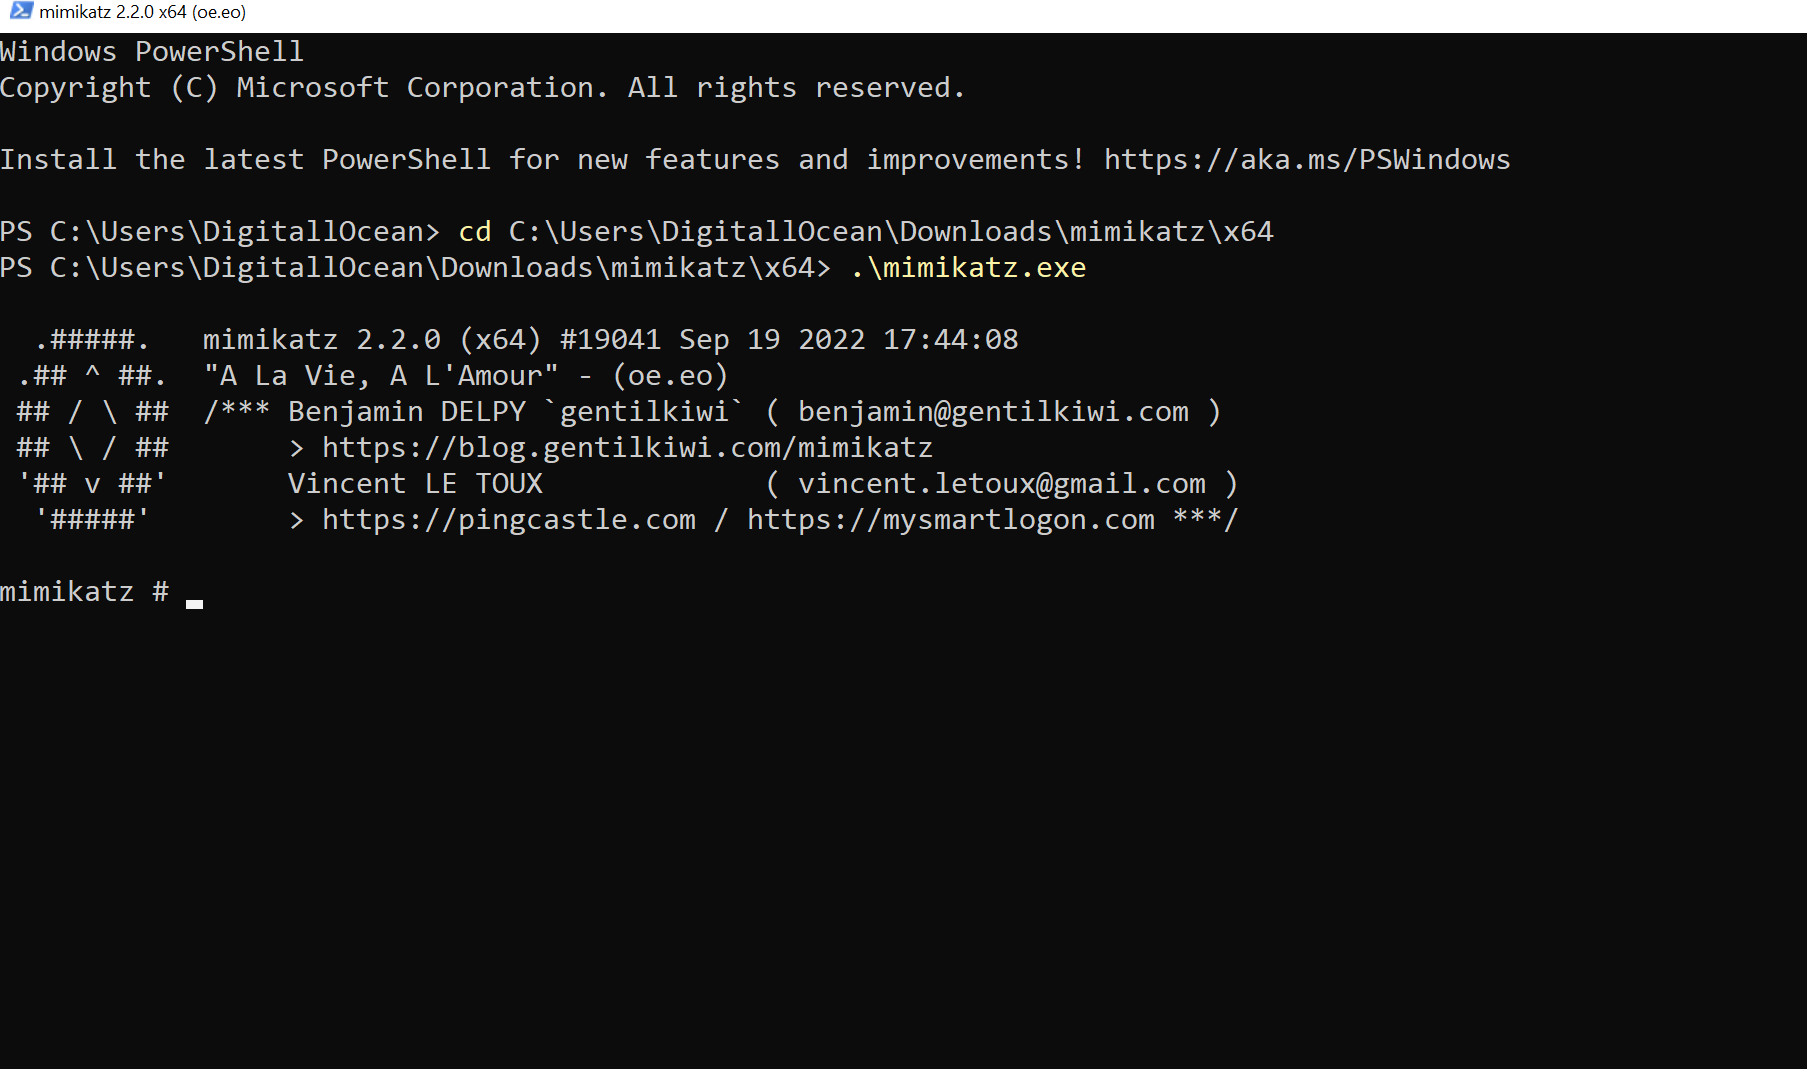
Running Mimikatz
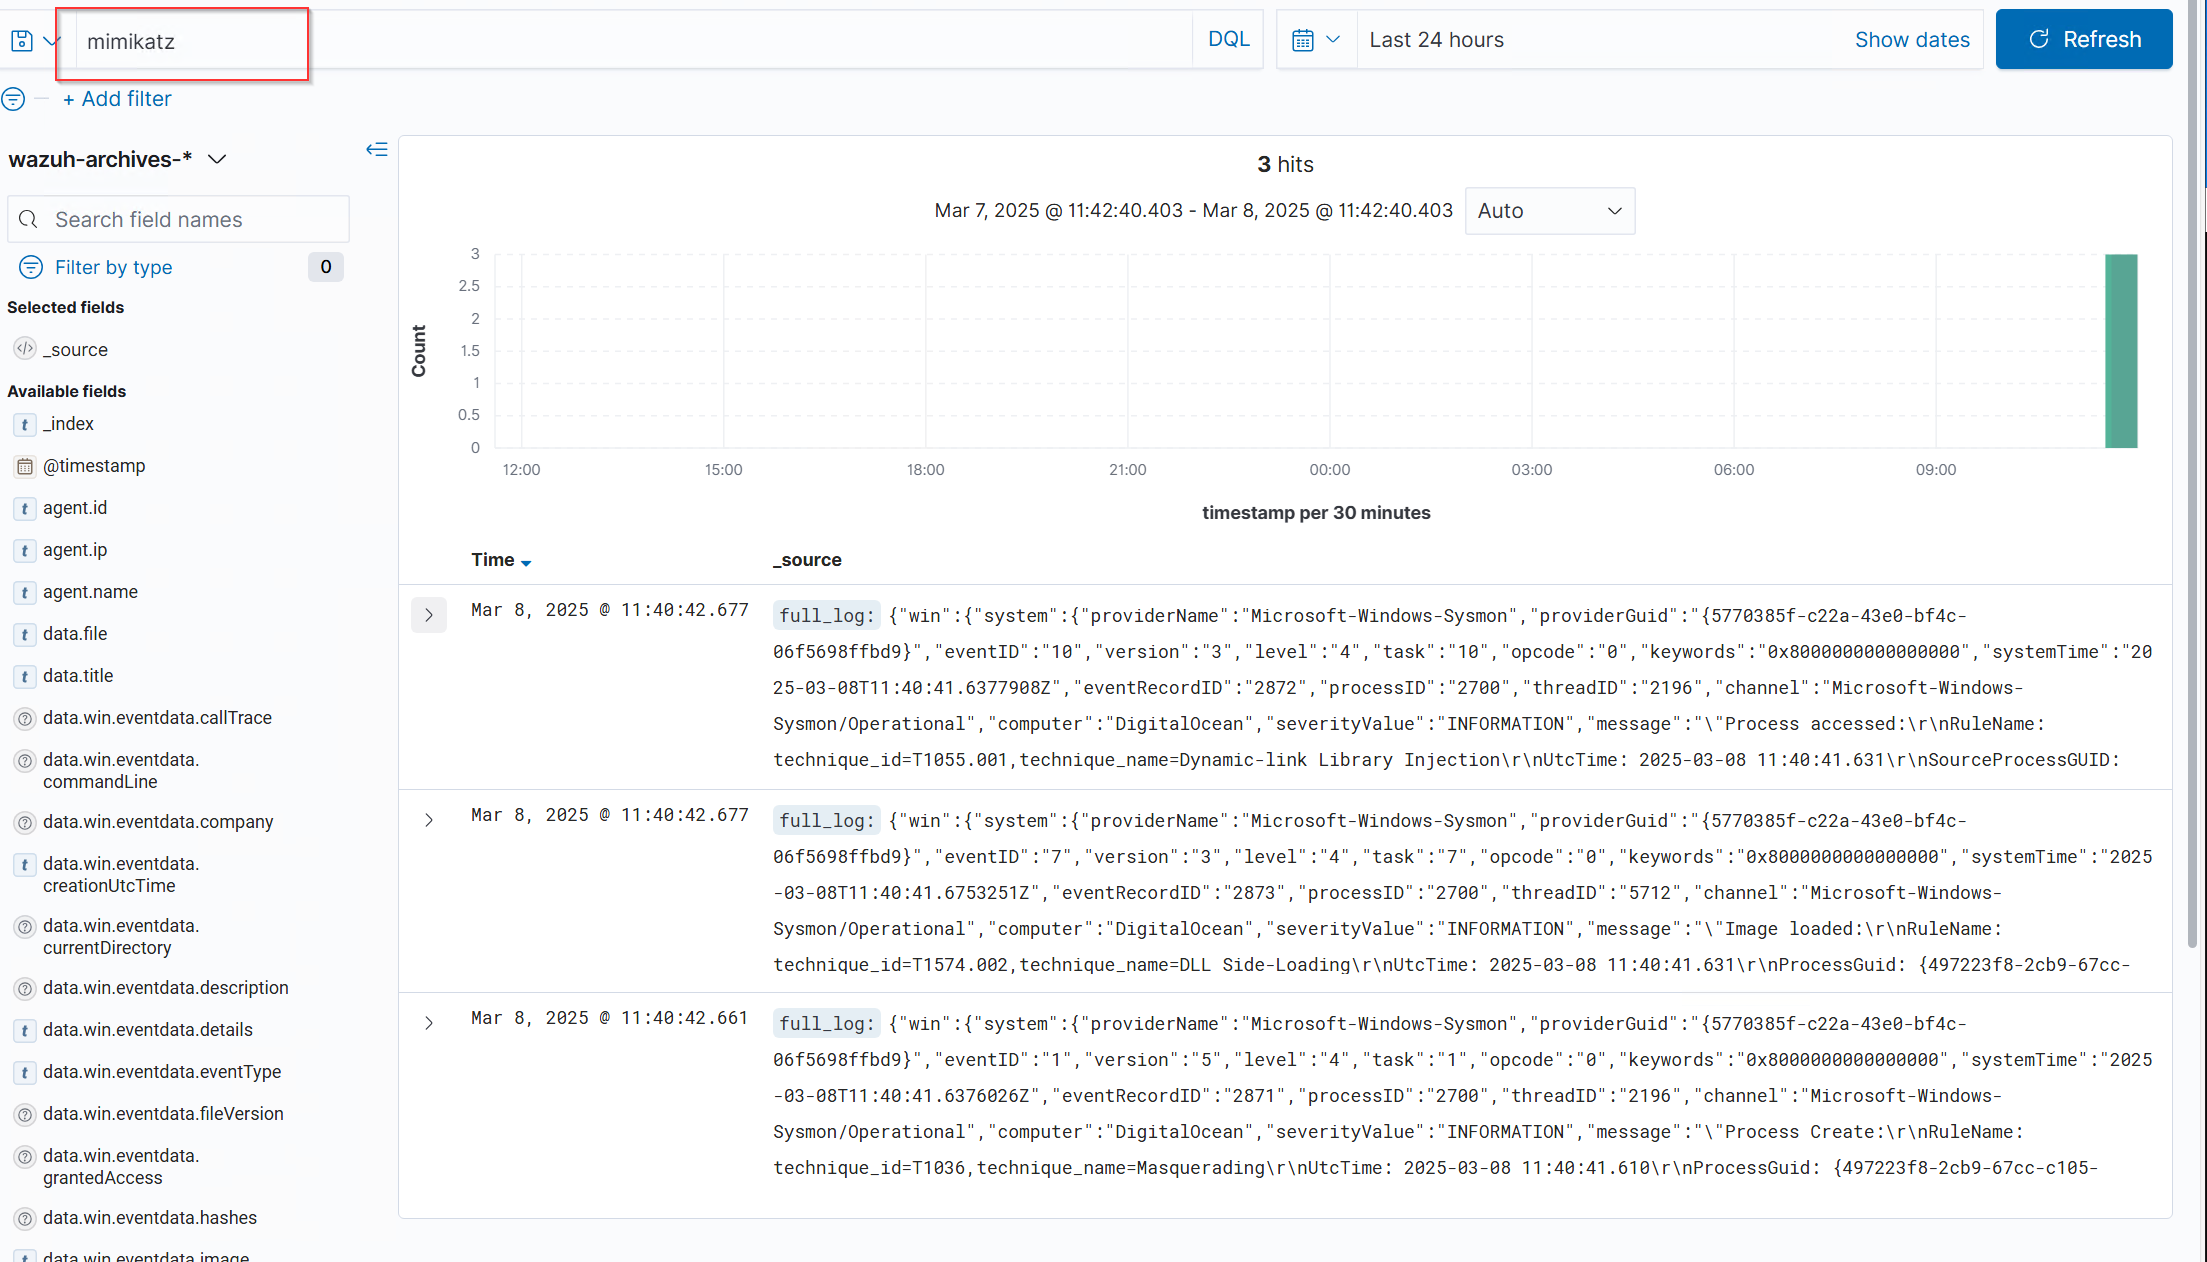
From Event Viewer, I can see mimikatz activity on sysmon events (Event ID 1=proccess create, I’ll use this for our custom rule later)
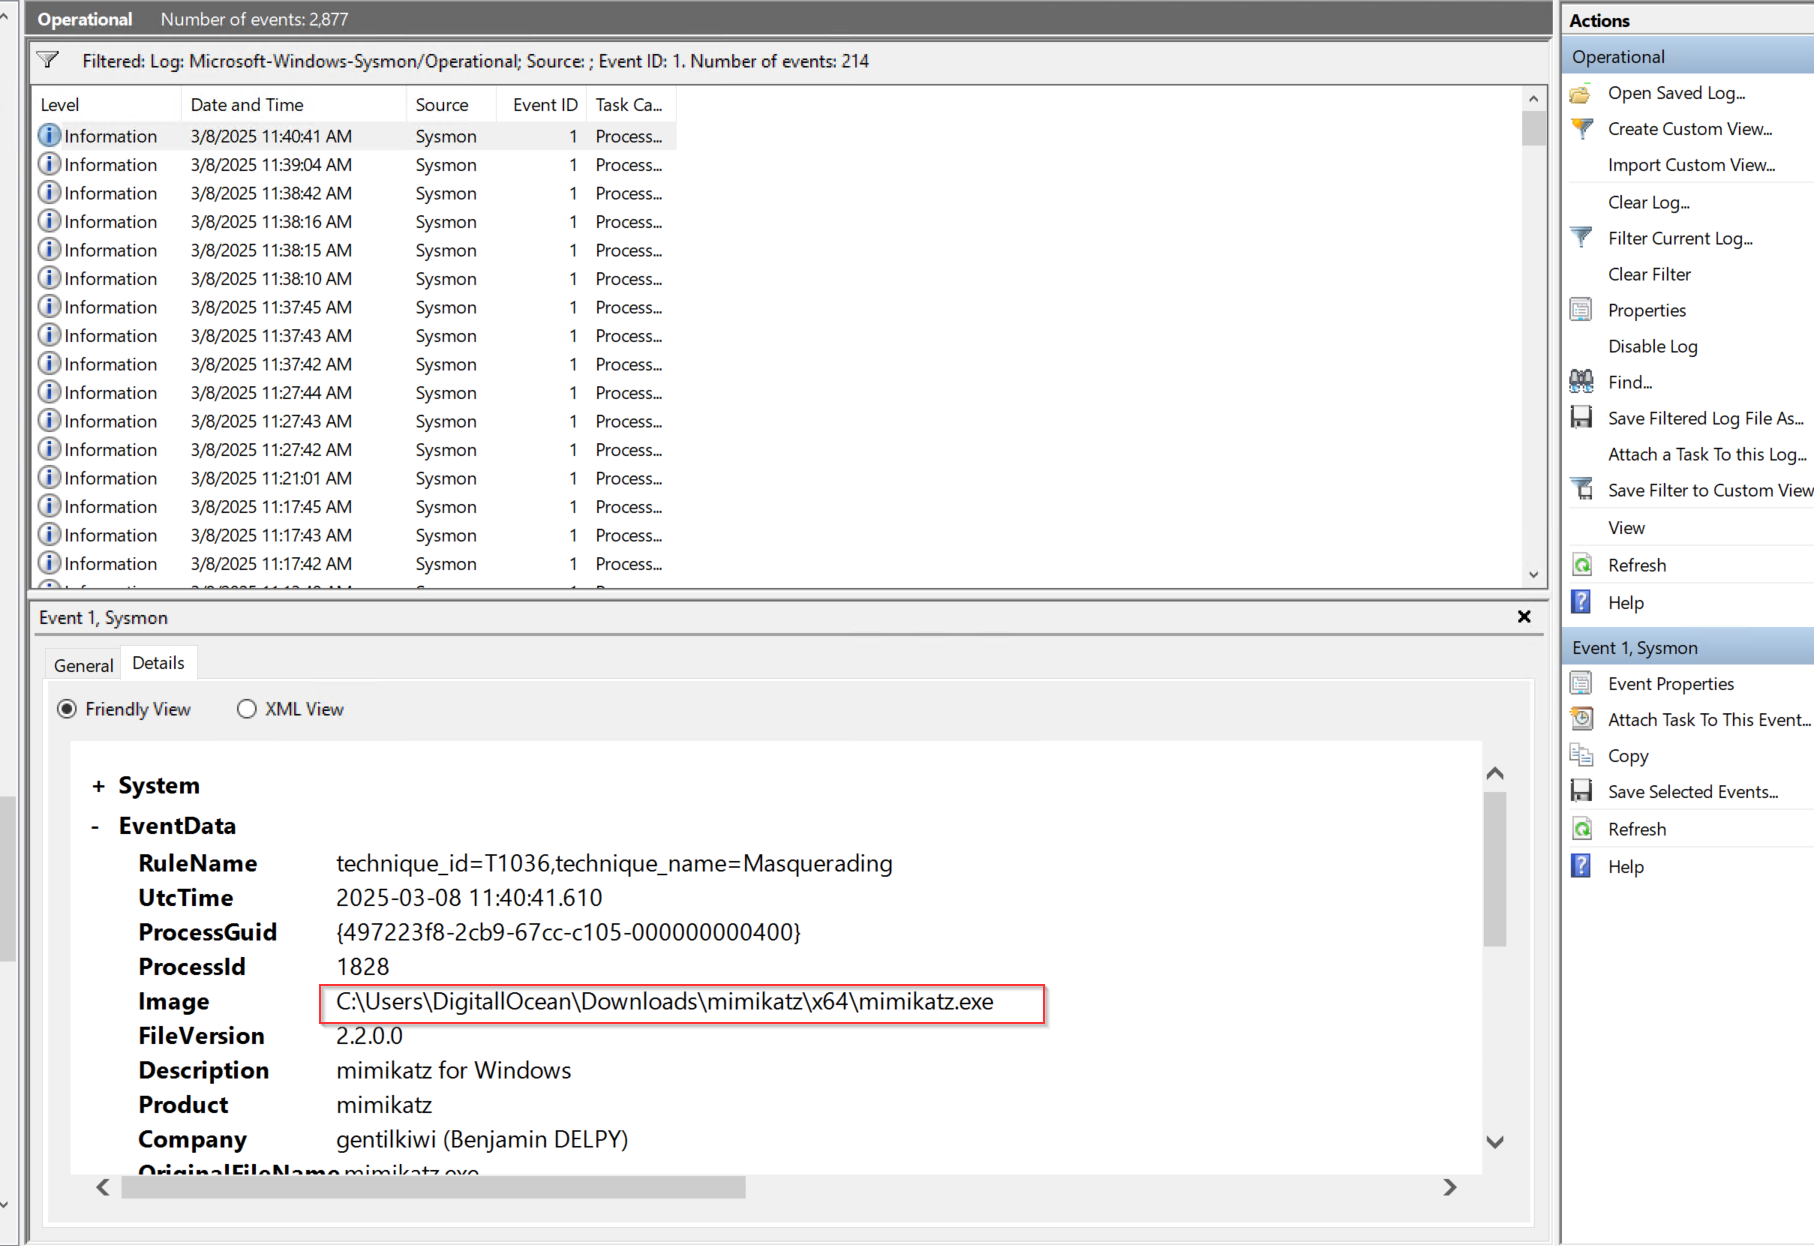
After a few seconds, then I searched for mimikatz on the new index I got some logs.
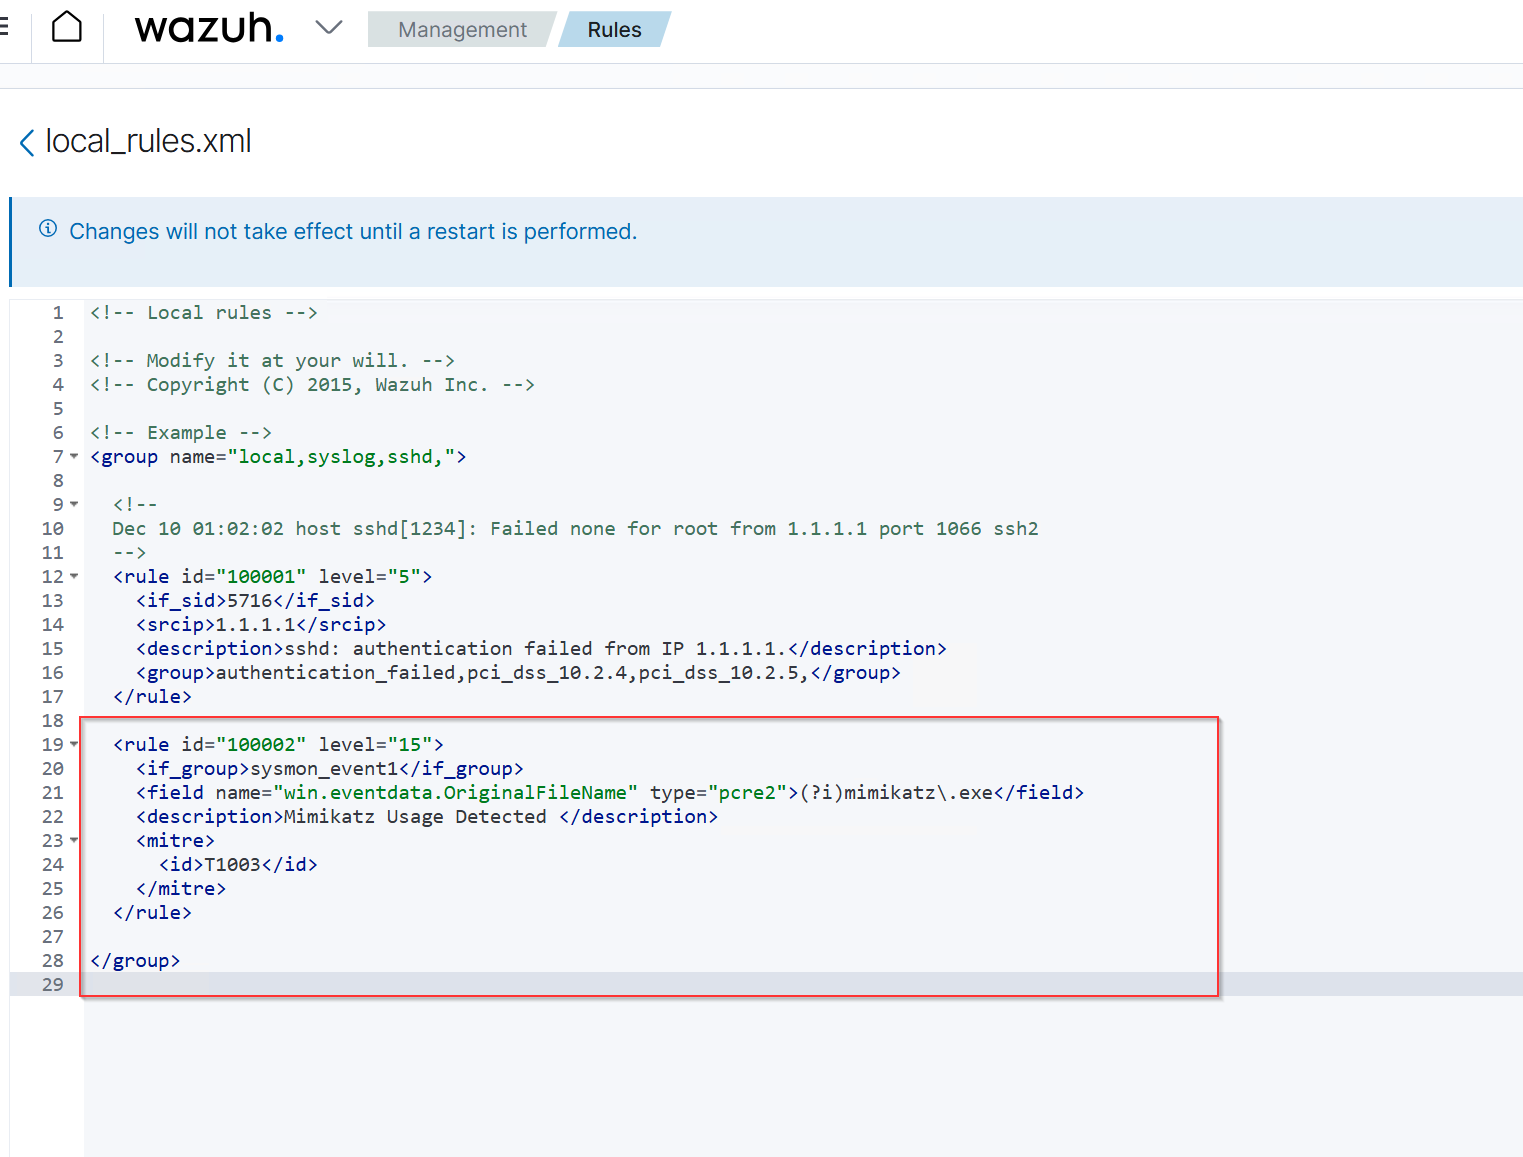
Creating an Alert (Custom Rule) The next step is to create a custom rule that triggers an alert when Mimikatz is detected. I will use the data.win.eventdata.originalFileName parameter (visible in the previous Mimikatz event in Wazuh), which contains the original name of a file involved in an event. This ensures that even if an attacker renames Mimikatz, the rule will still activate and generate an alert.

Below the default rule, insert our custom rule:
<rule id="100002" level="15">
    <if_group>sysmon_event1</if_group>
    <field name="win.eventdata.originalFileName" type="pcre2">(?i)mimikatz\.exe</field>
    <description>Mimikatz Usage Detected</description>
    <mitre>
      <id>T1003</id>
    </mitre>
  </rule>
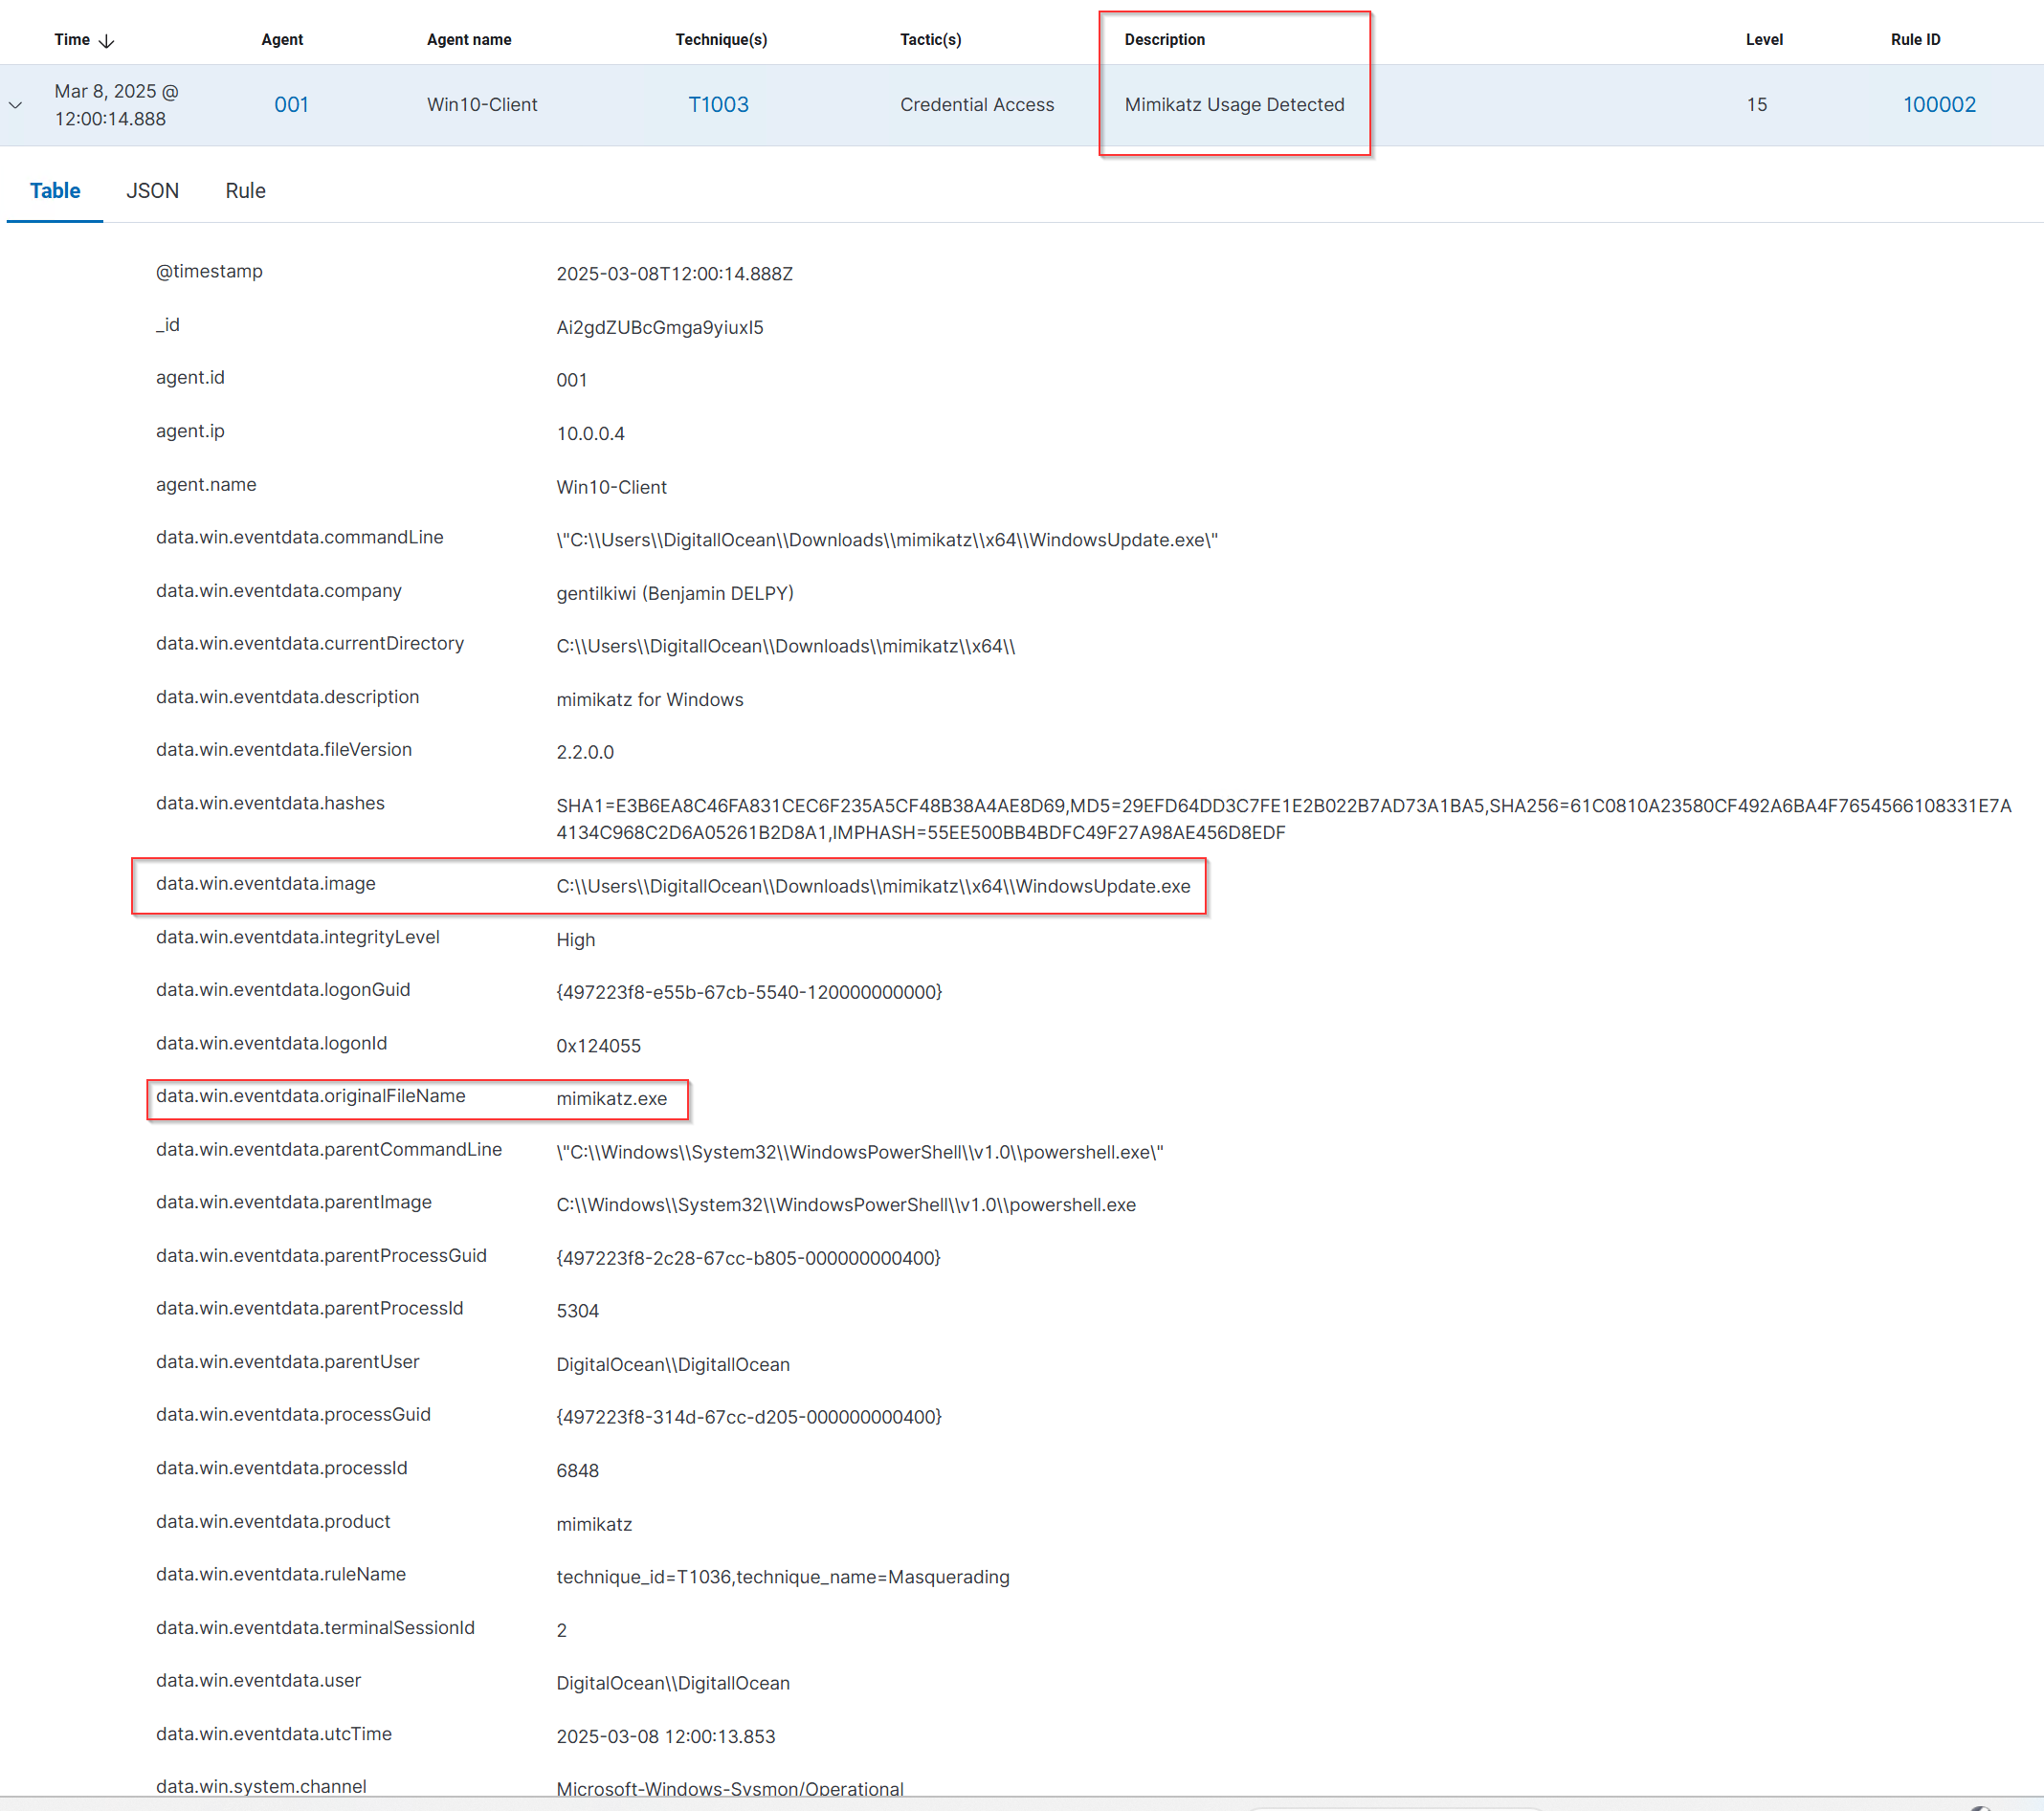
Testing
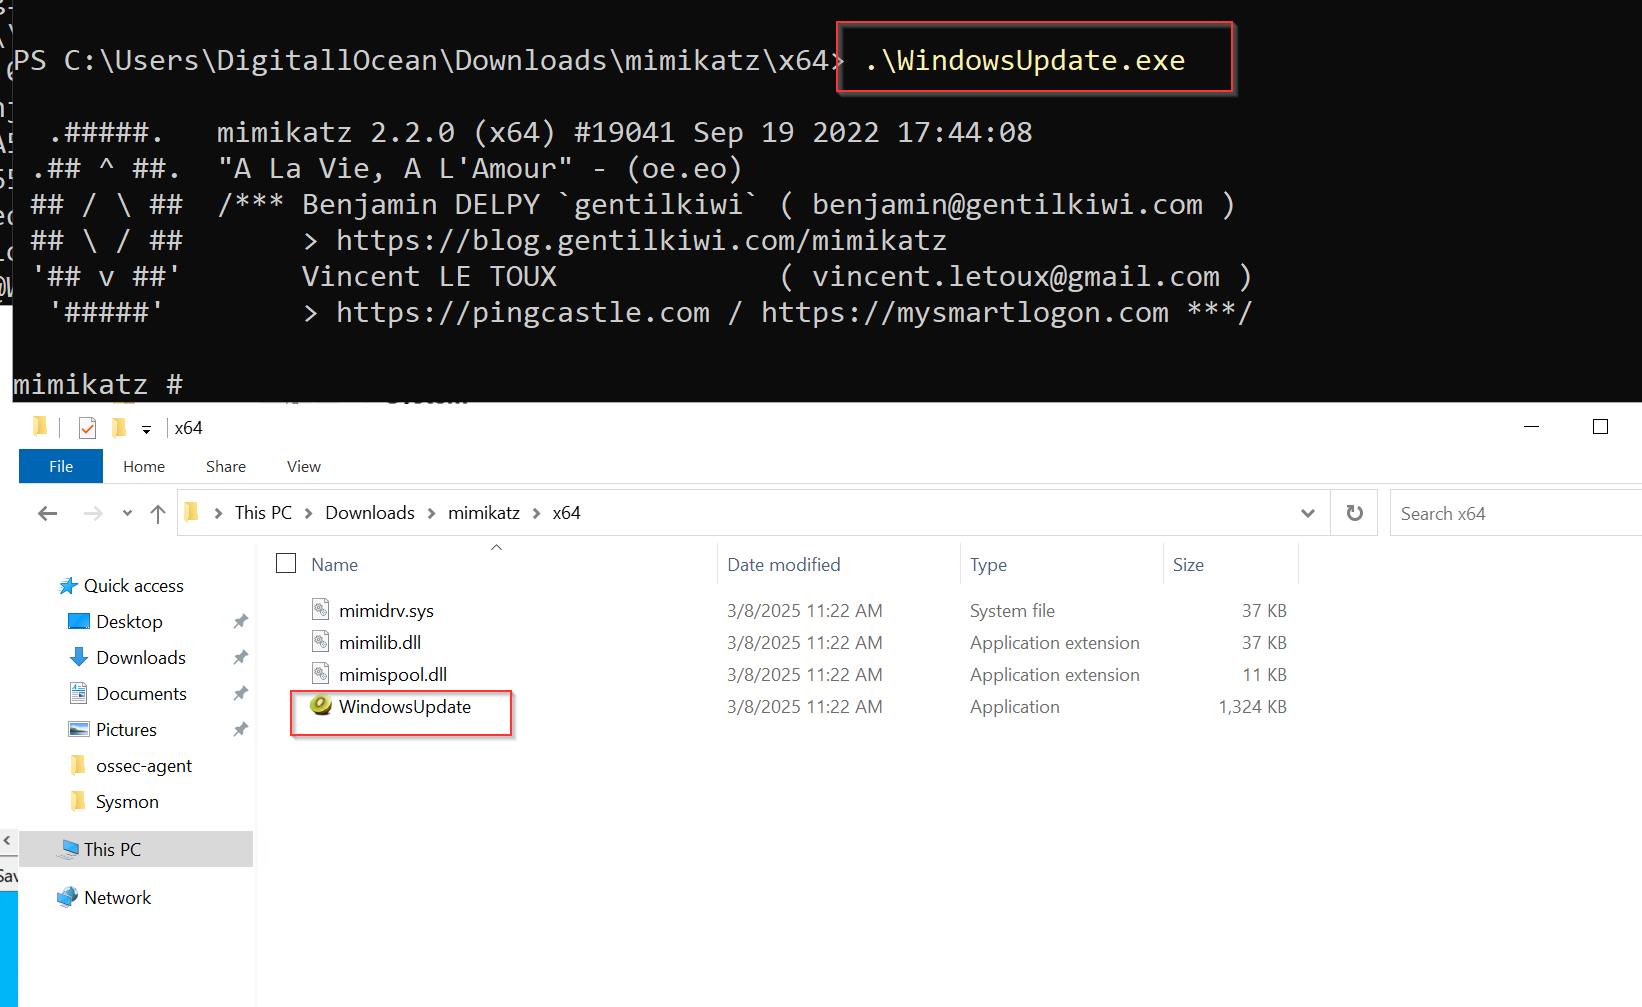
To verify that the custom rule functions as intended, I will rename mimikatz.exe WindowsUpdate.exe
Mimikatz was detected even when the name was changed to WindowsUpdate.exe
Shuffle
Shuffle is an open-source implementation of SOAR, designed to facilitate data transfer across an enterprise using plug-and-play apps, making automation accessible to all users.
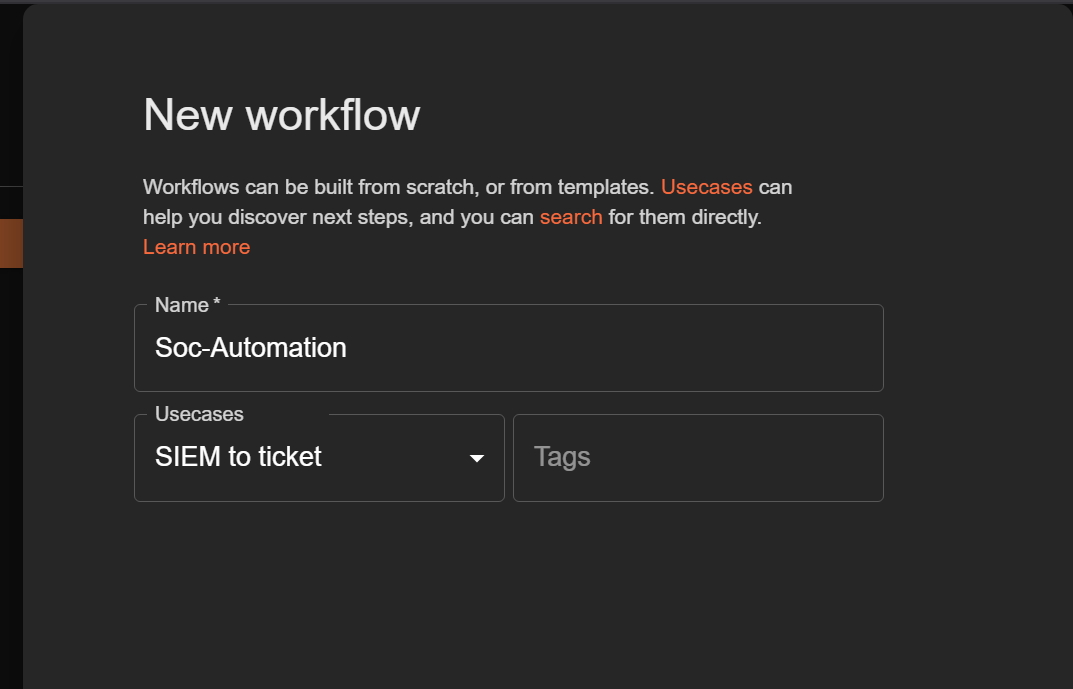
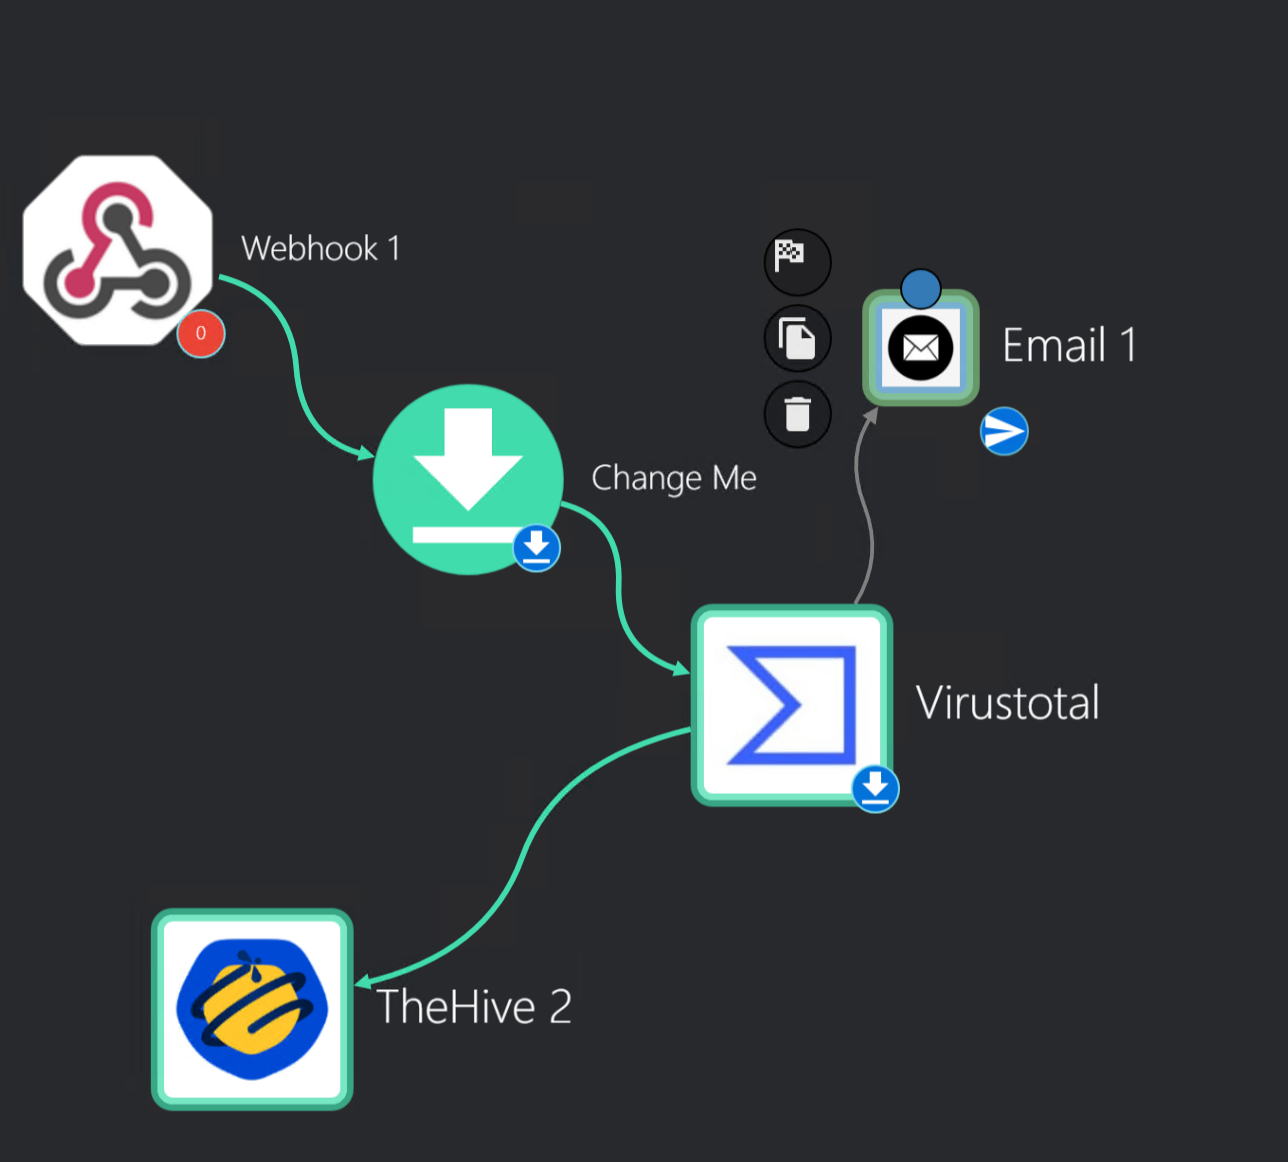
Created a new workflow name Soc-Automation
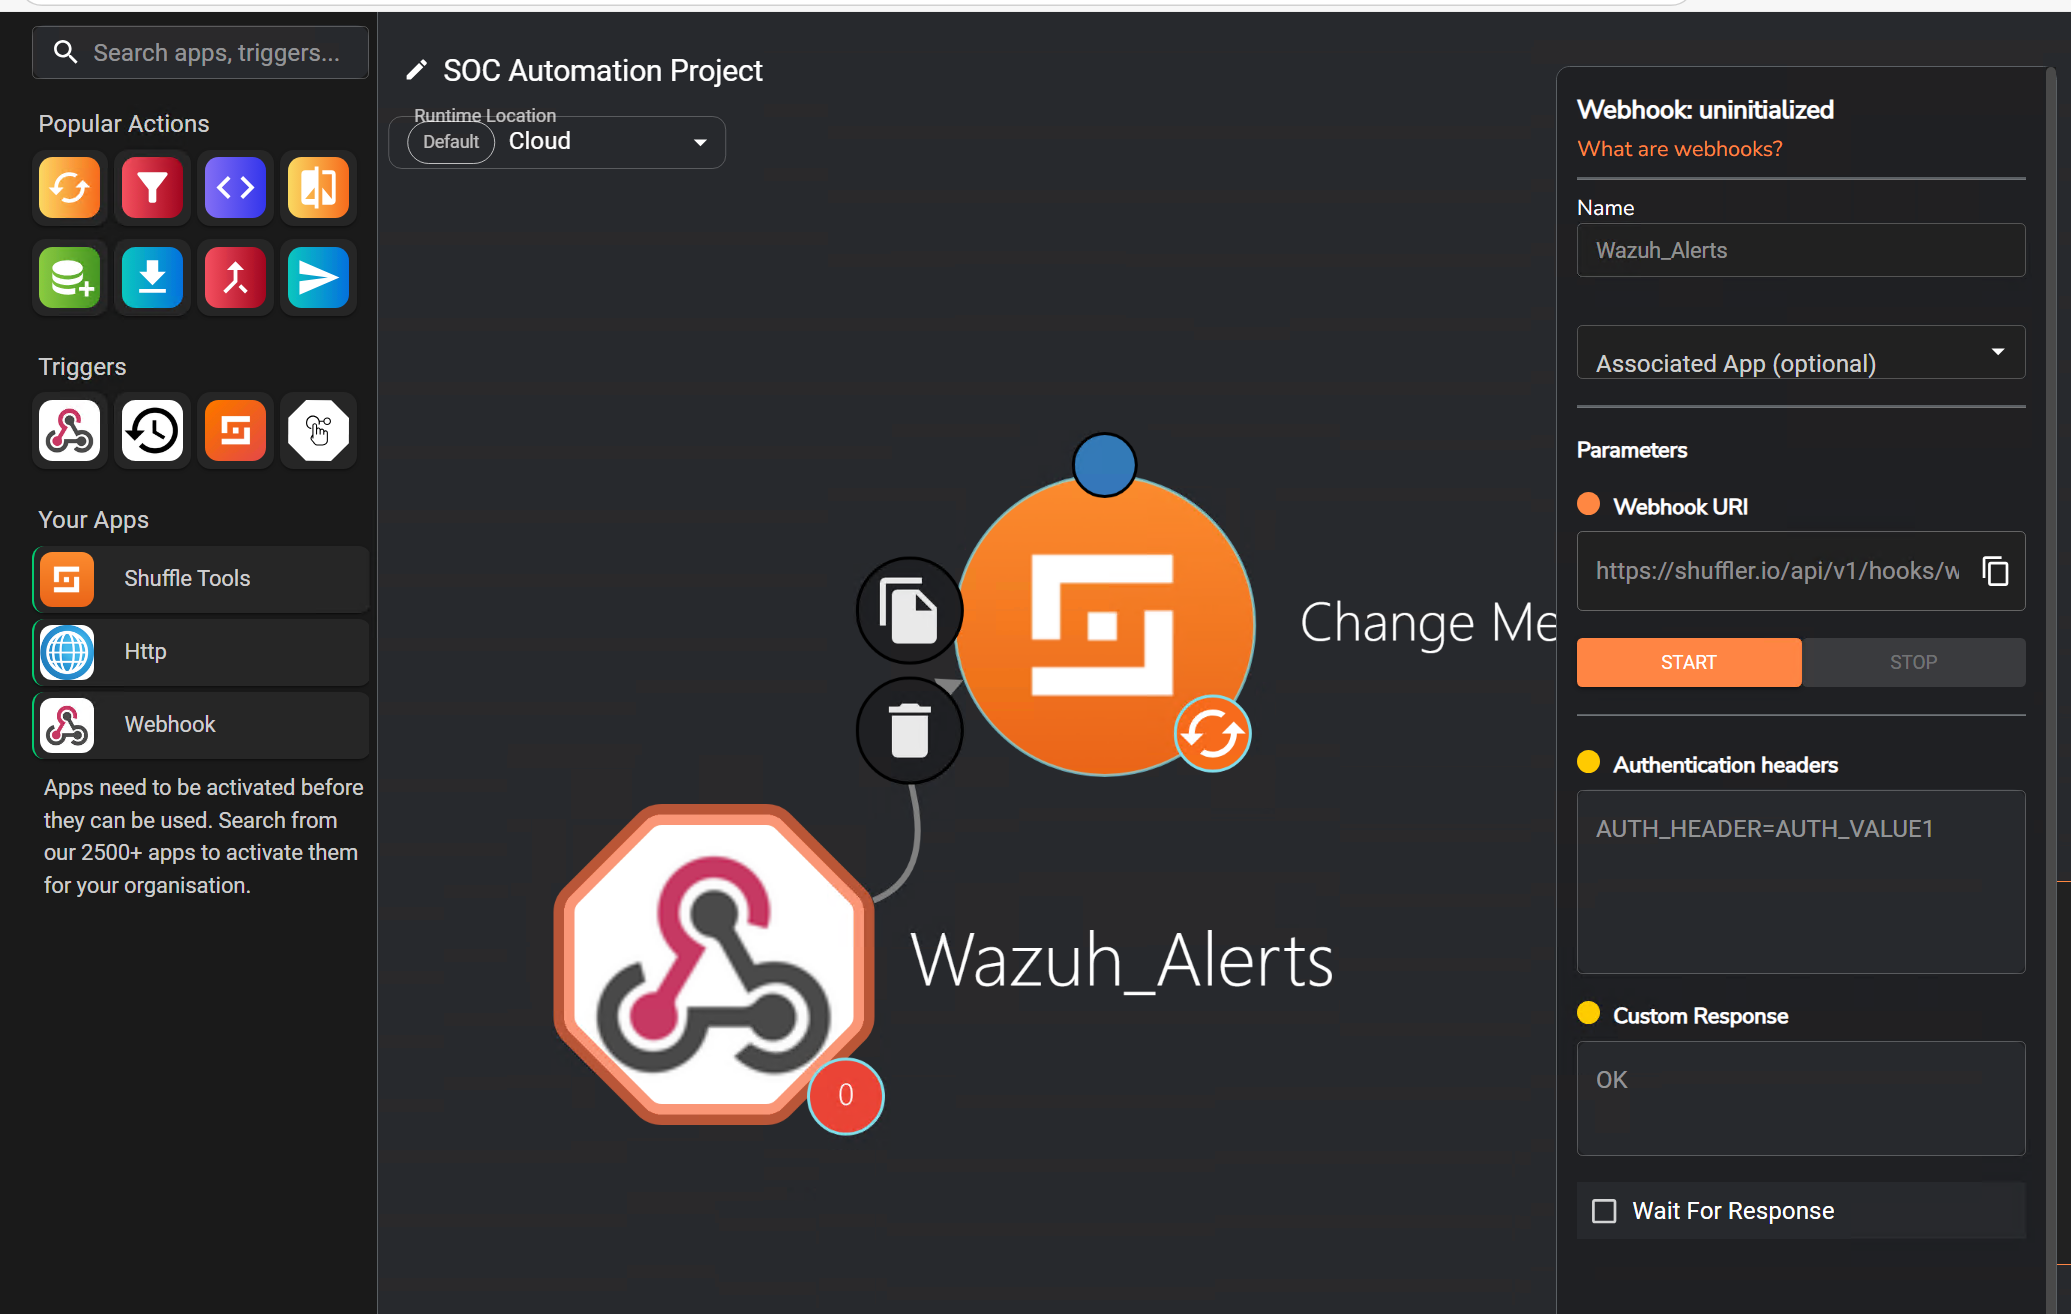
In the workflow interface, I will add apps, triggers, and variables to automate tasks. First, I will drag a Webhook into the workflow and link it to the Change Me button to receive Wazuh alerts. Then, I will adjust the Change Me button: set Find Actions to Repeat back to me, replace “Hello World” with + Execution Argument to echo alert content, save changes, and return to the Wazuh server SSH session for configuration.
another
Getting Wazuh Alerts to Shuffle
To link Wazuh with Shuffle, I will insert an integration tag into the ossec.conf file.
I will access ossec.conf and add the following content:
  <integration>
    <name>shuffle</name>
    <hook_url>"WEBHOOK_URI" <hook_url>
    <rule_id>100002</rule_id>
    <alert_format>json</alert_format>
  </integration>
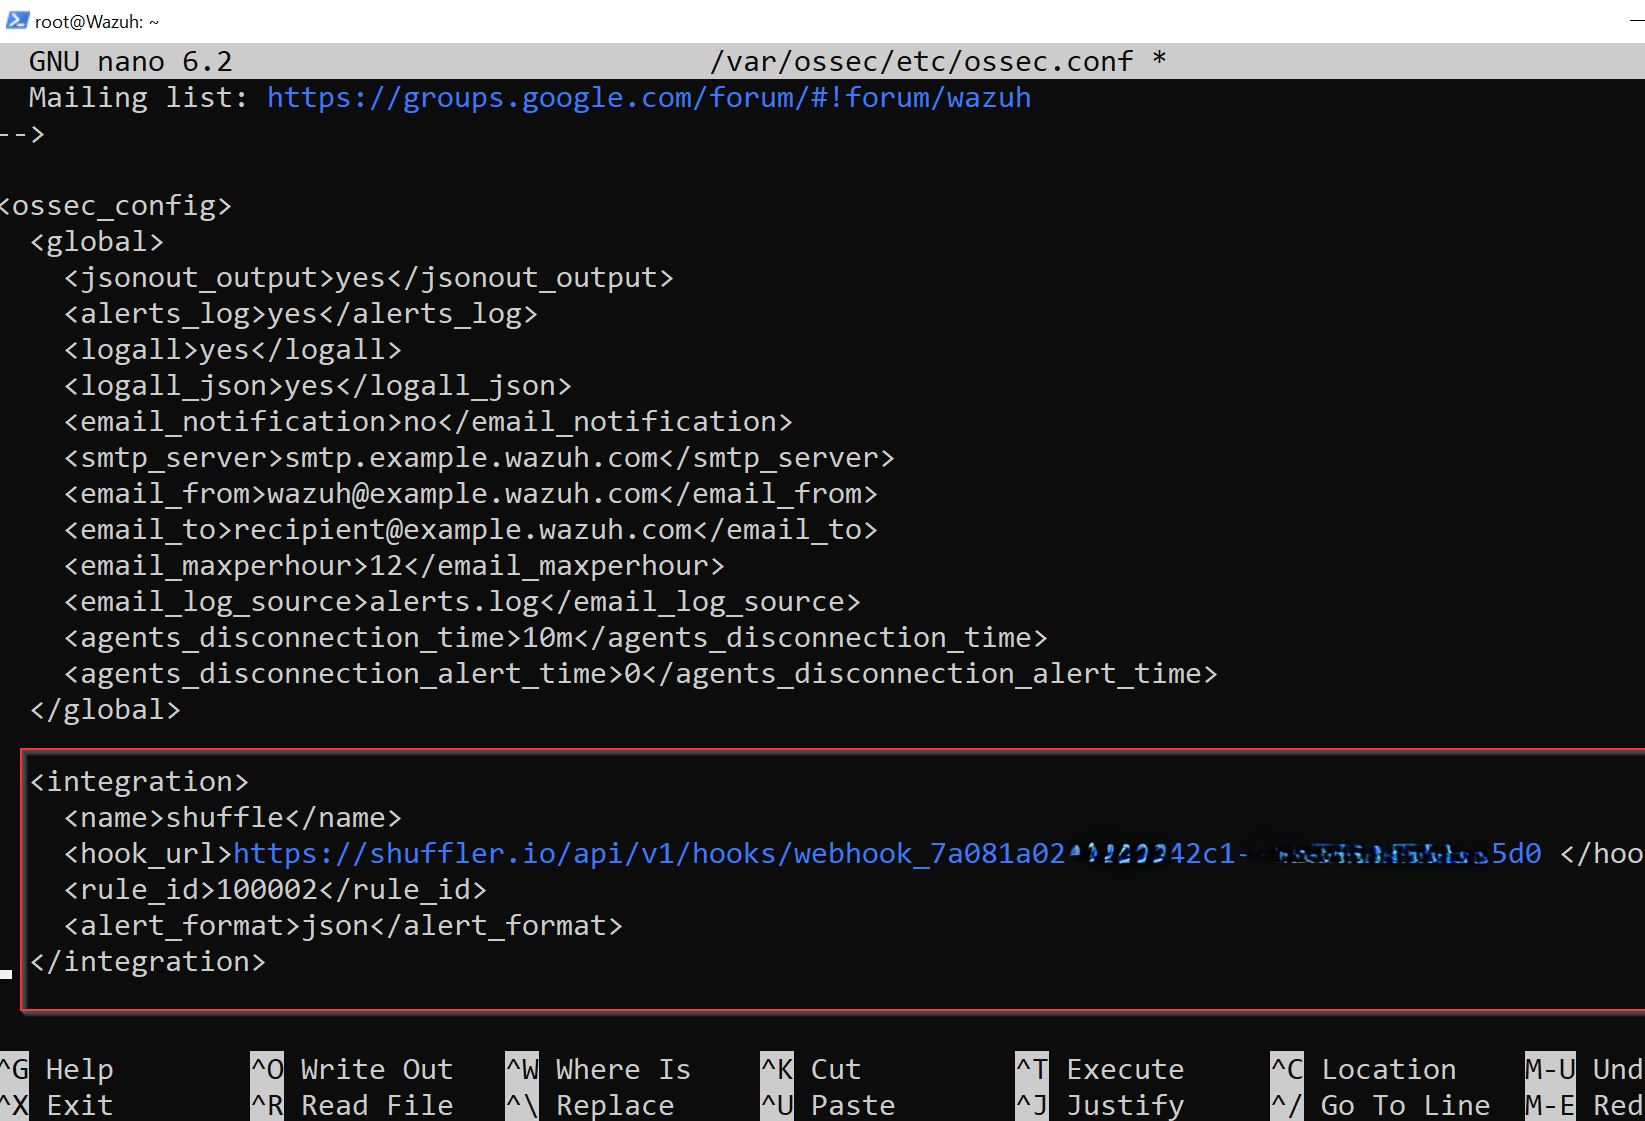
This configuration routes alerts tied to rule ID 100002 (Mimikatz Detected) to Shuffle.
I will rerun WindowsUpdate.exe (Mimikatz) on the Wazuh Agent to generate an alert.
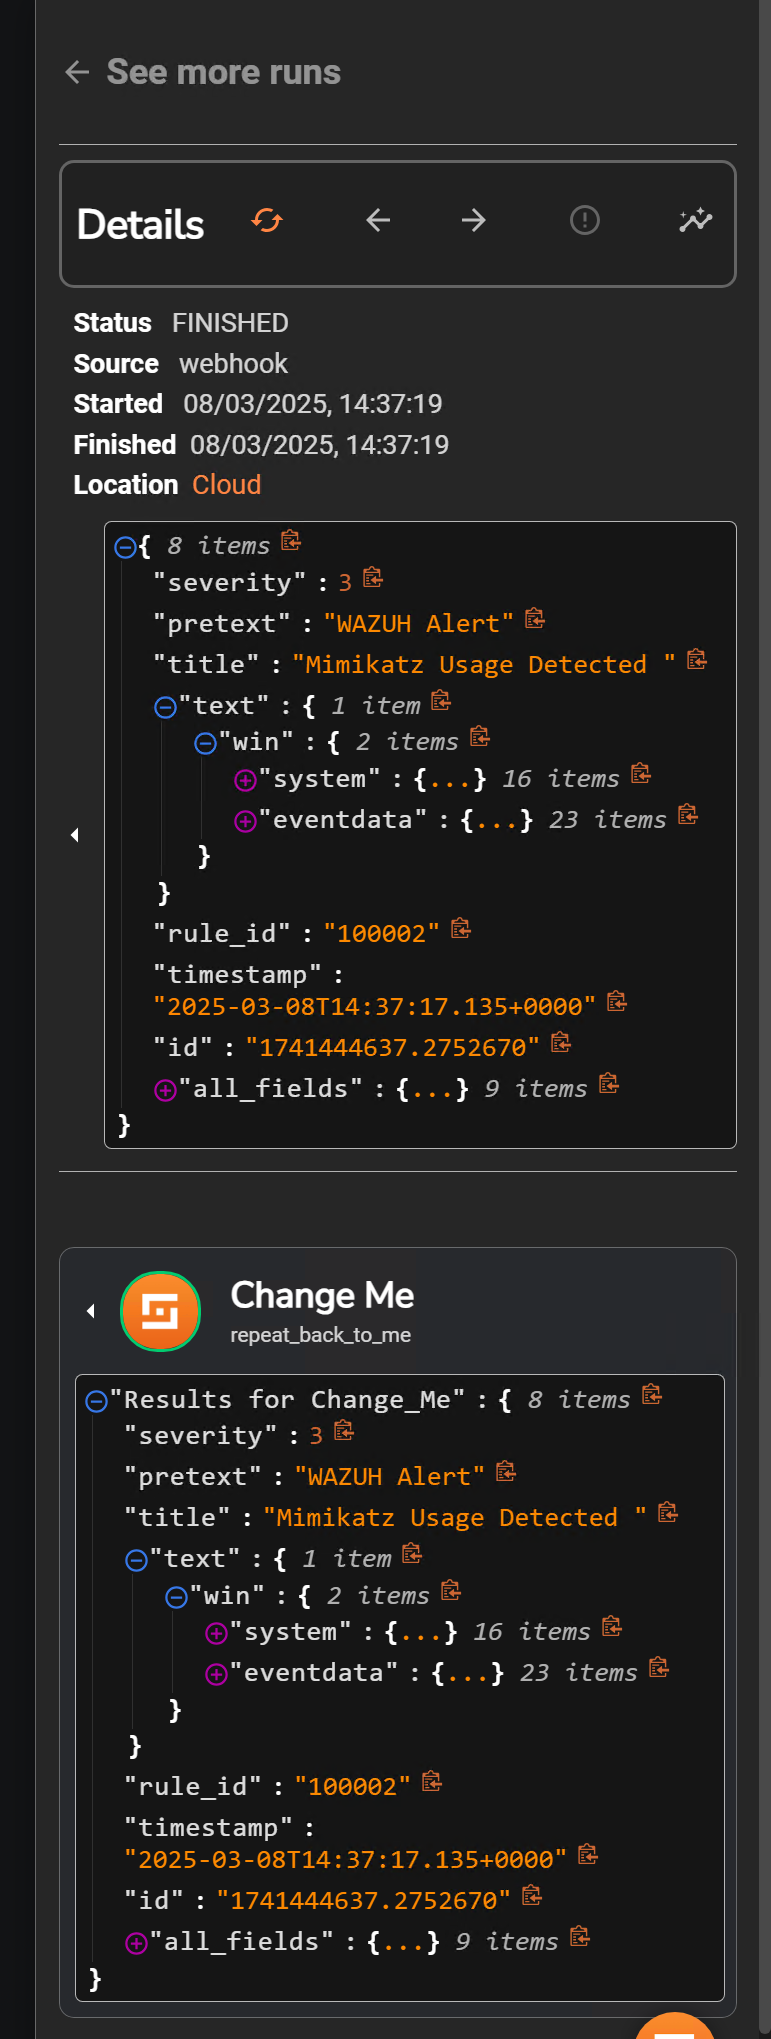
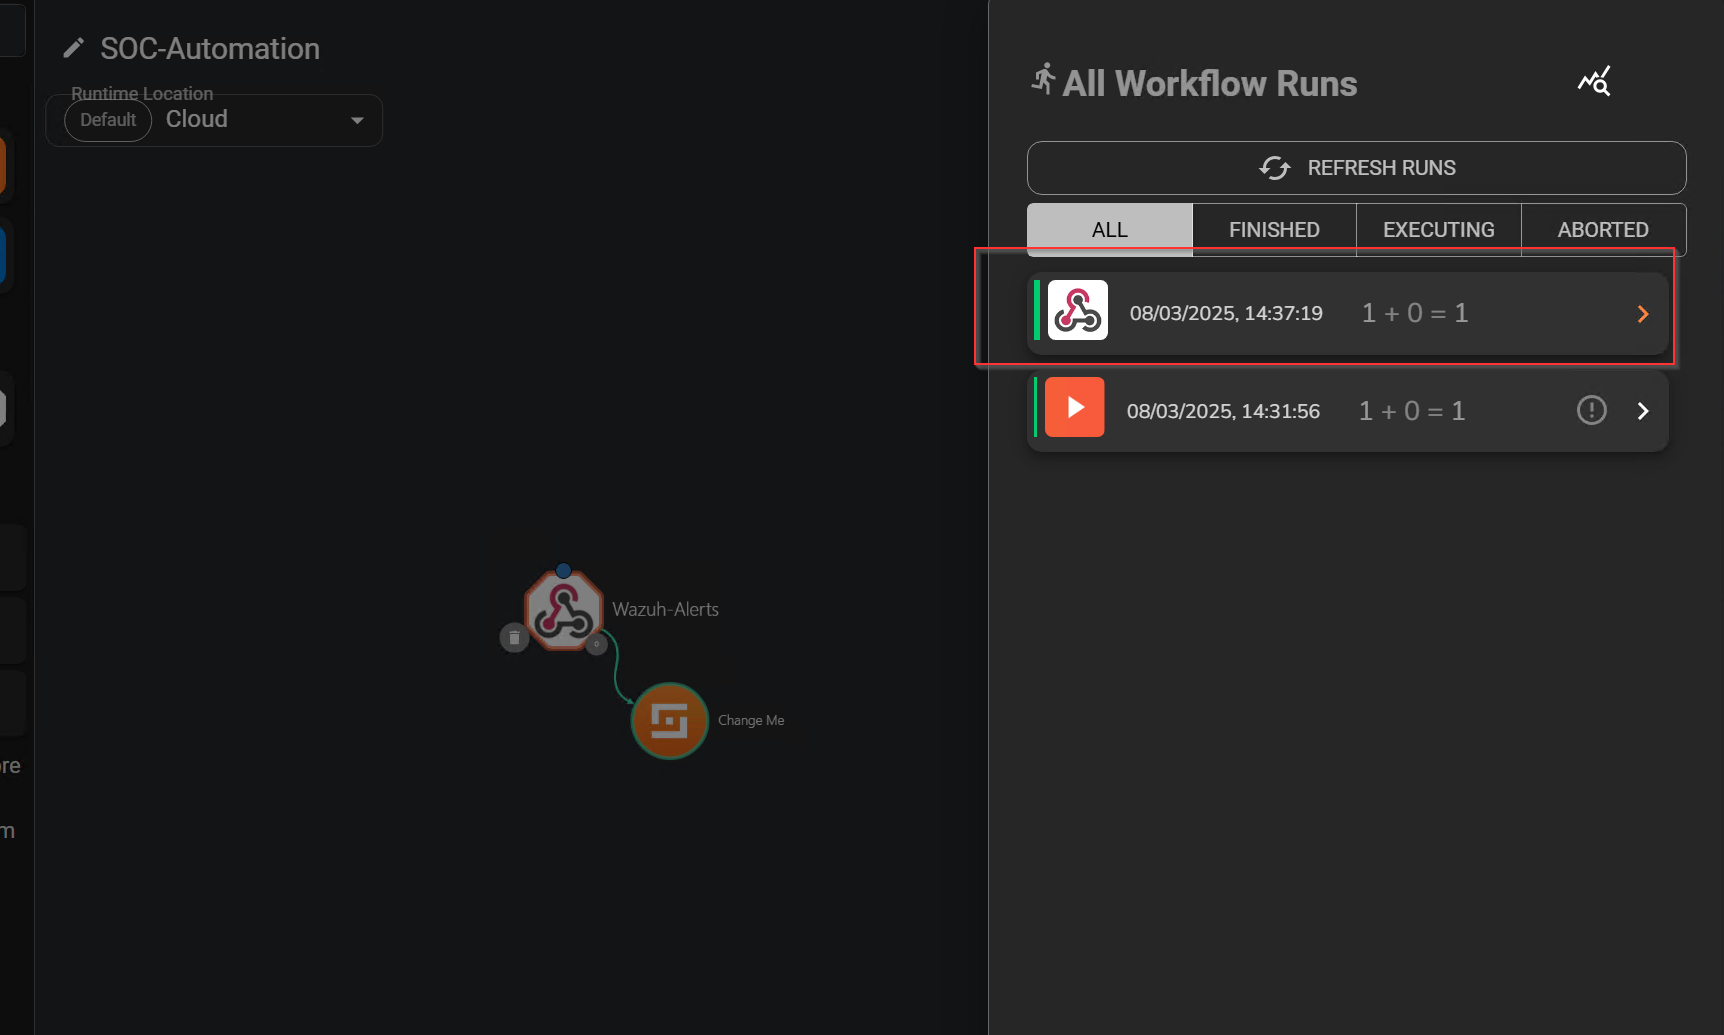 Next, I will select Show Executions, where events from Wazuh should be visible. By examining the Execution Argument’s content, I can verify the alert pertains to Mimikatz.
IOC Enrichment
With Shuffle now receiving Wazuh alerts, I can enhance the Indicators of Compromise (IOCs) using apps like VirusTotal.
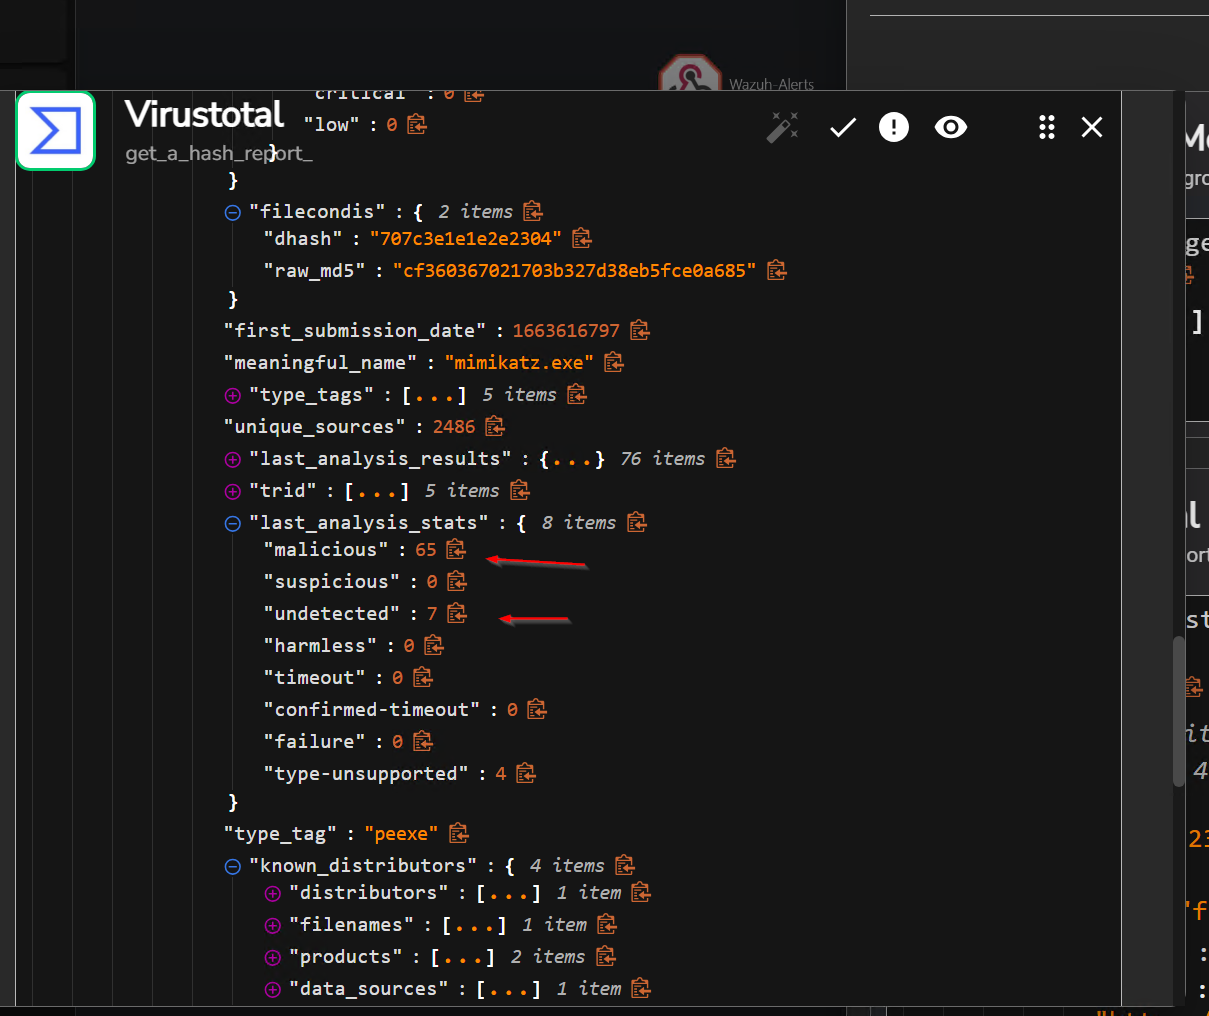
Here, I will assess Mimikatz’s reputation via VirusTotal by analyzing its SHA256 file hash.
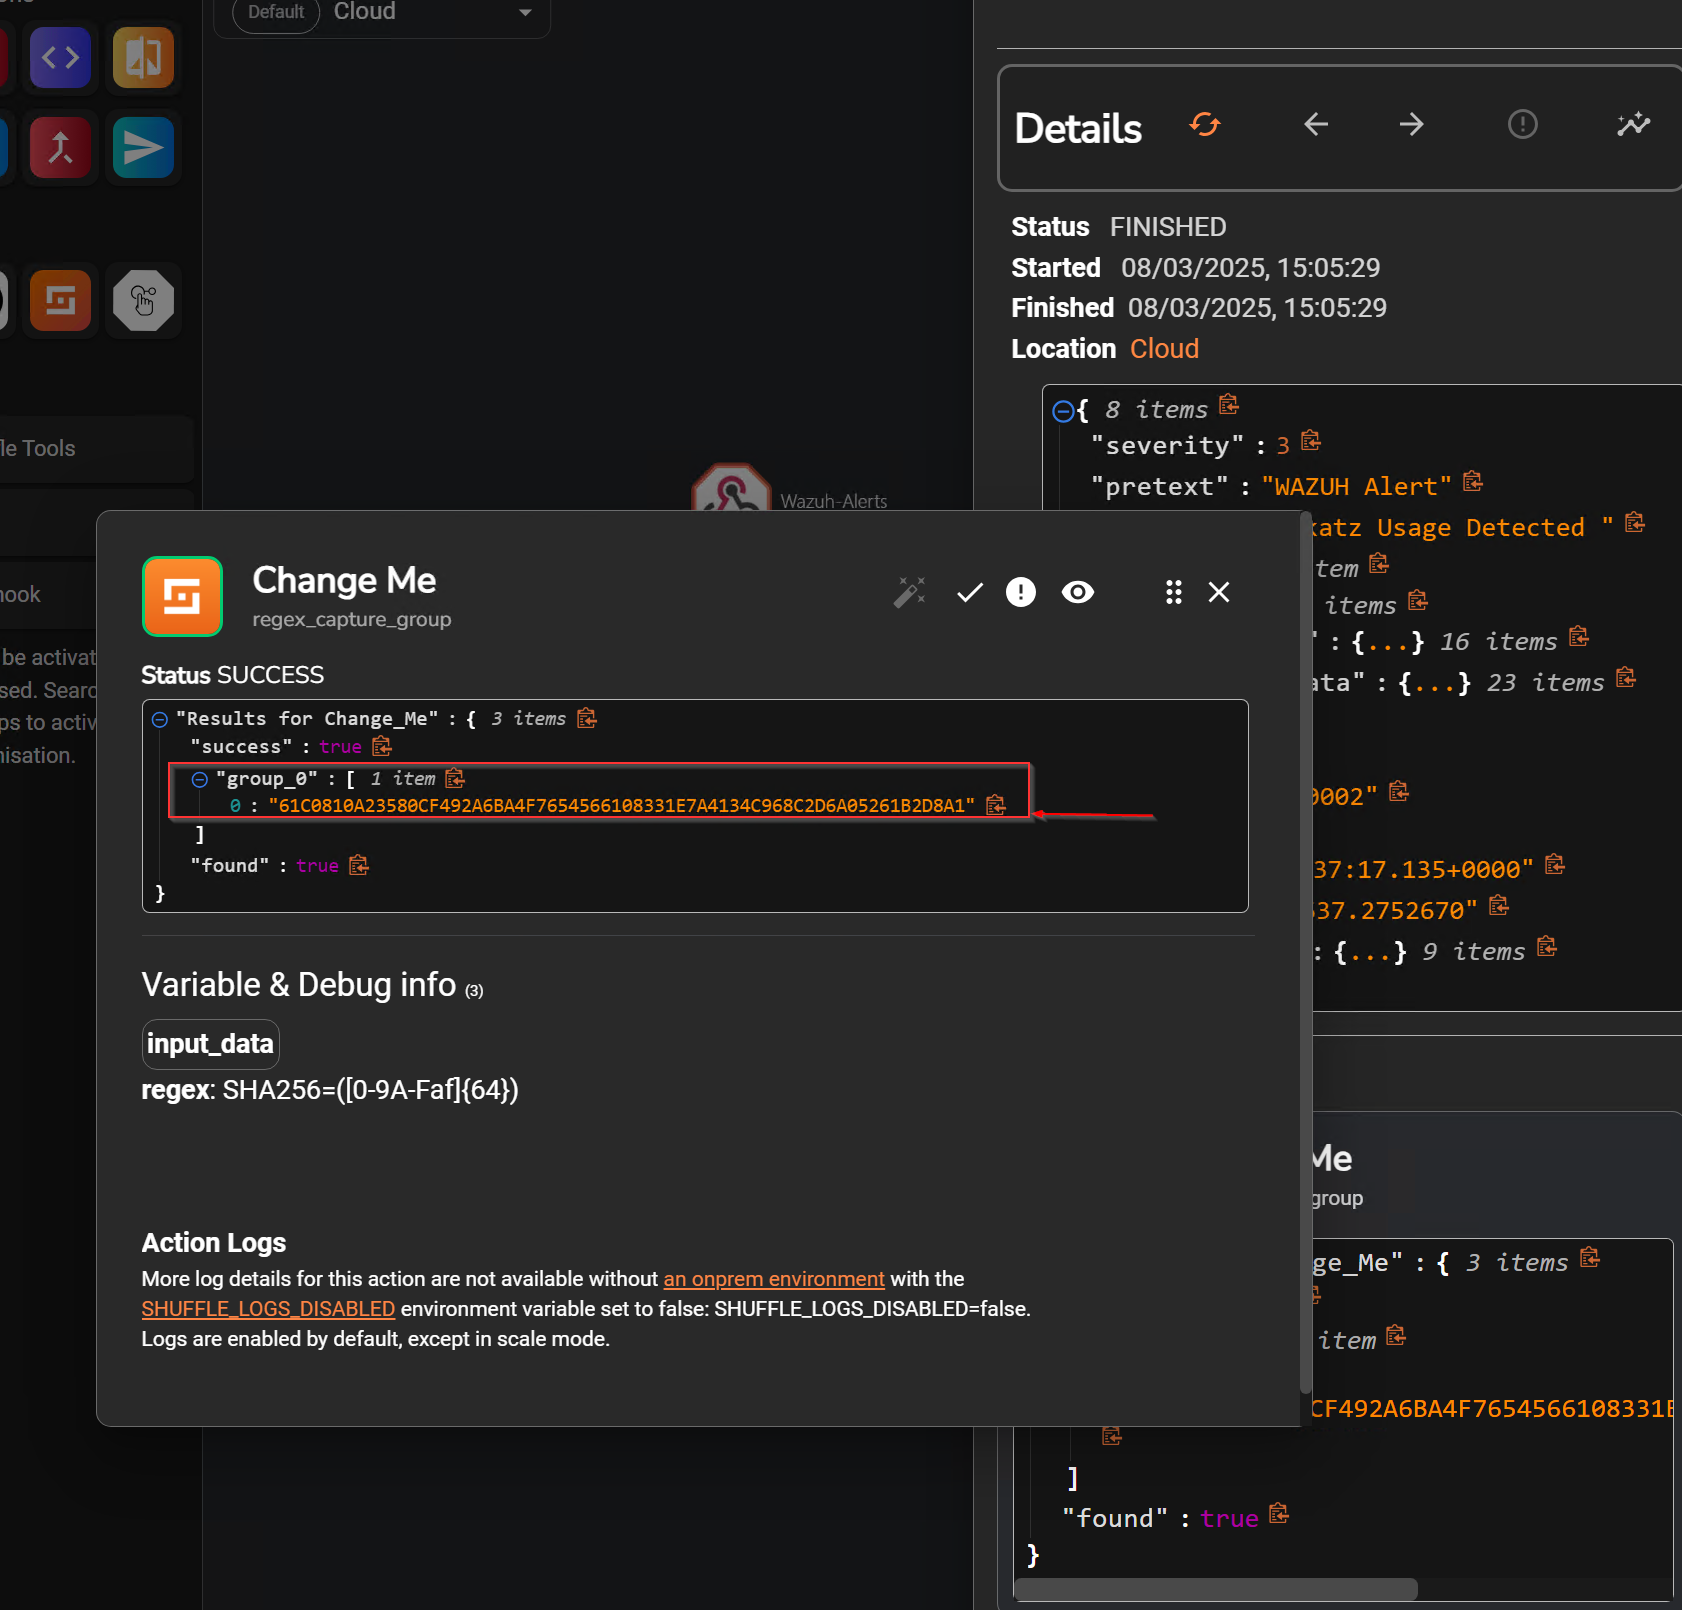
After creating the regex to parse the SHA256, I obtained this value SHA256=([A-Fa-f0-9]{64})
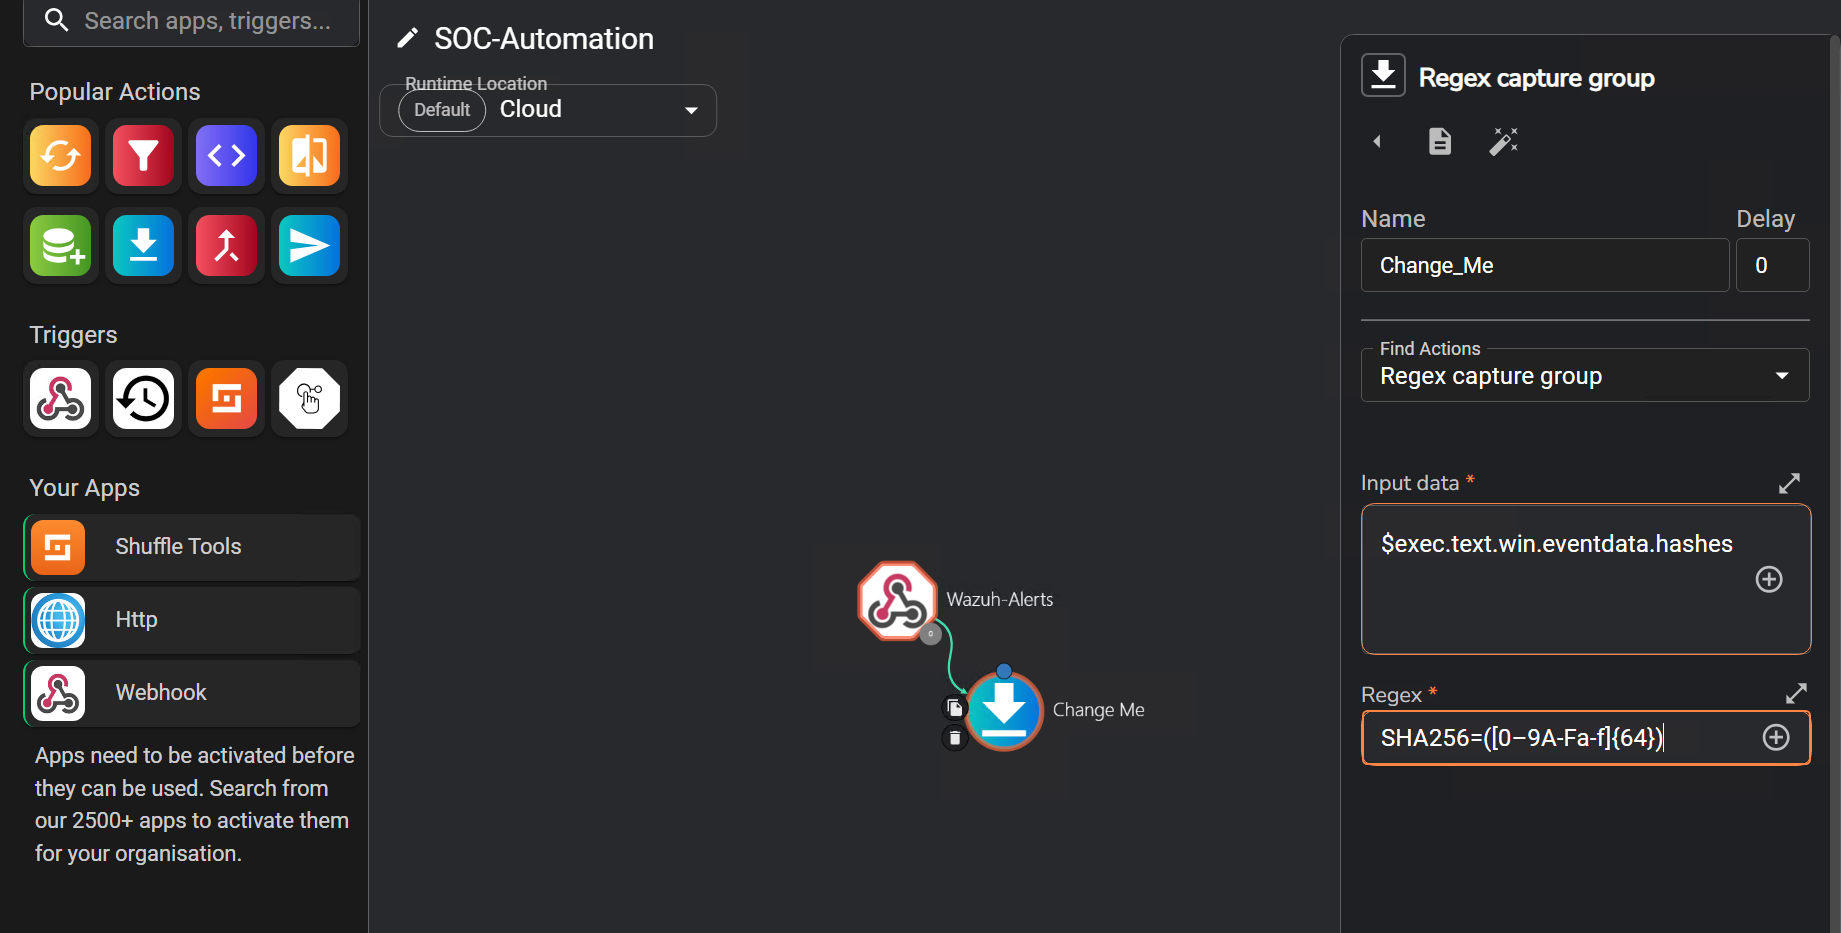
I will test it by selecting Rerun Workflow to ensure only the SHA256 hash value is retrieved.
Now that I have the SHA256 hash, the next step is to integrate VirusTotal into the workflow and retrieve file reports from it.
VirusTotal Integration I created an account and authenticated with the VirusTotal API keyon shuffle then i rerun the workflow.
TheHive Integration
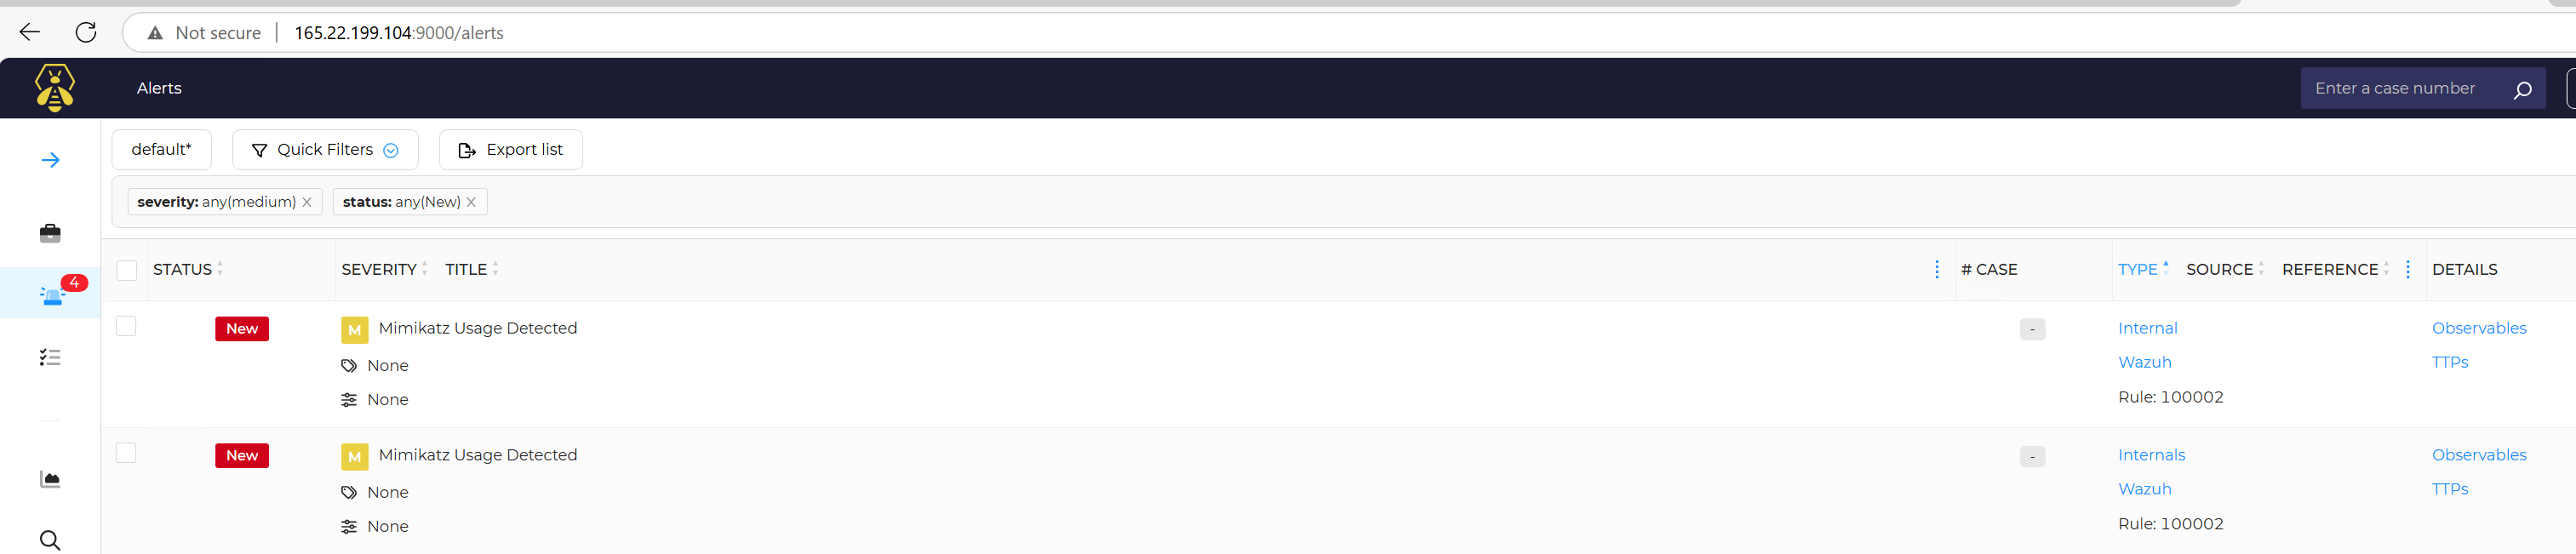
The next step is to forward all these details to TheHive to initiate alert creation for effective case management.
First, I will log into TheHive web interface at https://"theHive_IP":9000 and create a new organization to receive Shuffle alerts and information.
Authenticate using the API key obtained from the shuffle user and configure the URL to theHive’s server IP.
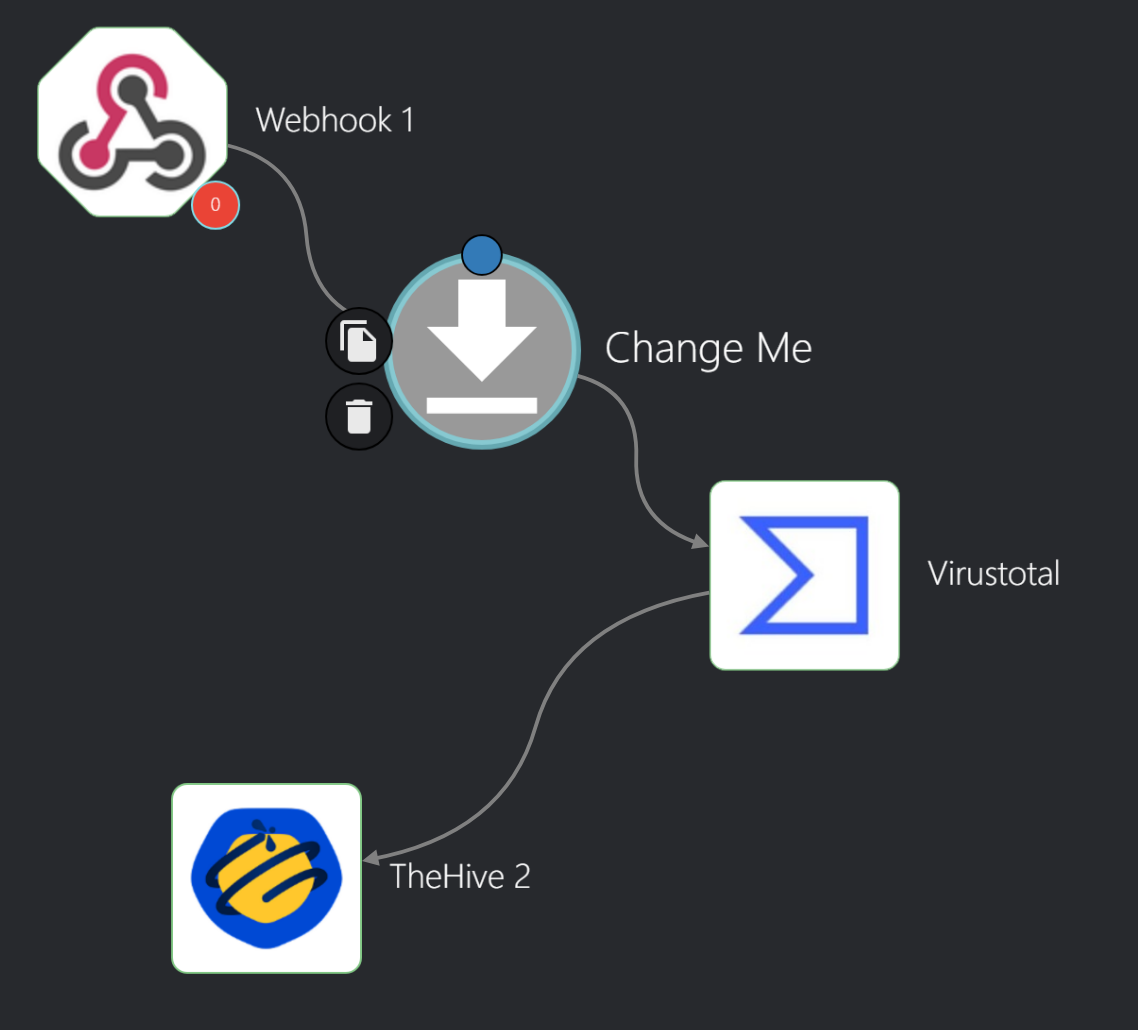
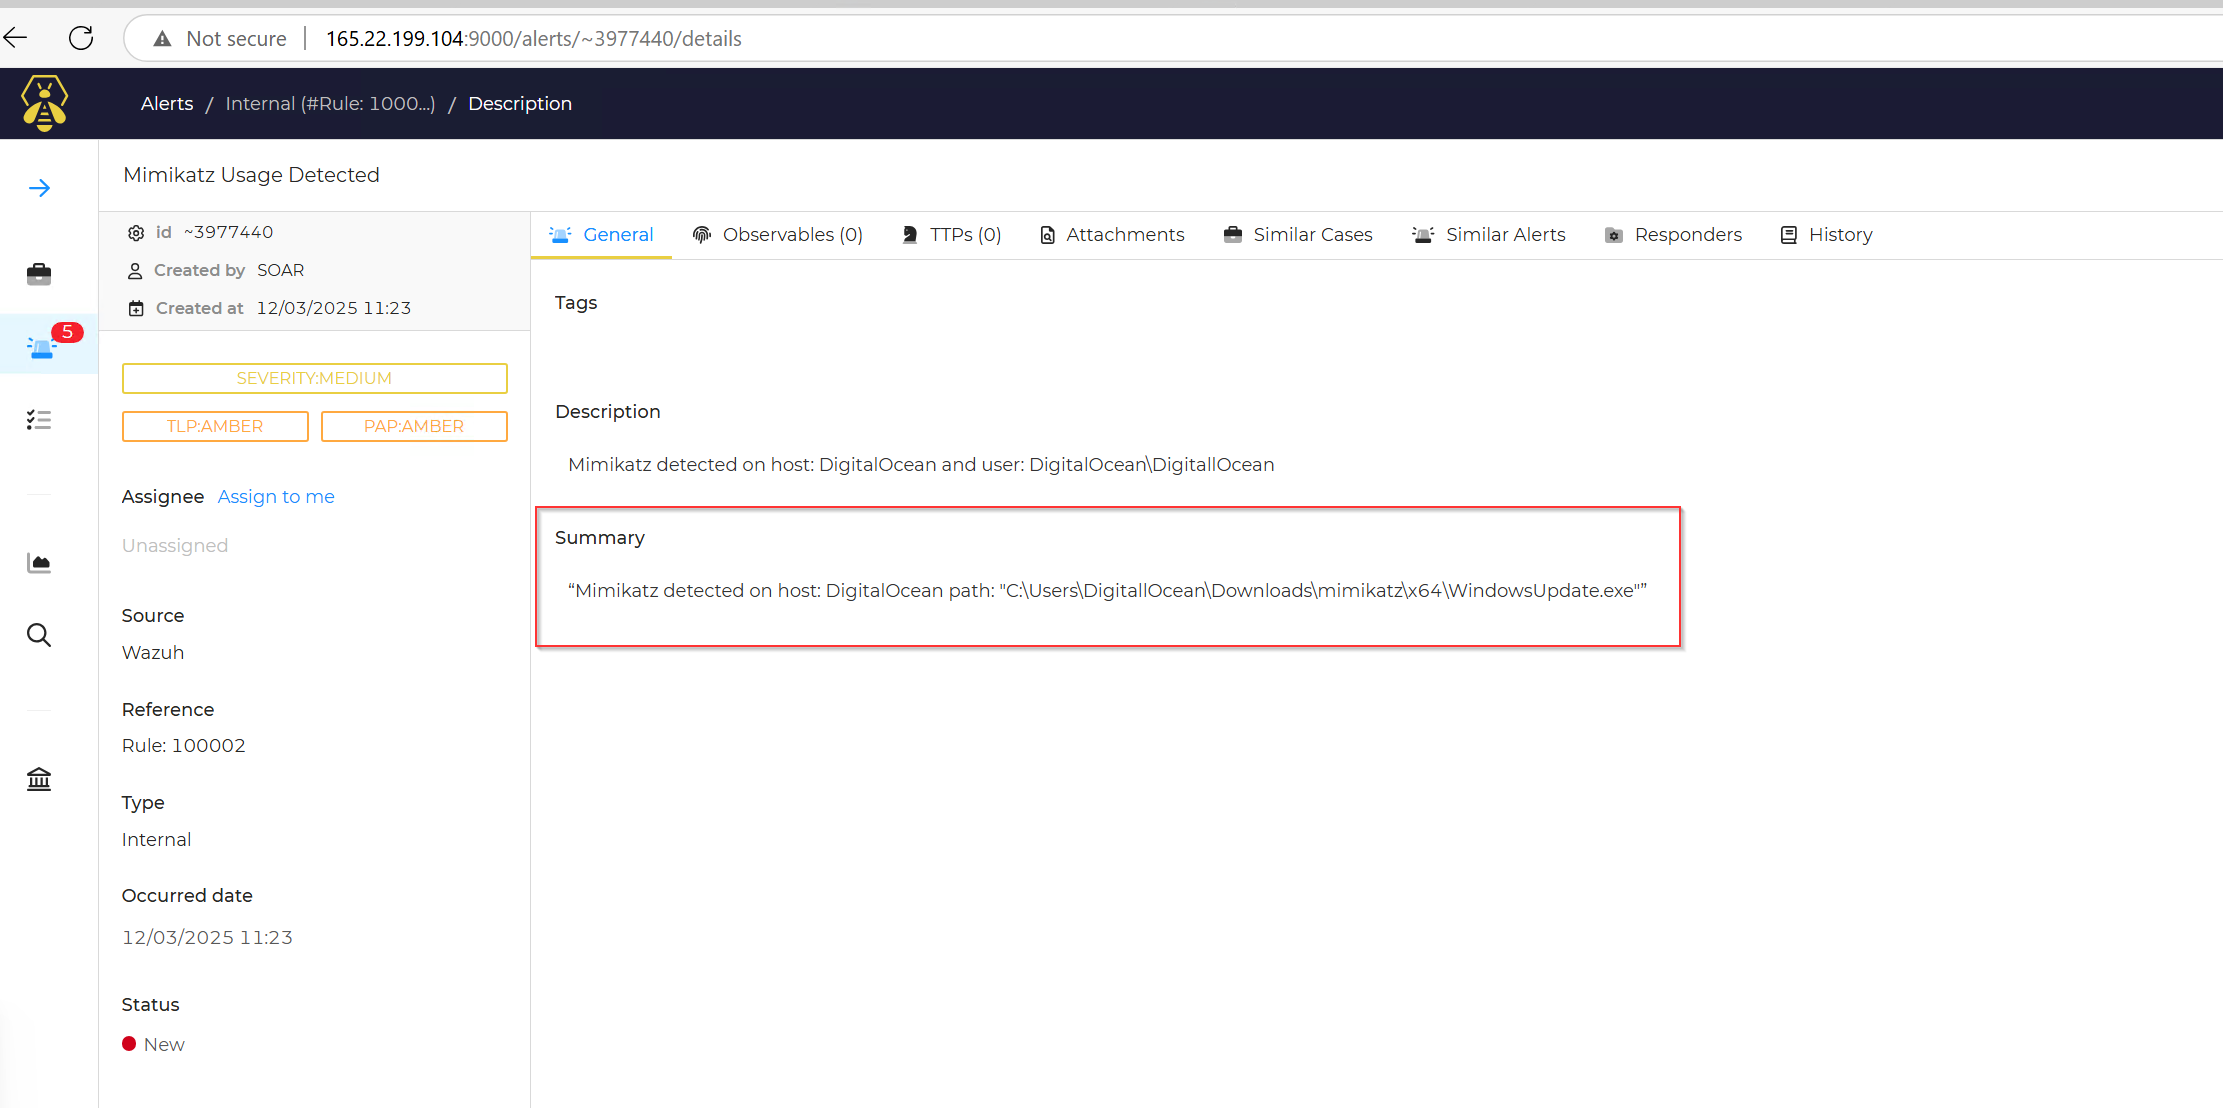
Connect theHive to VirusTotal and configure the following parameters:
- type: Internal.
- description: "Mimikatz detected on host: $exec.text.win.system.computer and user: $exec.text.win.eventdata.user"
- sourceRef: "Rule: 100002"
- source: "Wazuh"
- title: "$exec.title"
- Summary: "Mimikatz detected on host: $exec.text.win.system.computer path: $exec.text.win.eventdata.commandLine"
- status: "New"
- date: "$exec.text.win.system.systemTime"
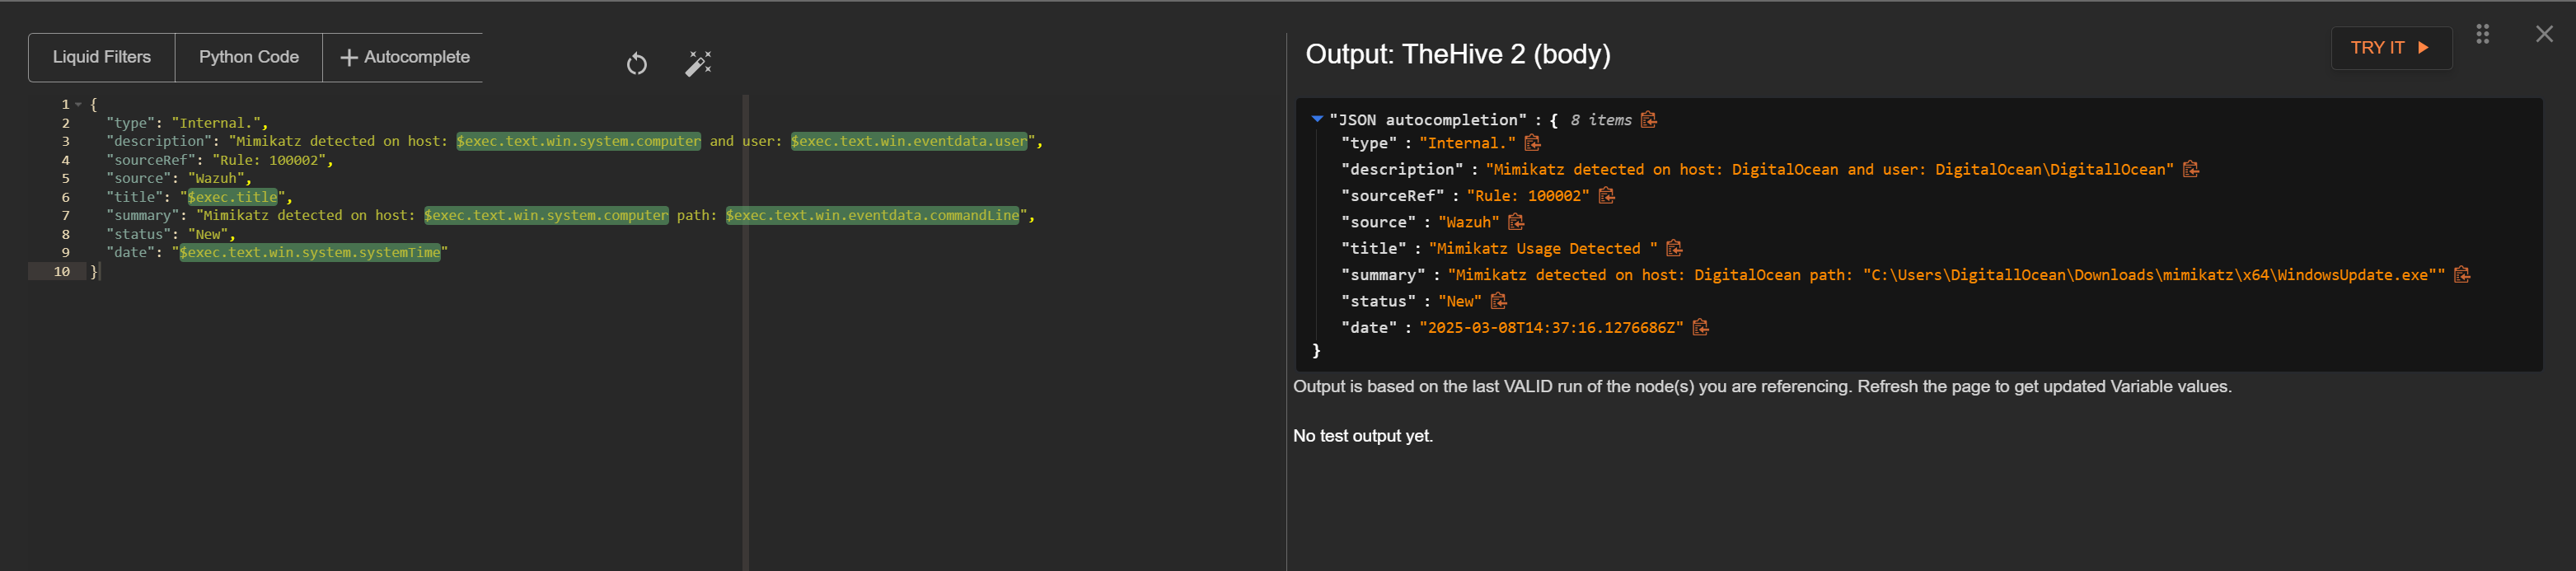
Now i have to rerun the workflow then sign into theHive account that was authenticated into shuffle to see if i got any alert.
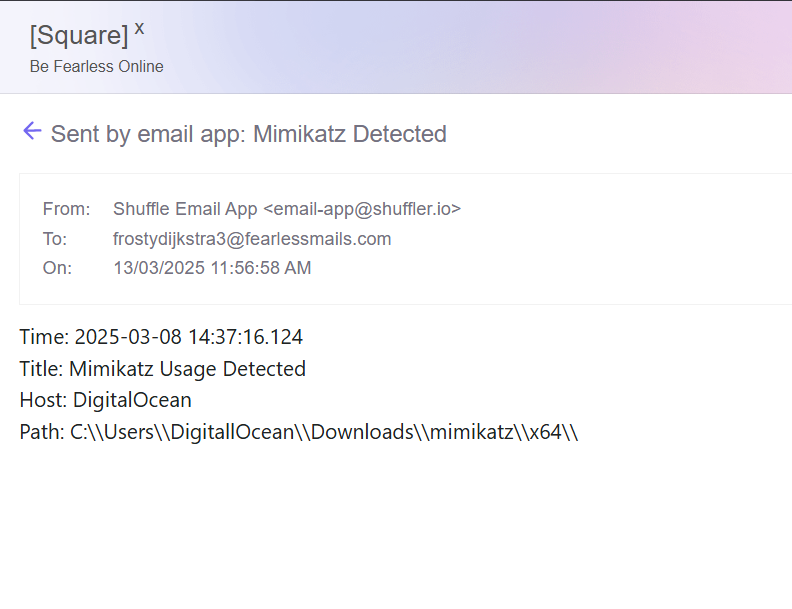
Notifying Analyst via Email
The final step is to set up email notifications for each alert occurrence.
To achieve this, I will add the Email app to the workflow instance in Shuffle and connect it with VirusTotal. I will be making use of SquareX disposable email.
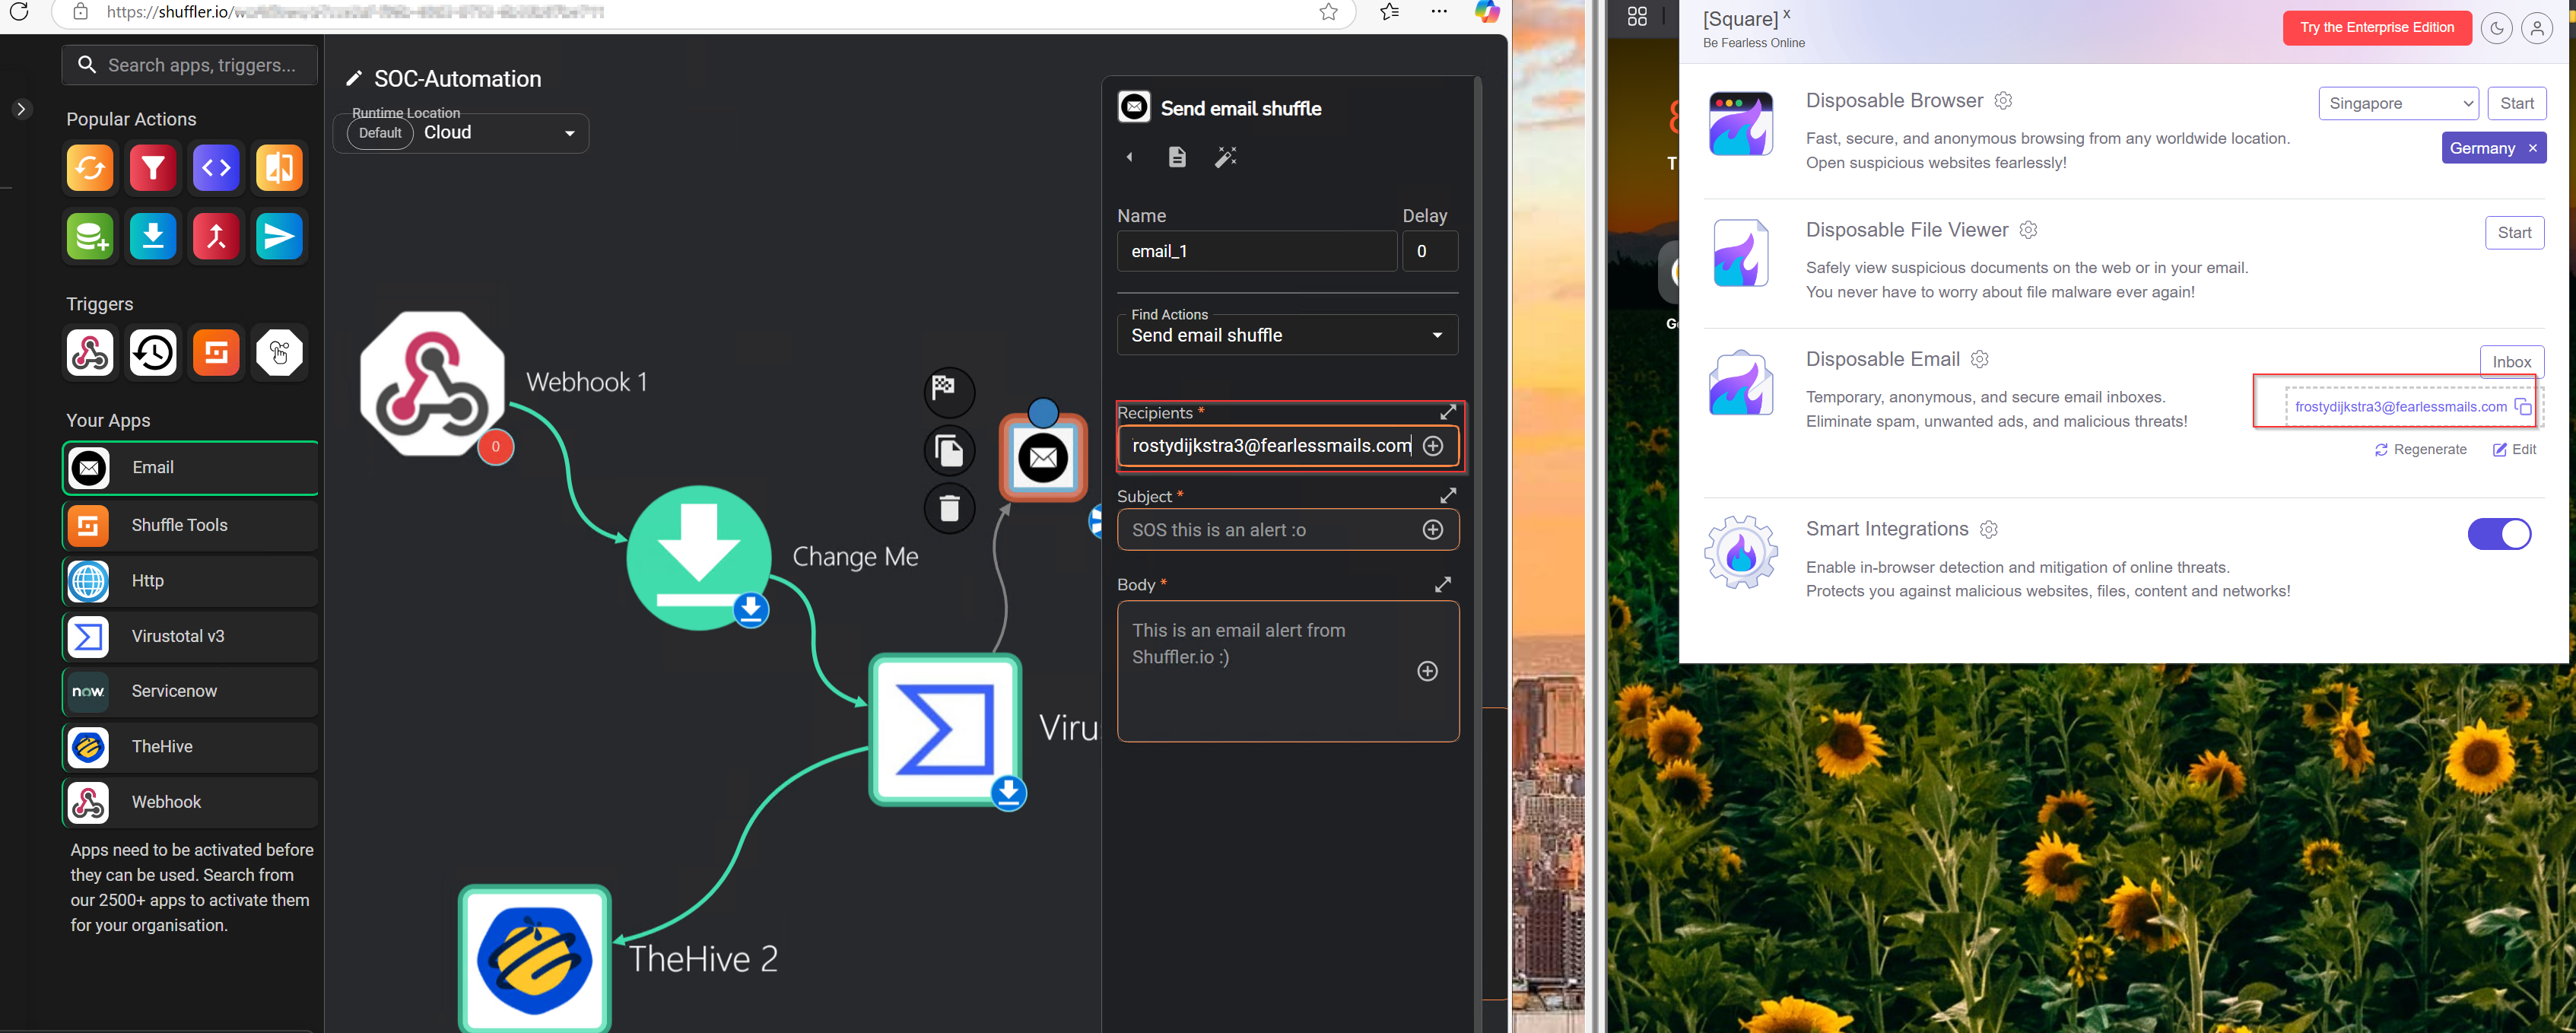
I saved the changes and rerun the workflow again.
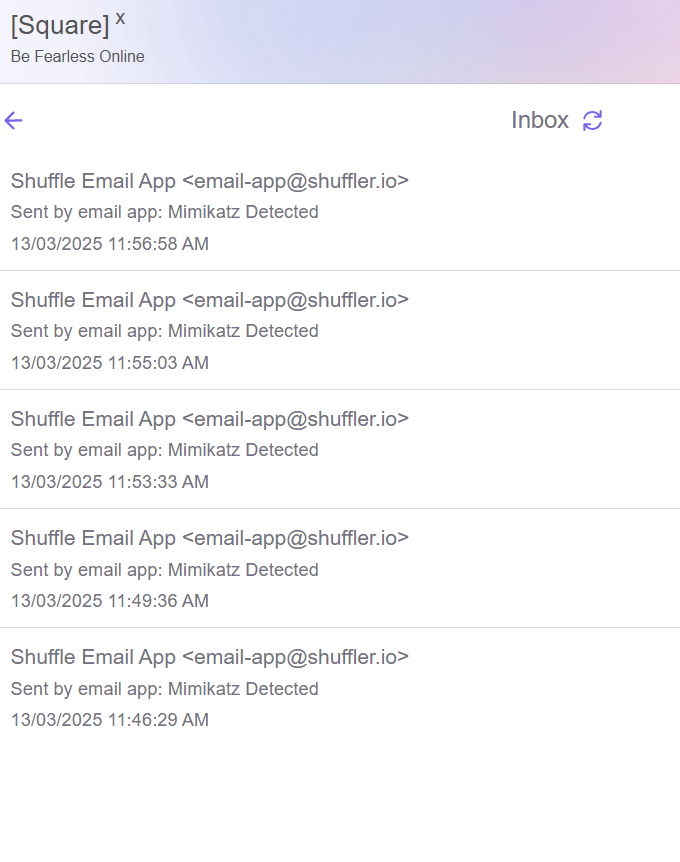 From Shuffle, I can see that the email was sent. To verify, I will check the SquareX email inbox.
Conclusion
In this SOC automation lab, I integrated Wazuh, TheHive, and Shuffle to create a functional Secure Operations Center, using a Windows 10 client on Azure and DigitalOcean servers to detect Mimikatz activity, enrich IOCs via VirusTotal, manage cases, and notify the SOC analyst via SquareX email. The project showcased the power of open-source tools for threat detection and incident response, with automation via Shuffle enhancing efficiency. It provided hands-on experience in SOC operations, applicable to platforms like VMware or VirtualBox as well.